|
|
|
Ok, from looking through the archives and staring at my car I now understand I need to disassemble the door to properly install my new vent window trim (sigh). However, someone (Phil S on a long ago post)did mention the possibility of cutting through the new rubber to position the hinge pin into the center of the seal. Fom the outset, this doesn't seem like the best option, as ideally you want to keep the thing intact, but has anyone ever done this and had it work for the long term, or did it start to peel up over time?
Also, it appears that I'l need to glue the one vertical, outward, flat side of the seal to the casing interior, is this correct? I'm assuming the same bright yellow, 3M sealant that I'm using for my trunk rubber will do the job (I forget the name of it)?
And if I'm doing all this work I feel like I should probably go ahead and put in new window fuzzies (are WINDOW FUZZIES the correct name anyway?!?), since those black fuzzy things that the window slides through seem almost flat from wear, and have probably never been replaced since the car was born. I only vaguely remember seeing something called "window fuzzies" for sale on ebay, AND, if I did this, is there any trick to THEIR installation?
Opening up these doors seems to be opening up a whole new Pandora's box, but I always feel it's better to do the job "right" if I do it at all...
Thanks, hfav
|
|
-
posted by
someone claiming to be shayne
on
Thu Feb 10 05:41 CST 2005 [ RELATED]
|
|
The wing window/rubber job sucks.
You will need the correct stainless steel rivets: four 1/8" and one 3/8" per wing plus the proper tool. Or, a pop rivet gun and those same-size pop-rivets.
Yes, you need to dis-mantle just about every thing on the door as mentioned...and remove the upper-most guide fuzzy to get the wing window assembly out of the door.
Once out, you will need to drill out the one 3/8" rivet that holds the pivot/hinge together, then remove the the 7/16" nuts and washer(s) assembly on the lower portion then remove galss. At this point you can to drill out the four 1/8" rivets along the back edge of the frame.
Peel out old rubber and firmly stuff the new rubber in it's palce. Now pry something like a small drill bit in to one of the four holes along rear edge to line-up the other three. Start popping the 1/8" rivets. Assemble glass back into frame, do-up the nuts and pop the final rivet. Put the wing back in the door.
Hope that helps.
Shayne.
|
|
-
|
|
|
Thank you Shayne for the detailed explanation as well. I have never used a pop rivet gun or installed any kind of rivet at all, but I will ask my handy neighbors who have lots of tools what I need to do or get--we all like fiddling with things--must be a commonality of people who all live on a clustered block of 150+ yr-old houses. Add this to the list of "Things I Had Never Done Before I Began Restoring This Car." And any tips about installing the new window fuzzies, or are they self explanatory once I see them/how they're assembled in there?
Thanks again
Holly
|
|
-
posted by
someone claiming to be shayne
on
Thu Feb 10 10:13 CST 2005 [ RELATED]
|
|
Sorry, peeling the old "fuzzy" from the wing window frame will undoubtedly ruin it. It's backed with steel that will probably bend/kink before letting go.
On the back edge of the wing window frame, I like to use old Volvo 140 window channel (wrecking yard). It's usually in real good shape and makes the roll-up window VERY tight and rattle free.
For all other (fuzzy) positions, I ordered number 19VR3469T from JC Whitney (800-529-4486), two sticks should do the whole 122 (you'll have to cut-to-length yourself). This window channel has the chrome bead on the outside edges.
All: Please forgive me for not doing this with OEM parts but mine was re-stored back in the '90's when the REAL stuff was not available from our regular sources.
Shayne.
|
|
-
posted by
someone claiming to be Svet
on
Thu Feb 10 19:02 CST 2005 [ RELATED]
|
|
Mistr Shayne! Silly talkingness of mythical "real"ness for Volvo fuzzpartings. Reptation of famous most excellent Radioflyer wagon speaking well enough for self we thinks.
If part fitting nicely ad not making for windywhoosh when motor happily along, is not of concrn for orginal parts! Not for mynor detailk like winidow trimnings at leats.
Blut and Svet working nicely with legendary 444 for making supernoisysonic Volvo. For windowfuzz, buy parts from farfignewton Vee Duble Vee store. Cheap! Working greatly! Loking originally! And simpler to buy across town than across giaganticus globe.
Fro hard mettl parts, still bgelive pieces from materland is best.
Szplug!
Svet
Blut&Svet Volvo Ficksers
"front door closed? drive into side of building!".[
|
|
-

|
|
Cool Shayne! I'm coincidentally attempting that exact same repair tomorrow. I seem to never have a problem taking things apart, but getting it all back together properly is another story. Things should go much smoother now that I have a clue......
|
|
-
|
|
|
Correction: I mean vent window RUBBER. Polishing my aluminum trim all morning makes me have "trim" on the brain.
hfav
|
|
-
|
|
I will assume you are referring to the horizontal "weather strip" (not the exterior rubber "seal strip") that is afixed to the inner metal door panel, opposed to the vertical "guide strips". Regardless, we all knew what you meant. I did these all on a 1960 Amazon-S and surprisingly, these are identical to restoration parts you can get from any reputable restoration source. Of course, you can buy the exact "made to fix" items from several aftermarket sources (check my opening web page cvolvo.com).
I bought the "weather strip" in an 8' length and cut it to size for all 4 doors. The real trick is to drill the staple like attachment holes in the same position as the ones you are replacing (used the old as the template), then I was able to use the same staples and bend them into place. I have heard of some people using aluminum pop rivets and adhesive, that may also work. I'm a purist and rather try to do the job as close to original as possible. I did not take any pictures of this exact process, but I think this shot does show my attention to detail. BTW, the original color was 42 California White!
--
Cam a.k.a. CVOLVO.COM
|
|
-
|
|
|
Hi Cam! Don't know if you realized it was me. I meant to let you know that my family all liked your great article on your PV444 in the latest issue of Rolling, complete with the nice pics. Did I tell you your seatbelts went in beautifully? My six-month old, whose carseat will be secured by them, thanks you. Thanks for all the advice after Christmas, too. I'm still plugging away on my car--but the payoff is really getting rewarding. Look for another post from me in a day or two about my "beautiful, stripped-down baby" emerging from the autobody shop.
I never know your car was originally white! Thanks for the advice here, although it was the vent (rotating window) rubber I was referring to. Actually, now that I'll be opening up these door panels completely, I will need to take a comprehensive inventory/assessment of everything door-ish.
Thanks again!
Holly in PA
|
|
-
|
|
|
Hi Holly: Obviously I did not know it was your posting. I guess my mind was getting a bit "fuzzy"! Thanks for the plug on my PV444 article. It was fun writing this and as the editorial put it, inspiring the theme of the issue. I think Jan deliberately put a picture of a maroon-red 1953 "ES" of the cover to help inspire me with my next project!
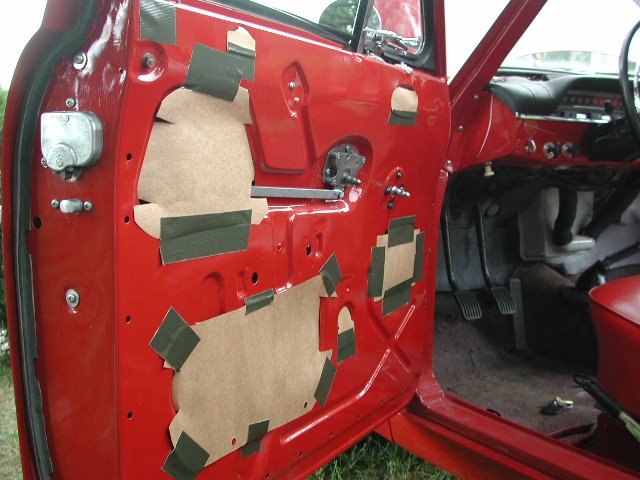
Now that I'm "on track", I did not replace the rubber window frames, so I'll have to sit back and listen to other's experience. To help redeem myself, does this picture help explain how the window rubber frame is attached to the upright?

I did do the window guides on my Amazon-S (both sides and top) with new channel identical to what Volvo used. The most difficult part was re-attaching the small brackets that hold these guides in place with the door. I drilled out the flush rivets then tried to use a similar soft rivet to hold the brackets in place. This was not entirely successful, so I did revert to using a pop-rivet, with the head buried into the fuzz. It is a time consuming process, but after spending so much time on your 122, you'd kick yourself for not taking the time to do it now. Besides, these do help keep the elements and road noise outside and make rolling up the window effortless. Good luck and yes, let's see some pictures along the restoration route. Take care.
--
Cam a.k.a. CVOLVO.COM
|
|
-
|
|
|
Cam,
Absolutely beautiful work on your '60 Amazon S, however, I'm almost certain that hfav is talking about the "rotating window" or vent window, and the vertical channel runners, one of which goes into the backside of the rotating vent window's long, long leg, which also serves as the regular window's vertical guide, with a fuzz-lined inner channel.
hfav,
I'm getting ready to do the same replacement of the rotating window's rubber seals.
Yes, you should remove the door panel (be careful, get right under the metal clips, they can be rusted in place and tricky to remove smoothly, without damaging the door's 30+ yr old side-panel backing material)
While you place the rubber seal and fuzzy window channel guides, it will pay off big time in the satisfaction you get if you also do the cleaning, lubricating and adjusting of the other parts, while you're in there.
Handle and lock mechanisms, window crank mechanisms, cleaning the bottom of the doors' drainage areas, adjusting the crank cable pulleys for smooth window crank operation, side mirror mounting and "mirror position spring tension" adjustment, if you have that type of side mirror. All good things to do
You just have to mentally commit. It ends up being fun, educational, and the right way to do it, all rolled in one.
gary - '67 122S, '72 ES
|
|
-
|
|
|
Yes, Gary, the vertical part of the rotating (vent) window rubber is what I was I was referring to. And so, as I was pulling out the old rubber (not hard--it was so cracked and stiff it practically fell into my hand with a few tugs), the only part that's still affixed firmly is the vertical leg that faces the regular window. Examining the new rubber, it looks like there's a metal strip embedded in it the side that faces the roll-down window (surface for glueing?), which if it requires adhesive, would explain why that portion didn't fall out like the rest. So no one quite answered that part: do I use the sealant there?
Yes, I was planning to clean out the windows and lubricate everything--and as I realize it, also need to install the new front door locks I bought (lost the keys to the others long ago); I've never installed a lock before, but hope that job will be self explanatory when I get to it. And a new side mirror to put in as well.
You're right--I will "mentally commit"--I think I did that a yr and a half ago, when I took my car restoration in earnest. Besides, I do want to "do it right," and I'd hate to disappoint all those friends, neighbors, family and complete strangers who are rooting for this car. And I like the work, when it's not giving me a headache! Thanks, Holly
|
|
|
|
|