|
|
|
I am working on a running failure.
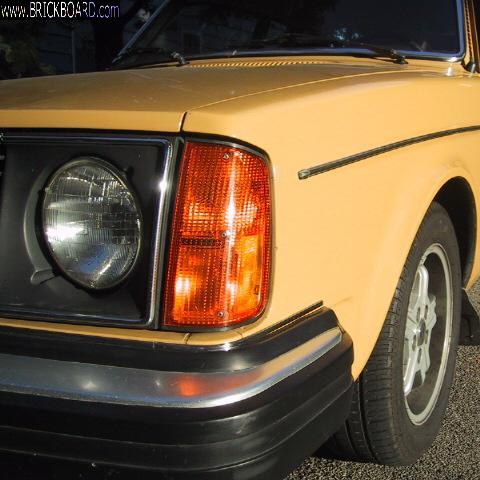
In the pic what is the black rectangular flat box next to the in-line fuse and is the device next to it the Step Relay?
In the green books there is a "Breaker Unit" in the B230F computerized ignition system diagram that looks to do nothing except be activated by the Knock Sensor.
It looks a whole lot like the Throttle Position Switch. Is it the TSP and if not where is this Breaker Unit and how can it be tested?
Thank you
--
1988 244 DL; B230F; LH-2.2; Manual 5-speed (M47)


|
|
|
|
|
Hey,
Looks like you absorbed the idea of how to make a seal pusher.
I must say, they look very well done too!
Very professional looking fit up so that seal could only go in the right way.
Nice write up to boot! Those pictures are really showing your handy work.
Thanks for showing us all!
Phil
|
|

|
|
The black box hides a piece of metal which connects red wires together. It is the power distribution bus. If you pull the cover up past the detent, you'll see what it is. Disconnect the battery first.
What is a running failure? Failure to run?
What is a TSP? Or did you mean TPS?
What is a Breaker Unit, or rather which green book describes one? Breaker points were eliminated from most Volvos by 1988, and would not be in the Computerized Ignition chapter, I'd think. Could be wrong.. maybe it refers to the Hall effect switch?
--
Art Benstein near Baltimore
"Doc, I can't stop singing 'The Green, Green Grass of Home.'" "That sounds like Tom Jones Syndrome." "Is it common?" Well, "It's Not Unusual."
|
|
|
|
|
Forgot to ask ...
The black box is covering a junction to distribute power?
--
1988 244 DL; B230F; LH-2.2; Manual 5-speed (M47)
|
|
|
|
|
Running Failure:
Failure while Driving or Car Died:
Driving across town. Pull through a stop light and lose all power.
Being in traffic and looking for a place to bail I turned into a parking lot and
- was not aware of the engine running before I turned off the ignition.
- oil light was ON
-- turned OFF ignititon
--- oil on dip stick, no pooled oil above head
- battery @ 12.56 V (I happened to have a multi-meter with me)
- replaced 25 Amp underhood fuse
-- starter cranks but engine does not fire
- ignition fuses test:
#s 11, 12, 13 are all 0.5 ohm and there is no visible breaks. At test of a spare fuse yields same result.
- ignition coil test:
-- across terminals 1 (2 green) and 15 (2 blue) - 1.4 to 1.6 ohm
(spec. 1.1 -1.3 ohm)
-- across terminal 1 and high tension center (ignition cable) terminal
1.039 mohm (!!), 1039kohm (spec. 9.6 -11.6 kohm)
--- A new coil is needed but Bosch discontinued production in 2014.
---- Any leads on where a replacement coil can be obtained?
************
Yes ... TPS: Throttle Position Switch(Not TSP: Tri-sodium Phosphate)
************
Green Book:
Service manual; Section 3 (39)l Wiring diagrams; 240, 1987-1988
(TP 31076/1)
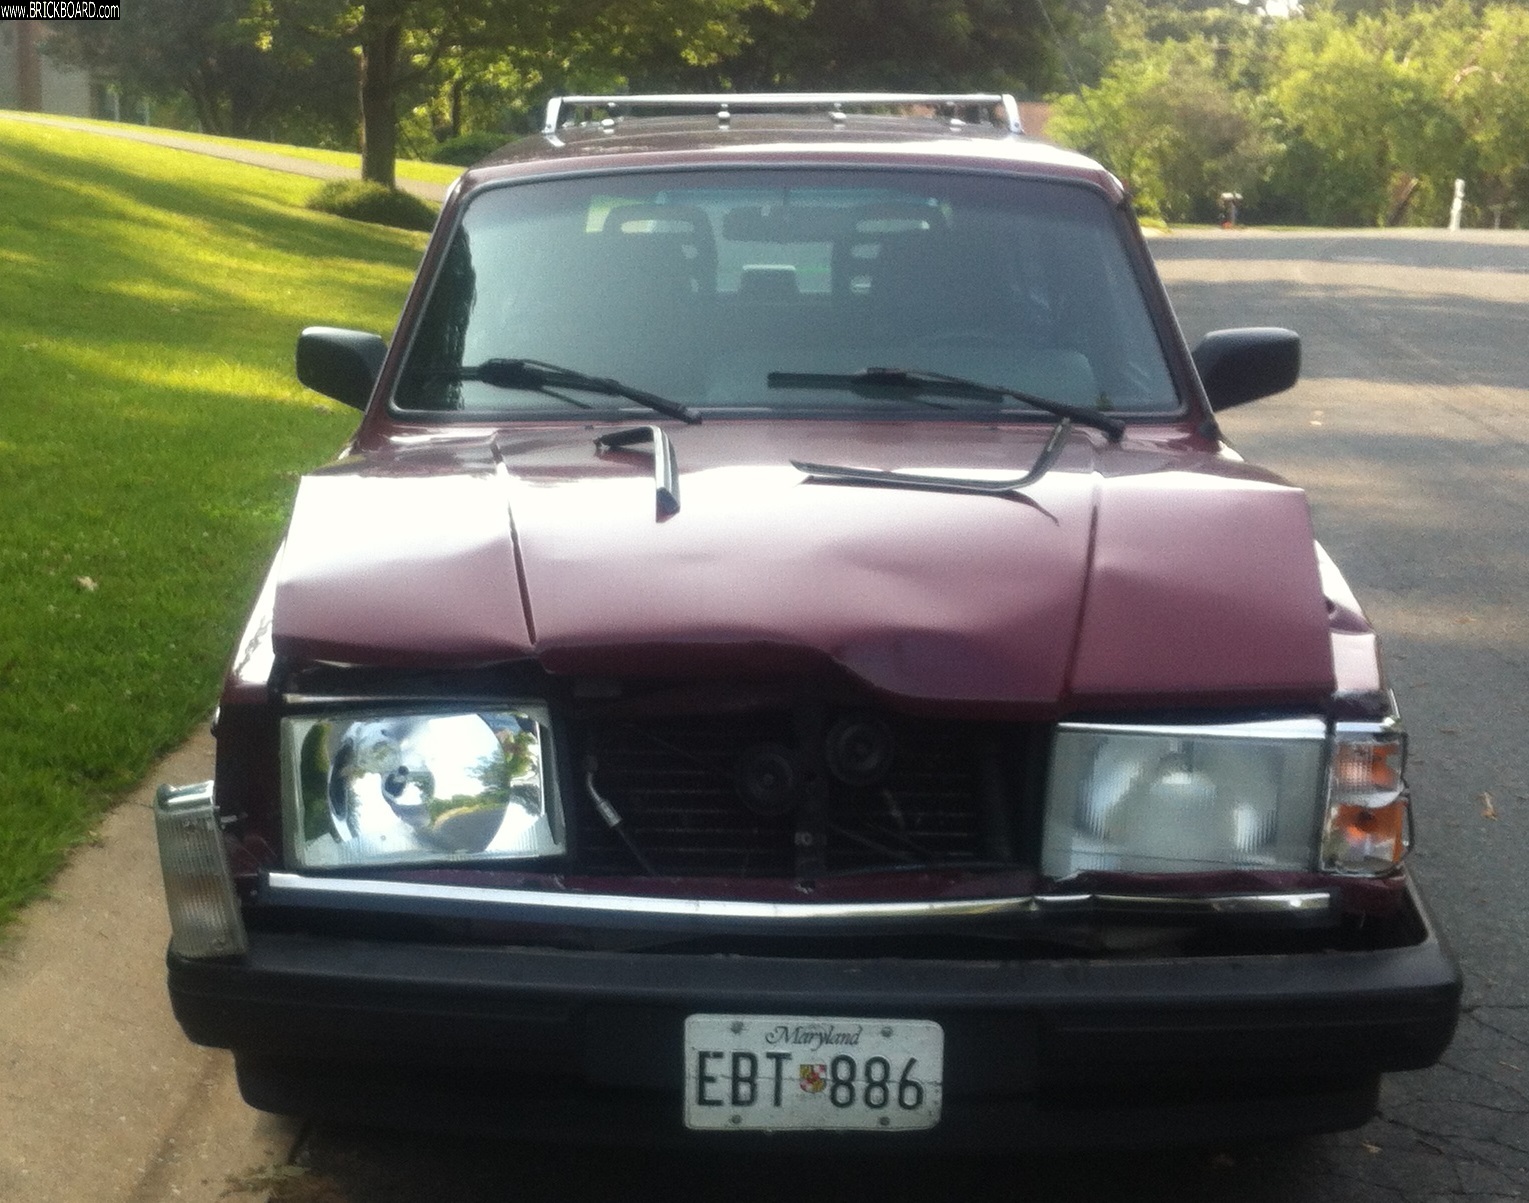
page 20 - item 'C' is identified as "Breaker Unit".
What is the Hall Effect Switch?
--
1988 244 DL; B230F; LH-2.2; Manual 5-speed (M47)
|
|
posted by
someone claiming to be CB
on
Fri Aug 25 13:40 CST 2017 [ RELATED]
|
|
I'll bet your Fuel Injection Relay crapped out.
To TEST.
Jump fuse 4 and 6 - this will run the main fuel pump ---try to start the car
|
|
|
|
|
Ahhh, yes, Breaker unit. I see it. That's the TPS. Smells like a translation glitch, of which there are many in the internal pages of the wiring diagram manuals. Throttle switch lets Volvo/Chrysler ignition computer know whether you're idling or have your foot on the pedal. It won't keep your car from running.
Make sure the cam is turning when you crank it. Hall effect is the distributor's way of replacing the breaker contacts.
Does sound like your coil is open, but before pulling it, I'd suggest double checking your ohmmeter against a known good, like a resistor in that range of 10K ohms. No sense hunting down a coil if it is just an ohmmeter defective from contact with a powered circuit..
Yes, the box is just a power distribution. There aren't any fuses inside the car you need to make the car run. It will drive across town with all of them removed unless you get a ticket for no signal or brake lamps.
--
Art Benstein near Baltimore
Two peanuts walk into a bar, and one was a salted.
|
|
|
|
|
Art,
I do not have spare resistors laying about.
I tried using a section of copper wire but my ohm meter is only accurate to 1 decimal place. I looked at different light bulbs and none of these met the expected ohms by calculation ... and I do not trust bulb manufacturer tolerances.
Do you have any suggestions of things more pedestrian than a resistor to test my multi-meter against?
--
1988 244 DL; B230F; LH-2.2; Manual 5-speed (M47)
|
|
|
|
|
tbb,
Sorry. I guess if you have no way to check your meter, you'll just have to trust it and your use of it. It is only my experience helping others causing me to suggest this. A heck of a lot of coils are replaced in Brickboard threads, only to leave the poster scratching his head and sometimes fighting with the vendor of the new coil, asserting it is just as bad as the old one. 15 years of this...
Every meter made for the weekend warrior, in my opinion, should be packed with a kit of resistors, at a cost of less than a dime, to be used to verify the operation of the various resistance ranges, each separately vulnerable to someone missing the instruction NOT to test powered circuits on the resistance setting.
So, tbb2, try to think of something. The coil on another car perhaps? Funny, people in my neighborhood seem to have an average of 5 cars each at their homes. There goes the neighborhood!
You check the cam is turning first, always, as that's the easiest thing to see and one very common reason you might not have spark. Timing belt.
After checking the cam, prove there's no spark by giving the intake manifold a shot of ether.
http://cleanflametrap.com/manignition76.jpg
--
Art Benstein near Baltimore
"Keep in mind that random processes can fluctuate in such a way as to mimic a signal when no signal exists." --Ransom Stephens
|
|
|
|
|
TIMING BELT!
That crossed my mind until I got distracted with the wild coil specs and lack of availability.
Time belt is broken.
Not sure what checking the cam does that removing the timing belt cover didn't do, but the belt is broken.
I was 5500 miles short of that replacement.
--
1988 244 DL; B230F; LH-2.2; Manual 5-speed (M47)
|
|
|
|
|
Hi,
Just curious about how many miles were you shooting for to get out of the timing belt anyway?
Phil
|
|
|
|
|
Phil,
I was going for 180000 miles.
It is only now after the fact that my putting off replacing the front oil seals until I did the timing belt only moved the timing belt replacement up. Since I am now seeing that oil leaks accelerates the timing belt failure. I was hoping the oil was running behind the timing belt cover. learn learn learn
So now I am digging into replacing the front oil seals.
- So is a 'real' seal press really needed? I'm reading of using a piece of PVC to press them in. Is friction all that holds the front oil seals in place?
- I'm reading bad things about other than Volvo seals. Does "viton" ring a bell?
It looks like I will be grounded for some weeks while I do other commitments, find parts and dodge the weather. After I get the seals and timing belt in I will know if something else was evolved.
Thanks everyone
--
1988 244 DL; B230F; LH-2.2; Manual 5-speed (M47)
|
|
|
|
|
Hi Thomas,
I meant for my post to say, "How many miles were you expecting to get out of a belt?"
Originally on earlier engines the recommended interval was 30,000 miles.
It has been move up to around 60,000 miles without to much of a worry but past that, for me, anything can make them go.
I try to lose them as soon as I can or at least before 70,000 tops. With your milage being 180k you broke even on them with an even number.
For what it worth to have my opinion, the seals last as they last. Their mileage definitely varies.
When considering in a dirty flame trap that influences them greatly. Single lip seals are not designed to contain pressures like other labyrinth lipped seal.
As far as VITON, that seal material is for higher heat prone areas. I have seen them work well with thermal fluid applications, that is not a motor oil, that will operate up in the range of 350-400degrees Fahrenheit.
VITON grade should be a better seal in that sense mostly. It goes back to cost difference to justify it. I'm definitely not a seal engineer but if there is a choice at reasonable cost I use them.
Most of the problems that I have seen are with the rear crank seal.
In most all cases where an Elring seal is used and go on too easily. They provided a seal at one time that the inside diameter was ONE millimeter larger in diameter, than the crankshaft size was itself.
I found a Timken orange seal that looks like the Volvo seal to be correct and I use it. I don't have the number off the top of my head.
Yes, seals are press fitted into place in many applications. I think in most cases, when paying labor, you change the seal while the mechanics are in there. While doing my own work, if the seals are still running dry, as in not weeping, why disturb them?
I can usually go two belts and then, I change them for sure. Its a judgement call between the conveniences of having them on hand to do the job and whether the flame trap or blow by of the engine varies the situation.
As far as using PVC or HDPE to make a pusher either will work as fine.
Both plastics are cheaper and easier to machine than metallic materials.
HDPE is just a poorer mans teflon it's away of staying away from the nylons family of polymers that have other purposes that again are more heat related.
As with any other material, it all needs to be machined with the ends square to axis of the shaft. The closer the pusher aligns or slips on the shaft diameter makes it all easier.
Holding the depth or "the stand off or set back" all the way around is thing to watch for. It's not that hard on these engines but a thin shim ring can be added to the pusher face for that. Especially if are relocating for wear or damage.
The straighter you can keep the seal while manipulating it the better. Use plenty of oil and your thumbs to assist.
Having the lip expanded evenly going onto the shaft is very important. In some cases I use some .002 brass shim strip stock soldered or super glued together into a closed ring fitted onto the shaft.
These really help where or when the seal location is out of sight or deep on a long shaft that keeps the finger out of the center. This is not the case with these engines.
Front wheel drive cars do limit the number of output shafts compare to ours. You have to be a very talented experienced persons with mirrors, thin tools and hands in my opinion.
After seeing FWD cars, I will jump to "all electric" ones, if my "self driving" 240's are eliminated in the future.
Some bearing diameters will have a "lead on relief undercut diameter" or a shallow bevel breaking the corner that allows the seal to slip over and not need a ring.
Some seals manufactures might offer a thin tapered plastic sleeve with a molded shoulder but are rare, in my limited experience.
You have to ask and look closely for code numbers. As "OEM stocked MAY" make up some the cost borne into A DEALER priced difference and have it in the box already.
All these internal rings will just slip over the shaft that the seal is made for only. It's not mandatory if work carefully and look befor seating the outer diameter in place.
It helps to keep the lip from rolling or puckering.
The coil spring behind it, that you cannot see, needs to stay in its pocket for proper tension around the lip. If it looks the same all around it will be good.
Hope all goes well,
Phil
|
|
|
|
|
Phil,
Thank you for the comprehensive information.
I was aiming to get 60k out of my timing belts.
Maybe without the oil contamination I would have made it. This will be the first time I will be changing the front oil seals at 174500 miles.
It was a bit curious that there was no obvious leak when I pulled the timing gears. The leak I had had reduced with several oil changes after running very very rich and getting gas in the oil. I was speculating the leak was due to shrinkage of the oil seals from being exposed to gasoline.
Now it seems that it is just age and a standard maintenance cycle.
I am getting my education by virtue of failures. Not the best, but my attention is then focused without unknown hours studying what might go wrong.
As of now I have found two manufactured items, PVC coupling and electrical metal conduit connector, that fit the outside diameter of the seals. I read that turning the old seal over and using it on the bottom of the homemade press will provide a better surface to surface contact to the new seal. I bought a longer bolt for the cam and intermediate seals. The crank bolt is long enough. Adding a washer gets from the bolts and original washer to the outside of the "presses". If these presses work I will post specs and pictures.
I also read a thin film like mylar, which I have, can be used to help the shaft lip slide in. This seems to be the home made version of the Teflon you mention. I am assuming that this mylar film will twist out once it has slid in with the seal. I plan to grease it on both side and leave some pull tabs on the outside ... unless there is a better way (?). I'm guessing this thin sleeve allows the seal to be set and the sleeve removed so that in two steps there is less to go wrong (?).
How many miles might I expect to get out of the rear crank shaft seal?
--
1988 244 DL; B230F; LH-2.2; Manual 5-speed (M47)
|
|
|
|
|
46 Install cam and intermediate gear seals.
- make press to help keep seal square while installing
-- use bolt (10mmx1.5x90 - existing bolt is too short), timing gear washer, large washer (5/8” ID x 1 3/4” OD) flat washer to cover EMT, 1 1/4” EMT screw set connector to metal box (two ended screw connector better) and use old seal for one to one contact. Use mylar are sleeve cut to circumference of for over shaft.
- apply bearing grease around the inner reveal to hold the spring in place - press the grease in and remove excess with a smooth spoon handle. Apply a thin layer of bearing grease on the inside and outside edges of the seal. Apply a thin layer of bearing grease to the shaft and bore. Grease the mylar sheet top and bottom where it is in contact with the shaft leaving a dry portion to pull on with needle-nose pliers. (grease is mentioned in Green Book for crank shaft seal) Set seal set to base of chamfer. IPD reports there is a seal STOP in the bore (not visible to me and the new oil seals are thinner).
- press in with fingers to start.
- set seal to bottom of chamfer. Do the installation in steps, removing the press and checking depth and square as it progresses. Check fit with pick by feel and with mirror. When set pull out mylar.
47 Crank gear seal. Larger than cam and intermediate seals. The seal is removed and installed the same as the two above.
- make press to help keep seal square while installing
-- use existing bolt, timing gear washer, large washer (1” ID x 2” OD) flat washer to cover PVC, Charlotte, P#130, 2” PVC DWV coupling (I made a slight chamfer on the coupling curved corner to get closer to the correct seating depth and it turns out this slight chamfer fits into the base of the old seal so it does not shift) and use old seal for one to one contact. Use mylar are sleeve cut to circumference of for over shaft.
- press in with fingers to start. See cam and intermediate seal installation.
--
1988 244 DL; B230F; LH-2.2; Manual 5-speed (M47)

|
|
|
|
|
Sorry I could not figure out how to attach multiple pictures ...
--
1988 244 DL; B230F; LH-2.2; Manual 5-speed (M47)

|
|
|
|
|
Oh good,
tbb2,
"Not sure what checking the cam does that removing the timing belt cover didn't do..."
Not a thing. Just is something you can do at the side of the road without a tool. Remove oil cap, crank car. Does cam move? It won't if the belt has stripped.
--
Art Benstein near Baltimore
What's the fastest liquid on earth? Milk, because it's pasteurized before you see it.
|
|
posted by
someone claiming to be CB
on
Fri Aug 25 16:41 CST 2017 [ RELATED]
|
|
a Broken Timing Belt
tbb2--- that's like winning the Lottery.
It's an often offered check for a No-Run situation here on the BB, but it's rare that it pans out....And in your case that option wasn't even offered.
Cheers
|
|
|
|
|
"And in your case that option wasn't even offered."
Indeed it was offered, two posts back. But remember the original post only required us to identify the black box on the fender, not guess why the car was not starting. Then it went on to identify an open coil.
--
Art Benstein near Baltimore
A jumper cable walks into a bar. The bartender says, "I'll serve you, but don't start anything."
|
|
posted by
someone claiming to be CB
on
Sat Aug 26 14:33 CST 2017 [ RELATED]
|
|
sorry Art. did not read your full post as you posted it post my post.
I had just checked back to see if my FI relay bet paid off. Then read tbb2's TIMING Belt broken.
so he didn't win the lottery after all
|
|
|
|
|
I think I'd call it a win. If he can DIY, a genuine Volvo belt is less than $20. Sorted and off you drive. Maybe $60-70 if done by a garage for job that was due anyway.
|
|
|
|
|
Yes, I agree. It is a straightforward mechanical issue, with no electrical mysteries needing guesswork. Can be done on the side of the road almost as easily as in the garage.
Too much emphasis is placed on the mileage interval. The belts do not have a life solely dependent on revolutions. The load is a factor, such as when a cam is not getting oil as it should. Oil leaks accelerate the rubber deterioration. Tensioner bearing and adjustment...
Mileage is only playing the averages, like insurance underwriting.
--
Art Benstein near Baltimore
Two fish swim into a concrete wall. The one turns to the other and says "Dam!".
|
|
|
|
|
Do you play CB? (the lottery)
--
Art Benstein near Baltimore
No, there are no dumb questions... just a surplus of those put without much thought.
|
|
posted by
someone claiming to be CB
on
Sat Aug 26 19:16 CST 2017 [ RELATED]
|
|
only the BIG Prize for a buck, when I buy some wine/beer and have a dollar as change. and only when it's over $250mil.
Odds are prob better having a broken timing belt...Cheers
|
|
|
|
|
Everyone on this RWD board should be wealthy already considering how many years we have been avoiding monthly car payments.
--
Art Benstein near Baltimore
Those of us who spent our allowance at the five and dime think we are getting a bargain at the dollar store.
|
|
|
|
...but after accumulating said wealth over the course of decades I realized I could afford something new(er).
Hence...

--
'80 DL 2 door, '89 DL Wagon, '15 XC70 T6
|
|
|
|
|
Both successful, and convinced of the value still offered by the marque.
--
Art Benstein near Baltimore
What engineers say and what they mean by it:
Engineering says: "Developed after years of intensive research"
Engineers meant: It was discovered by accident.
|
|
|
|
|
Art,
"Make sure the cam is turning when you crank it."
- Other than the obvious turning, what a I checking here?
"Hall effect is the distributor's way of replacing the breaker contacts."
- So as I dig into finding what this is and if it is working ... if it goes bad would it take out all power to the plugs?
-- Should I be thinking this Hall sensor is also obsolete?
--
1988 244 DL; B230F; LH-2.2; Manual 5-speed (M47)
|
|
|
|
tbb2,
Not sure what you are really asking yet, however, the silver box is the high beam control relay.
What is the running failure that you are experiencing?
Matt
|
|
|
|
|

