Volvo RWD 900 Forum

INDEX FOR 10/2025(CURRENT) INDEX FOR 7/2002 900 INDEX

[<<]  [>>]


THREADED THREADED EXPANDED FLAT PRINT ALL
MESSAGES IN THIS THREAD


  REPLY TO THIS MESSAGE Replies to this message will be emailed.    PRINT   SAVE 

I earned my heater core merit badge 900

1992 745 217K

The scent of coolant became evident during last year's heater season but half a bottle of Bar's Leak put it at the back of my Volvo to-do list. This year the smell was accompanied with the defrost setting adding condensation to the windows.

I can not thank the contributors to the FAQ's enough for their submissions. Every bit of support is appreciated in completing the heater core replacement. The extensive photos of the procedure submitted by Ari Rocchio were especially helpful.

I could not justify the $300 Volvo replacement for this particular car. I had a bad experience with a Nissen replacement radiator so I don't use their products. I went with Rock Auto's Spectra Premium ($72). It is not the brass and copper as stated on their site but rather aluminum. There were two problems with fitment:

1. The long dimension is about 5/16" shorter than the original. That required drilling new holes in the back of the heater box so that the steel strap that holds the core in place on the right side can be repositioned- not a huge deal.

2. The inlet and outlet tubes are not parallel to each other. The tubes would initially fit through the opening in the firewall but when I tried to move it into its home position the opening proved to be too small. I had to remove the fender washer immediately below the opening (and eventually the stud as well) and use a die grinder and stone to enlarge the opening. I would guess it required at least 1/8" of firewall to be removed before the core would fit properly and prevent the bottom tube from contacting the firewall. This destroyed what was left of the original foam seal, requiring the opening to be packed and then sealed with silicone.

Having successfully completed the replacement I will share my thoughts and emphasize points made in the FAQ's:

1. I can not even imagine replacing the heater core without removing the seats!

2. Grinding the end of the 7mm socket and then beveling the outside edge gave the socket a better bite on the screws that provided a less than "straight on" approach.

3. I did not need a 1/4" universal for the 7mm socket but I did use strip caulk on the socket connections to help keep them together and also hold the screws in place in the socket.

4. The top center heater box screw that is called out in the FAQ's looked like an impossible task. Reading the FAQ's suggestions in dealing with it provided little comfort.

Working from the passenger's side I took a piece of welding rod and pushed it through the foam that surrounds the opening in the top of the box that houses the heater core. After a couple of repositionings I found a path that put it perpendicular to that pesky top center 7mm screw. I then put together 15" length of 1/4" extensions and carefully pushed the assembly along the same path through the front and back side of the foam that surrounds the connection at the top of the box. The socket easily fit the screw and backed it out with no problem. Upon reassembly I just left that screw out.

I replaced the heater hoses and switched the coolant to G0-5 and distilled water. It also seemed like the opportune time to power wash the carpets after pre-treating them with Spray and Wash. They came out looking great.

Again thanks to everyone who participates in submitting information to Steve as well as his continuing efforts of compiling that information in the FAQ's.

Randy


  •   REPLY TO THIS MESSAGE    PRINT   SAVE 

    I earned my heater core merit badge 900

    This is not an easy job rstarkie, I agree.- I've done it as well on my 940- actually I ended up having to take the seats out and while I had them out I removed the upholstery and cleaned the seats, repaired the heating elements and cleaned the foam of residue from the years of use- yes, not an easy job.
    I took the carpets out and cleaned them and the under-layment of soundproofing as well. I added fat-mat soundproofing before I re-assembled the interior- it makes a big difference in the noise reduction.
    The little fastener that is behind the vent in the front most part of the core housing isn't really needed I don't think - I didn't put that one back in after trying for a while to get it positioned. I did seal the housing with DAP butyl rubber to help keep the vacuum seal. I did make sure the vacuum hoses were clear and clean. the factory uses some type of goop to hold the vacuum hoses to the casing- very messy- I removed most of it and put the hoses back in position held there with a cable tie and taped it to the case.
    The heater valve is tricky when you replace it because there is little room to tighten the hose clamps. The brass outlets are fragile so it takes an easy hand to fit the hoses over the outlets, and fit the clamps over the hoses. the best way is to fit them one at a time and make sure the hose clamp tightner screw faces up and toward the outside of the car.

    It's important also to check the connection from the exhaust manifold to the core and certify that the hose fits and is connected. There can be a small leak develop in that area.
    Anyway - congrats on getting the job done. It can be fun but aggravating!!
    Artca


  •   REPLY TO THIS MESSAGE Replies to this message will be emailed.    PRINT   SAVE 

    I earned my heater core merit badge 900

    I've done five 700/940 heater cores. I get to the top center screw using long 1/4" extensions like you did. I use two paint stirring sticks to hold to foam up on either side of the screw.

    It is a tough job. I can do a rear main seal faster.
    --
    john


    •   REPLY TO THIS MESSAGE    PRINT   SAVE 

      I earned my heater core merit badge 900

      btw sarge- when you do the rear main seal dont you have to remove that plate covering it on the back of the block and pry out the cam plug just above it? thanks tons oldduke


      •   REPLY TO THIS MESSAGE    PRINT   SAVE 

        I earned my heater core merit badge 900

        Oldduke I believe you're asking about the rear cam seal- and yes there is a cover that has to be taken off- it is difficult to do from the top of the engine, but it can be done. the seal pops out and is easily replaced- BUT do not use grease to help replace the seal - use oil or silicone spray- the lip on the seal may fold back upon itself and it will leak again-
        the rear main seal is accessed by taking out the tranny and that is a tough job in that if the car is up on stands it has to be at least 21 inches off the floor to move the tranny out- (don't forget to remove the kickdown cable first) Important- use marks to realign the timing gear- the FAQ's have a good section on that except that the tooth gear that tells the computer where TDC is, IS NOT VISIBLE from the starter hole- it is 15 gaps from the positioning of the RPM sensor. That is crucial!! iT PUTS THE SOLID PART OF THE TIMING GEAR JUST OUT OF SIGHT when you look in the starter mounting hole.
        hope this info is helpful.
        Artca


    •   REPLY TO THIS MESSAGE    PRINT   SAVE 

      I earned my heater core merit badge 900

      hi starkie and sarge- stark you deserve that medal maybe even the purple heart and combat infantryman medal too. sounds like you tasted true hell. thought the blower r and r and the heater core were equally hellacious on the 240 but much easier on the 740. was i misinformed? the great mystery of course is why was anything designed like this and why wasnt it promptly corrected in subsequent models? thanks tons oldduke


  •   REPLY TO THIS MESSAGE Replies to this message will be emailed.    PRINT   SAVE 

    I earned my heater core merit badge 900

    Here is the link to the section of the FAQ's concerning heater core replacement: https://www.brickboard.com/FAQ/700-900/HeaterCoreReplacement.htm

    Here is the link to a post I made after replacing the heater core in a 740 wagon: https://www.brickboard.com/RWD/volvo/1627838/740/760/780/earned_heater_core_merit_badge_replacement.html

    Good luck and Happy Thanksgiving!

    Randy


  •   REPLY TO THIS MESSAGE    PRINT   SAVE 

    I earned my heater core merit badge 900

    "The socket easily fit the screw and backed it out with no problem. Upon reassembly I just left that screw out."

    I used a Mangneti Marrelli copper heater core I got from FCPG years ago. Perfect fit. I think I got the last one they made.

    My son's 1995 heater core housing is missing "one" screw and so is my wife's evaporator core housing. No hesitation on these decisions. I think I'll take the heater core over the evaporator though.

    The above mentioned son was a big help on both jobs.


    Tom


    •   REPLY TO THIS MESSAGE    PRINT   SAVE 

      I earned my heater core merit badge 900

      I did an evaporator on our 94 944T several years ago and it was not much fun either. It was a good investment of my time as it has been "cool" ever since.

      Randy


  •   REPLY TO THIS MESSAGE Replies to this message will be emailed.    PRINT   SAVE 

    I forgot to include this..... 900

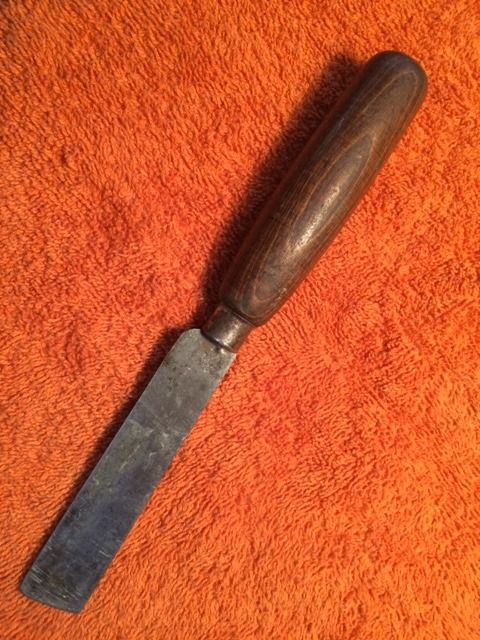
    After removing all 12 screws that held the two halves of the heater box together and separating them with a putty knife I was unable to remove the front half. This had been mentioned in the FAQ's.

    I used this tool to push up on each side of the box and cut/break the bond between the box and the material on the floor.

     photo IMG_2155_zpsxlatdzhy.jpg


  •   REPLY TO THIS MESSAGE    PRINT   SAVE 

    I earned my heater core merit badge 900

    Dear rstarkie,

    Hope you're well. Your further guidance should be incorporated into the FAQs. Tips - e.g., how to access the center heater box screw - are worth their weight in gold.

    Thank you for such clearly-written guidance!!

    Yours faithfully,

    Spook


<< < > >>


©Jarrod Stenberg 1997-2022. All material except where indicated.


All participants agree to these terms.

Brickboard.com is not affiliated with nor sponsored by AB Volvo, Volvo Car Corporation, Volvo Cars of North America, Inc. or Ford Motor Company. Brickboard.com is a Volvo owner/enthusiast site, similar to a club, and does not intend to pose as an official Volvo site. The official Volvo site can be found here.