|
This procedure describes the steps necessary to alter the instrument cluster from a 93/94 Volvo 940 for use in a 91/92 Volvo 7/9 series car. This supersedes the previous instructions I put together that were included in the FAQ's. This "fix" is easier and has far fewer steps involved.
If an unaltered cluster from a 93/94 car is swapped into the earlier cars the fuel gauge will not register. Many thanks to Karl Nitz for sharing with me the information on the changes necessary to the circuit board on the 93/94 clusters in order to make the 91/92 fuel gauge work when transferred to the 93/94 cluster.
I have come across several 93/94 clusters that have bad speedometers. You should remove the original cluster from your car and loosely install the 93/94 cluster. Check that all the gauges (other than the fuel gauge) and lights work before proceeding. Once you have determined that you have a good replacement cluster move both clusters to your workbench.
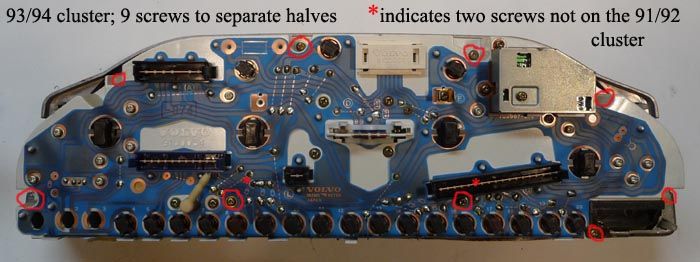
Remove the nine screws from the 93/94 cluster and the seven screws from the 91/92 that hold the two halves together. Separate the two halves of each cluster. Be extremely careful of the exposed instrument faces. The pegs that the gauge needles rest against are very fragile.
Remove the four screws that hold the 91/92 fuel gauge in place and remove it from the cluster. Remove the three screws that hold the 93/94 fuel gauge in place in its cluster and remove it as well. Remove the two screws on the 93/94 cluster's clock and set it aside.
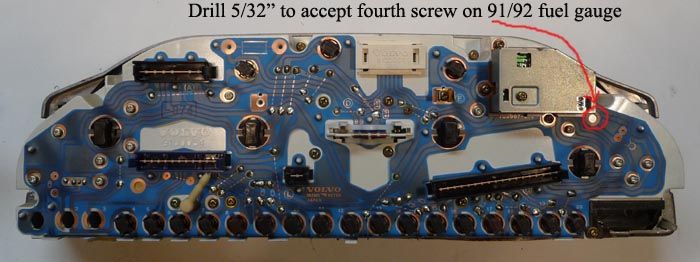
The fourth hole for the 91/92 fuel gauge is on the later circuit board but the hole needs to be drilled through the plastic of the 93/94 cluster. If you are careful you can simple "eyeball" the center of that hole and drill a 1/16" pilot hole and then follow up with a 5/32" drill. The 5/32" bit will clear the opening in the circuit board.
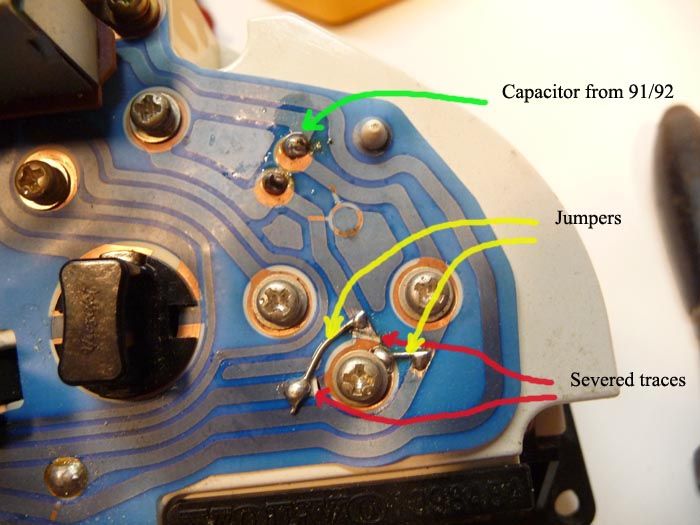
The 91/92 cluster has a capacitor that needs to be removed and then soldered into the 93/94 board. It has been suggested that this capacitor is not necessary but I have never been compelled to test that theory. It is easy enough to remove it from the one board and install it on the later one.
The alteration of the circuit board on the 93/94 cluster is the next step. Sever each of two traces by removing a portions with a razor blade knife. Make four small cuts on each trace and that section of the board will fall away.
Carefully scrape the area that shows the solder puddles in the photo and solder a light weight jumper into place. Very light wire requires less heat from the soldering iron and reduces the risk of damaging the board.
The fuel gauge and clock need to be reinstalled in the cluster. They will not fit into place without some alteration. Even with the alterations it remains a tight fit.
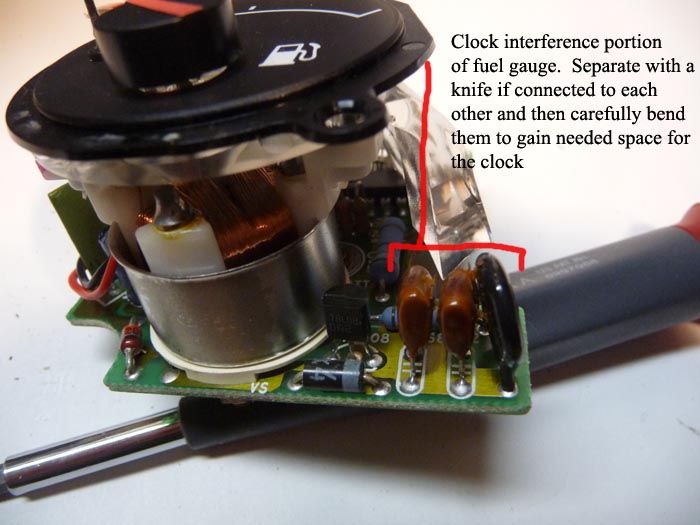
The fuel gauge components shown in the photo interfere with the time adjustment portion of the clock. You may find the components stuck together. If so separate them with a sharp knife. Then carefully bend them away from the clock position to gain the much needed room for both the clock and the fuel gauge to fit.

Use a dremel fitted with a cutting disk to alter the clock. You need to remove a portion of the clear plastic that covers the gear on the time adjustment mechanism. Care should be taken not to allow the dremel to come into contact with the gear. You can change the position of the gear with the adjusting knob so as to have more room to work; first cutting one side and then the other.
Install the fuel gauge and clock (the promised tight fit). When I assembled the two halves of the cluster they did not want to go together completely. I believe it was the edges of the gauges not fitting into the recesses around the openings. Wiggle, wiggle finally worked, but 20/20 hindsight makes me think that if you left the two clock mount screws loose until the halves were together it might make it easier.
Install the nine screws that hold the two halves of the cluster together and install the cluster in the car.
|


