|
|
|
I found worn brushes in alternator. Ordered on line replacement Bosch brush set to do my first ever replacement. Noticed that package not only contains the expected brushes and springs but also two small metal "tubes". Each tube has a "collar" located on the outside about midway along the length of the tube. 1. I'm unfamiliar with this part and not certain how it is assembled with each brush. 2. Secondly, all references say to pull the wire lead through the hole to the appropriate length and bend the lead over to hold this length before the next step of soldering. So, when do I know when I've pulled the lead for enough?
For the fun of Volvos,
Mike
--
'92 245DL, '90 760 GLT
|
|
-
|
|
|
Very informative thread! Thumbs up to Mike and Art for helpful pictures.
I might buy Volvo next time I restock on brushes, because I despise fishing a floppy pigtail through the eyelet.
|
|
-
|
|
|
For the laymen in the audience, when an alternator does die and then subsequently goes to the reman process, is there anything else other than the brushes that gets replaced/repaired in the process? Thanks in advance...
|
|
-

|
|
"...when an alternator does die and then subsequently goes to the reman process, is there anything else other than the brushes that gets replaced/repaired in the process?"
The smart-ass answer is "unlikely." Not being smart toward you, but toward a reman industry which seems to survive on "lifetime warranty" instead of quality control.
It ought to be totally remanufactured with bearings and slip rings too, the wear parts of the alternator. The stator winding should be hi-potted, I think, and the result fully tested, but I doubt whether there's enough profit margin to permit some outfits much more than the "spray and pray" monicker they earn.
The next best thing to doing it yourself is to work with a local rebuilder. Look up automotive electric rebuilders in your yellow pages or get a recommendation from an independent auto repair shop. They have a club, called Electrical Rebuilders Association. The chain store rebuilds don't get done there.
--
Art Benstein near Baltimore
I went to buy some camouflage trousers the other day but I couldn't find any.
|
|
-
-
|
|
|
Art and others,
Here's a photo of a jig I made up with scrap materials to facilitate the soldering. I have a question with the supplied eyelets. I snipped off the crimp and did a little filing so that the wire and brushes would release. Then I drilled out the hole where the wire passes to 1/8". To insert the eyelet, I would have to drill out the holes further to 3/16" and then crimp and solder. Please tell me, do I insert the eyelet from the outside or from the inside of the brush holder. I'm inclined to insert the eyelet from the outside, then crimp and solder.
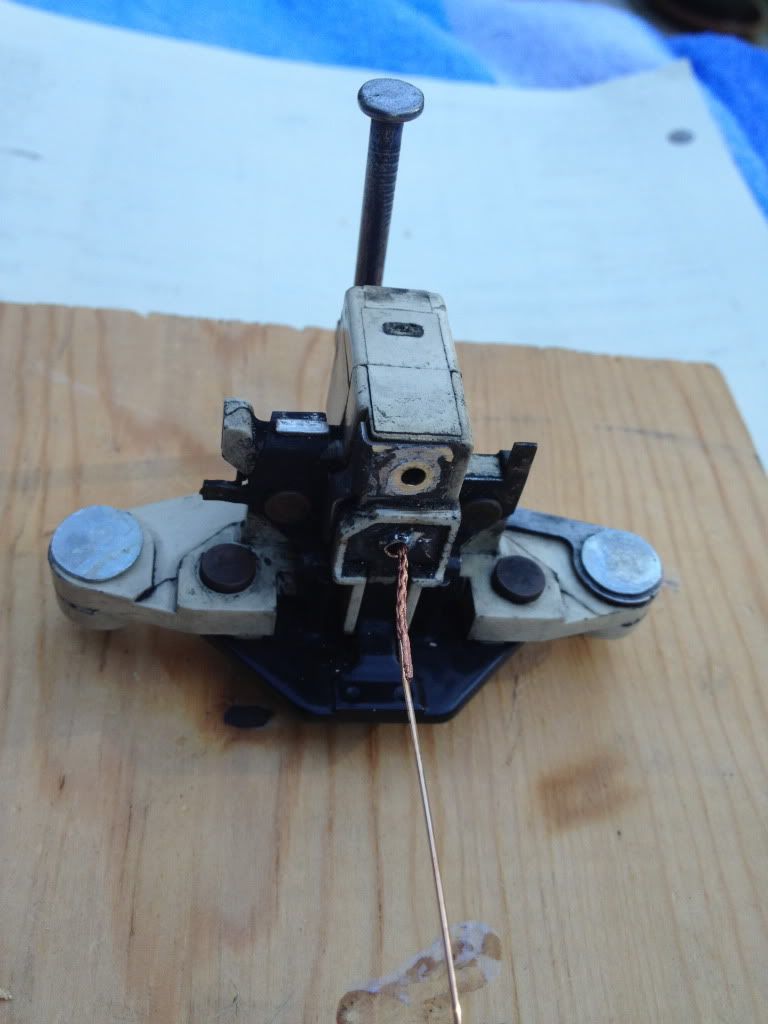
I predrilled holes for the nails so that the nails are snug and can be pulled out by hand.
For the love of Volvos,
Mike
--
'92 245DL, '90 760 GLT
|
|
-
|
|
|
If you care to use the eyelets at all I would Put the Brush wire through the regulator and then slide the Eyelet down to the Regulator for soldering. Solder the wire to the eyelet at the same time the eyelet is getting soldered to the regulator. I wouldn't bother to crimp anything. No real need for the additional mechanical connection here. I agree with Art, The solid Wire lead takes all the 'fun' out what should be a simple soldering task.
--
'75 Jeep CJ5 345Hp ChevyPwrd, two motorcycles, '85 Pickup: The '89 Volvo is the newest vehicle I own. it wasn't Volvos safety , it was Longevity that sold me http://home.lyse.net/brox/TonyPage4.html http://cleanflametrap.com/tony/
|
|
-
|
|
|
I feel like my episode of learning brush replacing has advanced from course level 101 to 201. I should have left well enough alone. No. I had to press on with my zeal to fit those new eyelets into the brush holders. Additional drilling to work out the old "eyelets" in the holder, or what I thought were eyelets, led to my end. What I thought was an eyelet was really a rivet like fastener to hold the end of the terminal strip in place tightly to the holder. That rivet is made of a different and harder metal, maybe brass. It was difficult to quickly cut and actually it spun loose without falling out, still gripping the terminal and the inside of the brush holder. I used a hammer and punch thinking it was almost ready to release. Ouch! Those eyelets that come with the brush set are not meant to fit into this brush holder. I actually chipped some of the white plastic surrounding the brush holder terminal. I should have just ignored the supplied eyelets. This whole thread has wised me up on the anatomy of voltage regulators and their care and feeding.
For the fun of Volvos,
Mike
--
'92 245DL, '90 760 GLT
|
|
-

|
|
Ok,I think I passed Brush Replacing 201 thanks to these posts.
I would have made the mistake of trying to use the eyelets if I got them in the brush kit which I didn't but the copper rod would have been useful. I did see the infamous rivet in the inside of the brush holder base, thanks.
My procedure: I used a file to flatten the factory 4-way crimp on the braid crimp, only slightly though, such that the soldering iron could melt the existing solder which I assumed was in there. I heated the crimp area and the old brushes sprang out. My regulator holder was a vice, jaws loose, with a rag over it. The rag caught the old brushes and springs, the springs of which I never would have found if they fell on the floor.
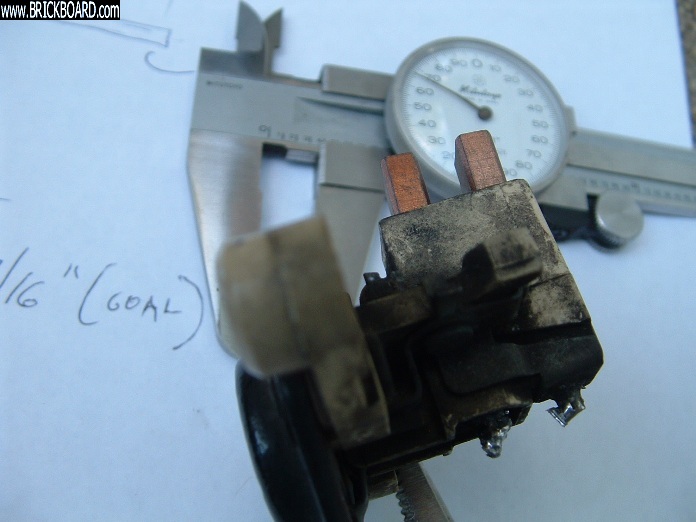
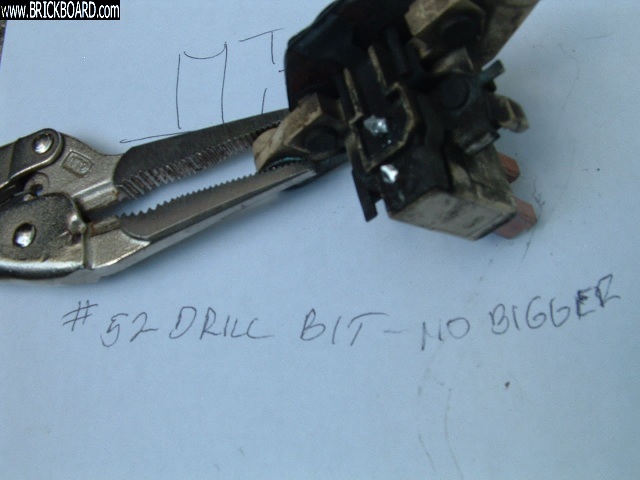
I saw daylight through the crimp, although tiny, too small for the copper braid. I tried to open the holes a little with a scribe but could not get enough pressure to deform the old crimp and did not want to get too medieval and crack the plastic. Next step, drill out the crimp just large enough for the braid. I used a #52 or #54 drill bit and would have felt better, knowing now, going a little smaller. The drill removed mush of the crimp. The new braid did go through with little trouble. One fear is using too much solder and having it wick into the braid. Tested for fully functioning brushes and passed.
I used Art's dimensions to cut the silicone insulator and the tried to measure the .437 brush dimension before soldering. I ended up with .368" so I supposed I shortened the life a little but who can say what the original regulator had? Thanks to all.
Tom
Needle nose vice grips, a favorite tool.
Quote from NewMexico240:
Funny, how when we are successful at completing
tasks on our bricks we want to share that with
someone. It's a darn that when we talk to those
around us, about it, they give us that crazy eye.
Or am I the only one that gets that crazy eye ?
Joseph in New Mexico
|
|
-
-
|
|
|
I pulled a couple regulators from alternators and also compared it to a new Bosch regulator and I found that some had a diode soldered to the top (as in Art's pic) and some didn't-the new Bosch regulator didn't. What is this diode for exactly? Protection?
Thanks,
Travis
|
|
-
|
|
|
Hi Travis,
I think you are referring to the 68-ohm resistor I find on the Bosch regulators, but not on the aftermarket copies. It is connected in a way that it would provide for lamp test of the battery warning light at half-brilliance even if the brushes were not making contact. May be the new Bosch regulators incorporate this internally?
Why the aftermarket units don't use one, I cannot imagine, unless it is a patented feature. I show it in the lower left here:

Also, some more info here if you're into this stuff:
alt811.jpg
alt812.jpg
alt813.jpg
alt814.jpg
alt815.jpg
alt816.jpg
alt817.jpg
--
Art Benstein near Baltimore
THE FOUR STAGES OF LIFE:
1) You believe in Santa Claus.
2) You don't believe in Santa Claus.
3) You are Santa Claus.
4) You look like Santa Claus.
|
|
-
|
|
|
Art (and others),
I took a photo and attempting to attach to this. You'll note that this is a Volvo part. I purchased it from TASCA. Yes, the wire lead threads through the clear tube. Your explanation of the length of the lead is clear.
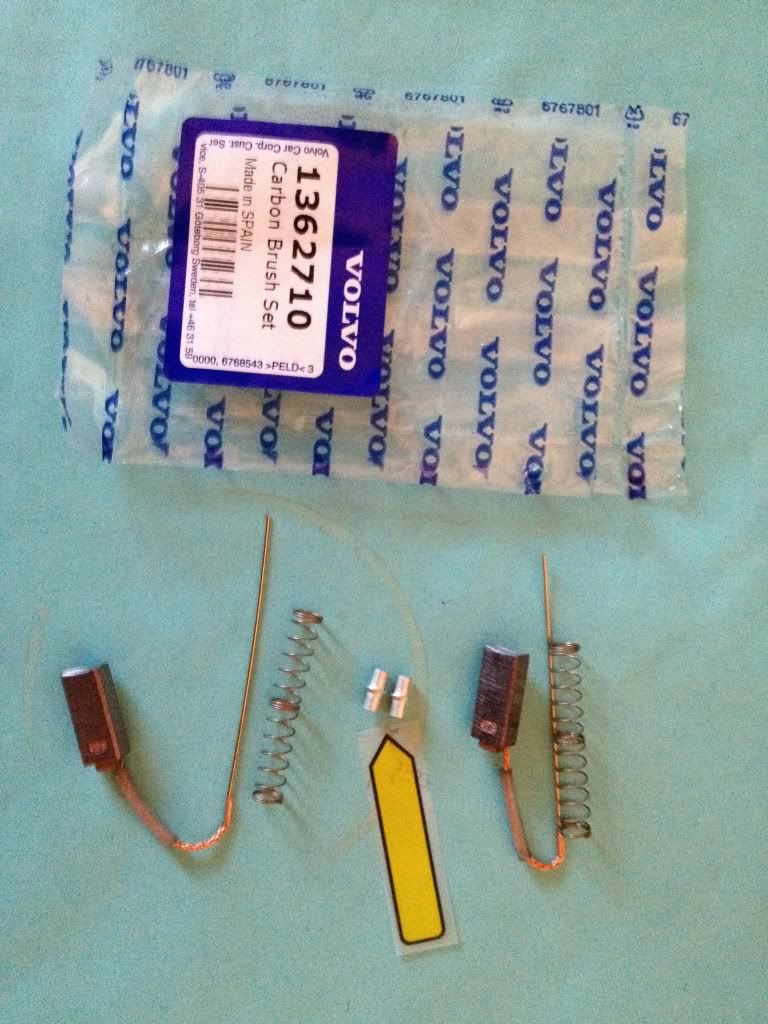
For the fun of Volvos.
Mike
--
'92 245DL, '90 760 GLT
|
|
-
|
|
|
Oooh, that's cool. That solid core leader takes all the fun out of trying to fish the flaccid brush wire through the eyelet! Looks like replacement eyelets are provided as well. That takes the fun out of salvaging the originals with a pick. :)
The brush kits I bought recently went up to $7.50 a set. I bought 3, noting the rapid rise in price. Also bought a flat of oil filters on rumor of skyrocketing costs. But, look at the advantages you get for an extra $3.
Thanks Mike, I learned something from your post. I had figured you got brushes for another alternator, but I was wrong.
--
Art Benstein near Baltimore
Sign on on the side of the electrician’s van – “Let Us Get Rid of Your Shorts”.
|
|
|
|
|


