Volvo RWD 200 Forum

INDEX FOR 10/2025(CURRENT) INDEX FOR 5/2012 200 INDEX

[<<]  [>>]


THREADED THREADED EXPANDED FLAT PRINT ALL
MESSAGES IN THIS THREAD


  REPLY TO THIS MESSAGE    PRINT   SAVE 

Kick down questions 200 1986

First of all thumbs up to all the posts from my kick down cable post. Those were great posts folks. Also read Art's link on that transmission replacement seal replacement, Art was right on the money about how well that was done.

I will have to give the cable replacement a try, was thinking about having my pro do it. Fate cruelly intervened Saturday, my pro of the last 28 years had someone walk in and buy his building last week for what his contract was asking. It was a cash deal and they gave him to this past Monday to vacate the building. He was emptying out the shop Saturday on the way to retirement dang it. So it's time to man up and do this thing. Have to go down to Sam's and see about shampoo and shower caps in bulk.

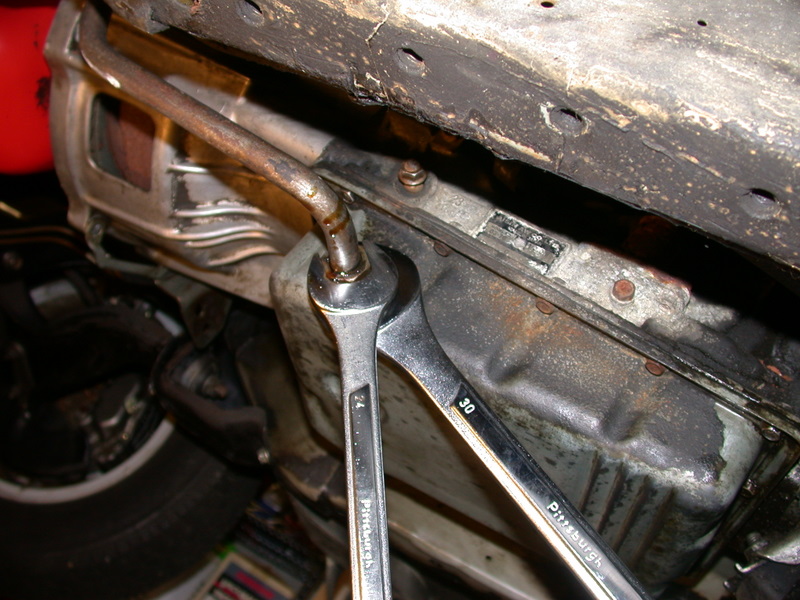
I have a very temp fix for the cable in place and working. Went down to the pup and sliced off the throttle body end of a cable, that is were Inga's cable broke. Cut Inga's wire back and then drilled out the center a butt slice with a drill bit. Slipped the donor section and the very end of the old kick down cable into the drilled out butt splice so the wires were sticking out both sides. Crimped both ends of it and then applied a good coating of flux (plumbers flux). Pulled out the map gas and some silver solder and was able to get solder to flow into the butt splice and onto the wire. Just for luck after the wires and crimp cooled a bit mixed up some J B Weld and coated the entire connector and the ends of the wires from end to end with the mixture. Let it cure for a couple of days before hooking it up yesterday morning. I have had kick down for two days now and dang you really need that thing to work and work well. I was pulling the car into 2nd and hitting the OD off to accelerate away from a light after driving for a bit. Pretty sure the OD was staying engaged almost the entire time. The Temp cable fix really showed just how important that cable really is.

Before I don the shower cap and head down under a couple of more questions. How much transmission fluid will be needed after my fluid shower is done and the new cable is in place?

Will I have to remove the transmission fluid lines, and if yes are there any seals that will need to be replaced?

Can someone describe removing that filler tube one more time. At the pup, slid up under an 88 model and that sucker is really on there. What am I missing or doing wrong.

Upside of the PUP visit was a solid rattle free glove box and a nice solid passengers door pocket were found and purchased. The Filler Tube nut was an exercise of failure however.

Thanks and Regards,

Paul


  •   REPLY TO THIS MESSAGE    PRINT   SAVE 

    Kick down questions 200 1986

    I removed the dipstick with the transmission pan intact by removing the 2 bellhousing bolts (starter bolts). The whole thing can be dropped intact that way. I don't relish trying to break the dipstick loose at the gland nut.


  •   REPLY TO THIS MESSAGE    PRINT   SAVE 

    AW filler tube 200 1986

    That filler tube nut is scary. Some will laugh because it was easy for them, while others talk of cutting the tube rather than risking the pan. I really wanted to find a 24mm line wrench before attempting, but I went ahead with an open-end after all. The nut came out hard. It went back on hard.

    A line wrench is better, because pushing on 4 of the six flats instead of just 2, it has a smaller tendency to deform the hollow flare nut.

    I disagree with the warning against Chinese tools, at least those I bought and used here. They fit well. By the same token, if you substitute a dial-a-size for the counterhold, be sure it isn't loose and worn.


    --
    Art Benstein near Baltimore

    Some days you're the bug; some days you're the windshield.


    •   REPLY TO THIS MESSAGE    PRINT   SAVE 

      AW filler tube 200 1986

      My experience was exactly as Al described. I was very careful to hold the big nut and move only the smaller one. Every turn was hard coming out and hard going back in. The bolt to the bell housing holding the tube was not a problem for me. I think I only used about 3 or 4 quarts to put it back together and I would not remove the filter, just more oil in my hair and it was spotless.

      I do remember that I removed the cable sheath and that made it easier to remove the cable and manipulate the lever inside the transmission that the cable connects to because I could pull on the actual cable while underneath the car. I had it up on ramps.

      I assure you patience is a virtue here.

      HAwk

      BTW, Al's photos are wonderful and ever so helpful.


<< < > >>


©Jarrod Stenberg 1997-2022. All material except where indicated.


All participants agree to these terms.

Brickboard.com is not affiliated with nor sponsored by AB Volvo, Volvo Car Corporation, Volvo Cars of North America, Inc. or Ford Motor Company. Brickboard.com is a Volvo owner/enthusiast site, similar to a club, and does not intend to pose as an official Volvo site. The official Volvo site can be found here.