|
|
|
'79 244 DL ~300k miles. Tonight was relatively cold in my area. Above freezing, but enough to require a decent jacket while outside. While driving, I turned the heater on and off a few times. After parking, I noticed steam coming from under my hood. Popped the hood and immediately saw that my brake booster was covered in coolant. It was also spread across other places in the engine bay, but the brake booster seems to have gotten the most direct splash. Coolant level is very low. Fortunately, I always carry basic car/non-car emergency supplies in the trunk, so I filled up the reservoir, and changed plans to let me head straight home. Upon parking, steam again and the reservoir is very low. It was dark when I got home, but based on where the most steam was coming from, I suspect the heater hoses that go into the firewall. I also think my heater core may be going out - past few weeks the driver's side of the windshield fogs when the heater is on. What should I look out for/replace while I am rooting around my heating system? If the heater core is bad, I'll have the dash apart anyway so blower motor seems like an obvious choice. Based on records from PO, it got done in the early 2000s. I'm assuming the intake manifold needs to come off to get to the heater hoses, so intake manifold gasket too. Anything else? Also, anything else it could be? I will get a better look at where the coolant is going once it is light out, but any pointers on what to look at are appreciated.
|
|
|
|
|
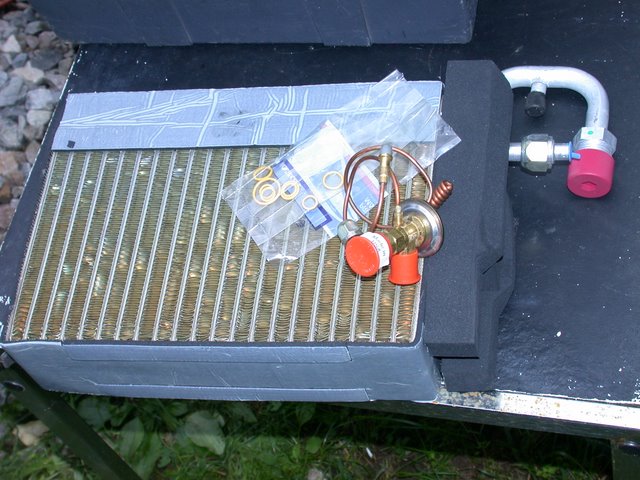
Update for anyone trying to do this repair: I recommend just pulling the intake manifold. You can probably get the lower of the two hoses off without removing it, but with how seized the upper one was I couldn't have gotten it off with the manifold still in place. I took the chance to throw a fresh intake manifold gasket on. Runs great and no more coolant leaks.
|
|

|
|
How did the old intake manifold gasket look? K-jet, I'm told, is very sensitive to minor vacuum leaks.

--
Art Benstein near Baltimore
A man's knowledge can never outweigh his experience.
|
|
|
|
|
Pretty rough. Previous owner never replaced valve cover gasket and oil leaking down from that pretty much saturated it.PITA to get off.
|
|
|
|
|
Some good feedback here, especially from the grey kitty. If evidence of coolant leaks is strictly in the passenger compartment then the heater core is the prime suspect. I think you're lucky in both having a 240 known for long lived heater cores as well has having coolant residue on the booster. Odds are extremely high it's a leak where the heater hoses join the core nipples, either split or improperly clamped. Coolant jetting out from the connection can penetrate through the firewall into the passenger compartment, eventually soaking carpets and fogging the windshield. Check for leaks at the hose connections with a wrapped paper towel to help figure out where the leak may be starting.
--
Dave -still with 940's, prev 740/240/140/120 You'd think I'd have learned by now
|
|
|
|
|
Hi Dave,
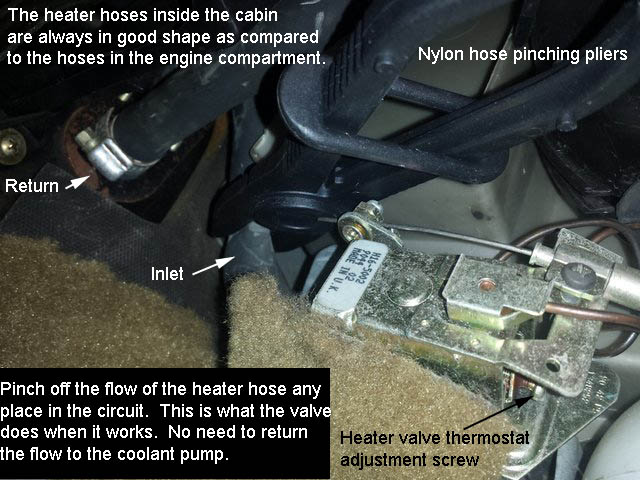
Why couldn’t it be a heater valve leaking?
The originals did go bad by no longer automatically adjusting the temperature once the lever was set.
That stem coming up out of the seat junction does drip onto the carpet.
Doesn’t or wouldn’t the heater core leak into the lower pan beneath it and drain out onto the transmission?
I sure hope so.
Removing the left side cover on the console gives a somewhat easy access to the valve for inspection.
Doing a sniff and feel while looking for antifreeze trails would be my first plan of action.
Phil
|
|
|
|
|
Hi Phil,
The 240 heater valves are on the cabin side of the firewall, driver side, close to the firewall and mildly accessible for inspection with the console side panel removed. The OP said significant steam was coming from under the hood and the booster is getting coated. Also, increased fogging on the driver side windshield, so that is suggestive of a heater core failure or heater valve leak.
It could certainly be multiple problems. My attempt to explain that it could be from a single cause, like where the heater hose goes through the firewall. That could be a stress point as the engine vibrates and if a motor mount was gone could make it worse.
The heater core having been previously replaced leaves open the possibility it was a cheaper aftermarket and may or may not have been installed without nicking or pinching the hoses.
In my own experience the 240 heater valves are more prone to progressively fail providing less and less heat, eventualy perhaps leaking drips that might get to the carpet, but not a catastrophic failure like the later 700/900 series. A paper towel stuffed in around the heater valve would soon determine if it's involved.
BTW The 240 heater valves are the same as in the earlier 140 series. In the 140s, there was a calibration screw on the valve saddle and you could often extend the life of the heater valve through readjustment. The later 240 valves lacked that adjusting screw. Cable readjustment was possible in both styles. I've had both styles and don't recall ever having to replace them in the 16 years I had a 140 and 13 years I had a 240, nor do I recall much comment about it here on the brickboard. The OP's '79 may have either the later or earlier style and is way beyond the longevity I'm familiar with.
--
Dave -still with 940's, prev 740/240/140/120 You'd think I'd have learned by now
|
|
|
|
|
Hi Dave,
Thanks for the nice reply to my questions and as usual it is chocked full of information.
You definitely keep things alive here on the BRICKBOARD.
I never knew that the thermostatic valves went back into the one series either.
I did realize that most of the coolant loss was outside of the cabin. Otherwise the wipers could have located the mess outside and get wiped around.
I guess that’s foolish thinking on my part as the cowling vents bring it all right on in to the insides of the car.
I don’t like the idea of having to replace a heater core so yes I would put towels in there everywhere.
Just think of them as dry eyeballs with green or yellowish witness stains. (:)
Over the years I have collected some heater valves during my salvaging in junkyards.
I too thought there has to be a point to make adjustments in their manufacturing.
I don’t know if they lose gas in the sensing bulb or it slips out of range from wear.
Some of my collections gave me fairly new valves so the plan was to sit down and check them out.
Setup a way to heat the bulb coil and observe the actions.
So far that plan disappeared on to many of my back burners so a box of them just sits.
When a human hand is involved in operating devices there is going to be wear someplace.
That cable is constantly getting slammed back and forth.
Things just break around us creatures. (:-)
The Wagonmeister.com sells a ball valve replacement but it’s plastic and he has had issues when getting it manufactured. He fought to refine his efforts and I guess he still offers them ?
I have two installed and so far it’s working in place of the original.
I have seen cheaper valve than his offerings, made of metal, but haven’t read any reviews.
Tome, a ball valve is all that’s needed as you learn where to slide the cable or adjust a window or blower.
I don’t need a thermostat or those electronic black boxed gremlins to fail, using vacuum lines, to make it all work.
As far as leaking I wanted to study the prospects of making replacement seals. The design is simple enough as there isn’t anything else to fail in the original valve.
The feasibility of doing that was another big idea of mine when I was younger yet.
But I have passed retirement age and have gotten somewhat lazy. (:(
Having summer and winter homes and seven vehicles to keep running is keeping me busy doing maintenance. Yard work, painting and enticing projects just keep a coming.
I just mounted a grain grinder onto a standing bicycle for a sister-in-law.
I biggest lesson learned and just beat myself up with, was removing heavy rust above the pinch weld flats.
In One three inch place it was all the way through.
I’m not a body man by any means but I fixed it by blending the face around the windshield with the satin SEM black trim paint.
It covers the POR15 and the body coming out from under the gasket for a short distance.
The black gaskets facing that outwards just looks a little larger.
The cars paint is in good shape and its a dark metallic gray, so I’m getting away with it. (:-)
Th mobile glass installer was fairly impressed but he say rusts makes all installers run away or they just cover it up on used cars.
I know why as it seemed to take me forever and my labor is cheaper. Caring labor is absolutely hard to find today.
He will be installing a new glass in my 86 wagon with the old trim, of which, I thought couldn’t be done.
I found a good man even if he doesn’t pull it off. He did them about 15 years ago.
Doing your own work is so satisfying in so many ways!
I’m now enjoying one of my paybacks again.
So waxing up a couple cars is the next thing to relax with.
Phil
|
|
|
|
|
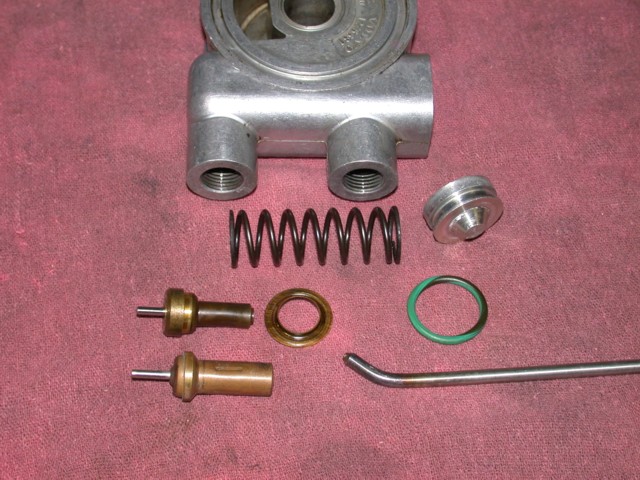
"As far as leaking I wanted to study the prospects of making replacement seals. The design is simple enough as there isn’t anything else to fail in the original valve"
Hi Phil,
As you, I have collected many of those 240 heater valves.
Over the years I have encountered 2 seal failures and about 4 with thermostat that would not work properly, like full open or closed.
I repaired a couple by combining the half that has good thermostat with the part that has good seal.
Before I was testing the seal at 10 psi and the thermostat by dipping the coil in boiling water and watch that little piston action. After it involve removing the C clip between the two sections, use a dremel to grind a little the riveted legs that hold the valve together.
For re-assembly I did delicate tack welds on the legs. There was not enough metal left on these to make secure riveting.
Having two 240 I keep a couple good heater valves on hand ready to install. But with time some thermostat and seals may go wrong even on the shelf so I am not trying to recover them all for now.
Have good day,
Roland
|
|
|
|
|
" I have a collection too, but don't know how to fix the thermostat."
Hi Art,
I can see your point. I read sometime ago that these coil thermostats were filled with wax while other people mention gas filled.
Your picture shows very well the piston actuator. I noticed in testing thermostat coils in hot water that some will respond a lot by pushing the piston out while others will barely push the piston. Showing their end of life I think.
If the coil and piston were filled with wax as an active temperature sensitive media I was thinking that flatening the end of the coil tube on a certain lenth would restore some inner pressure and make the piston move again with heat. For a while ?
I would think thermostat failure is caused by a leak ?
I suppose there is an end for everything but WE 240 owners realy like to push the finish line further ahead. And we succeed a lot. No worry about the center screen not working or lighting up, no critical computer codes that keep us from using the car, just simple problems that keep us thinking and we go on fixing it with the help of the wonderfull people on this site.
Roland
|
|
|
|
|
Hi everyone,
Boy did I open up a subject line about keeping old heater valves lying around to work on.
Guess I’m not so eclectic after all.
Now I wish I hadn’t put off this project and could help more if I had more knowledge or hands on experience.
I will add what I know about thermostat or power head operation of expansion valves used in refrigeration systems. This I learn back in the seventies to get my AA degree in HVAC.
On expansion valves the “power heads” is the diaphragm on top. Capillary tubes are filled with an amount of liquid refrigerant after a vacuum is pulled on the sensing bulb, tubing and diaphragm.
The amount isn’t known but it is filled with the same refrigerant that the expansion valve is to be controlling with in the system.
The diaphragm is working with or against the systems internal operating pressure and spring differentials.
This sets the stroke of opening the valve more or less to prevent flood backs.
The setting involves readings of “superheating” and boiling off liquid to know vapor gases are going back to the compressor.
So the power heads have to be a close approximation range or with pressure/temperature responses for the best accuracy of the evaporators low side where the bulb is located.
Now in the case of mechanical thermostats a pressure “medium” in the sensing bulb has to be selected to change its pressure to operate a device according to range of temperature needing to be controlled.
Freezers, refrigerators, cabins or ovens etc.
In ovens at home, back before electronic sensors, a drop of mercury was put in the sensing bulb as its liquid to vapor expansion pressure is is up in the hundreds of degrees. Well above wax or refrigerants.
I was told it was only drop of mercury and never asked how the teacher knew this.
I have wondered if there could be other gases used to fill the whole space of the unit.
Because, When one or more gases are used in one contained vessel the two gases combine their sums. Dalton’s Law of partial pressure. I have learned to respect physics and it’s science.
So with the heater valve being used to sense heated cabin air flow.
I would not discount a wax or refrigerant or bimetallic actuations.
Wax does seem very plausible as a wax pellet is used in automotive coolant thermostats.
The assembly is very short, immersed and compact for hose connections.
If you cut one open, I bet Art Benstein has, (:-) the wax pellet is packed in there.
Here is proof if he didn’t.
https://en.wikipedia.org/wiki/Wax_thermostatic_element
A special and precise formula wax is discussed along with it’s limited temperature ranges.
Cut open a heater valve assembly you might find nothing because any amount of refrigerant would be instantly gone.
Maybe cut it under a liquid (water) and hope for a breathe of a gas bubble. If not an ooze of a wax.
I have thought that I could replenish the sensor bulb by adding refrigerant to a vacuumed out assembly and using the pinch off method after setting the range close.
I’m sure the factory has a refined technique.
Finally soldering the tube end past the pinch point sealed.
Thats how it’s done on hermetic refrigeration units.
Thermostats and power heads systems can be equal.
This is where of either method of mediums has to allow an adjustment point for variances in charges and mechanical fit up.
The gases or wax has to or will expand and the amount sets the design of the mechanical action or stroke to provide flow through the valve.
The opening and closing stroke points is where we adjust the cable along a cam or linkage of some type.
It’s really simple physics applied but IMHO you can see why electronics changed the scene and to drop the use of Mercury there.
Some very high current relays still use mercury because the mercury stirs and is sealed from oxidizing.
No mechanical contacts to burn away.
As far as the name ”Ranco” I picked that up somewhere in my junkyard finds and it’s a common refrigeration name in the trades or industries.
Apparently a car I picked from had a new source provided by Volvo or aftermarket.
Curiosity led me to this site.
It is now called RobertShaw or were both the same? Only A Limited history on it.
https://www.robertshaw.com/About-Robertshaw/.
The first thermostat started there according to them.
They do automotive still and are reaching into electric vehicles production solutions with motor operated valves. IAC … or Coolant Water Diverter CWD… the automated heating or cooling of cabin or the electric motors. (:)
Before computers there used to be book type catalogs. You know. Pictures and specifications.
The engineers I rubbed elbows with suggested that I check into a certain dumpster ever so often.
They culled catalogs as vendors issued new ones.
I was told designing engineers are only as good as their sources to fit ideas.
Those friends told me to dumpster dive since I was sort of an unpaid “liaison” between machining and prototype work in my formative years.
Reading trash lead to several challenges within R&D projects and then career changes as production trade jobs left to be off shore.
Actually with my overtime I made more money than most engineers so machine tool metalworking was my open door to nice hallways.
If I had been born about thirty years later and of course had richer parents it’s possible that the information coming out of the internet would have made me more of a shaker and moving nerd?
Oh well, the hallways had enough door knobs!
Phil
|
|
|
|
|
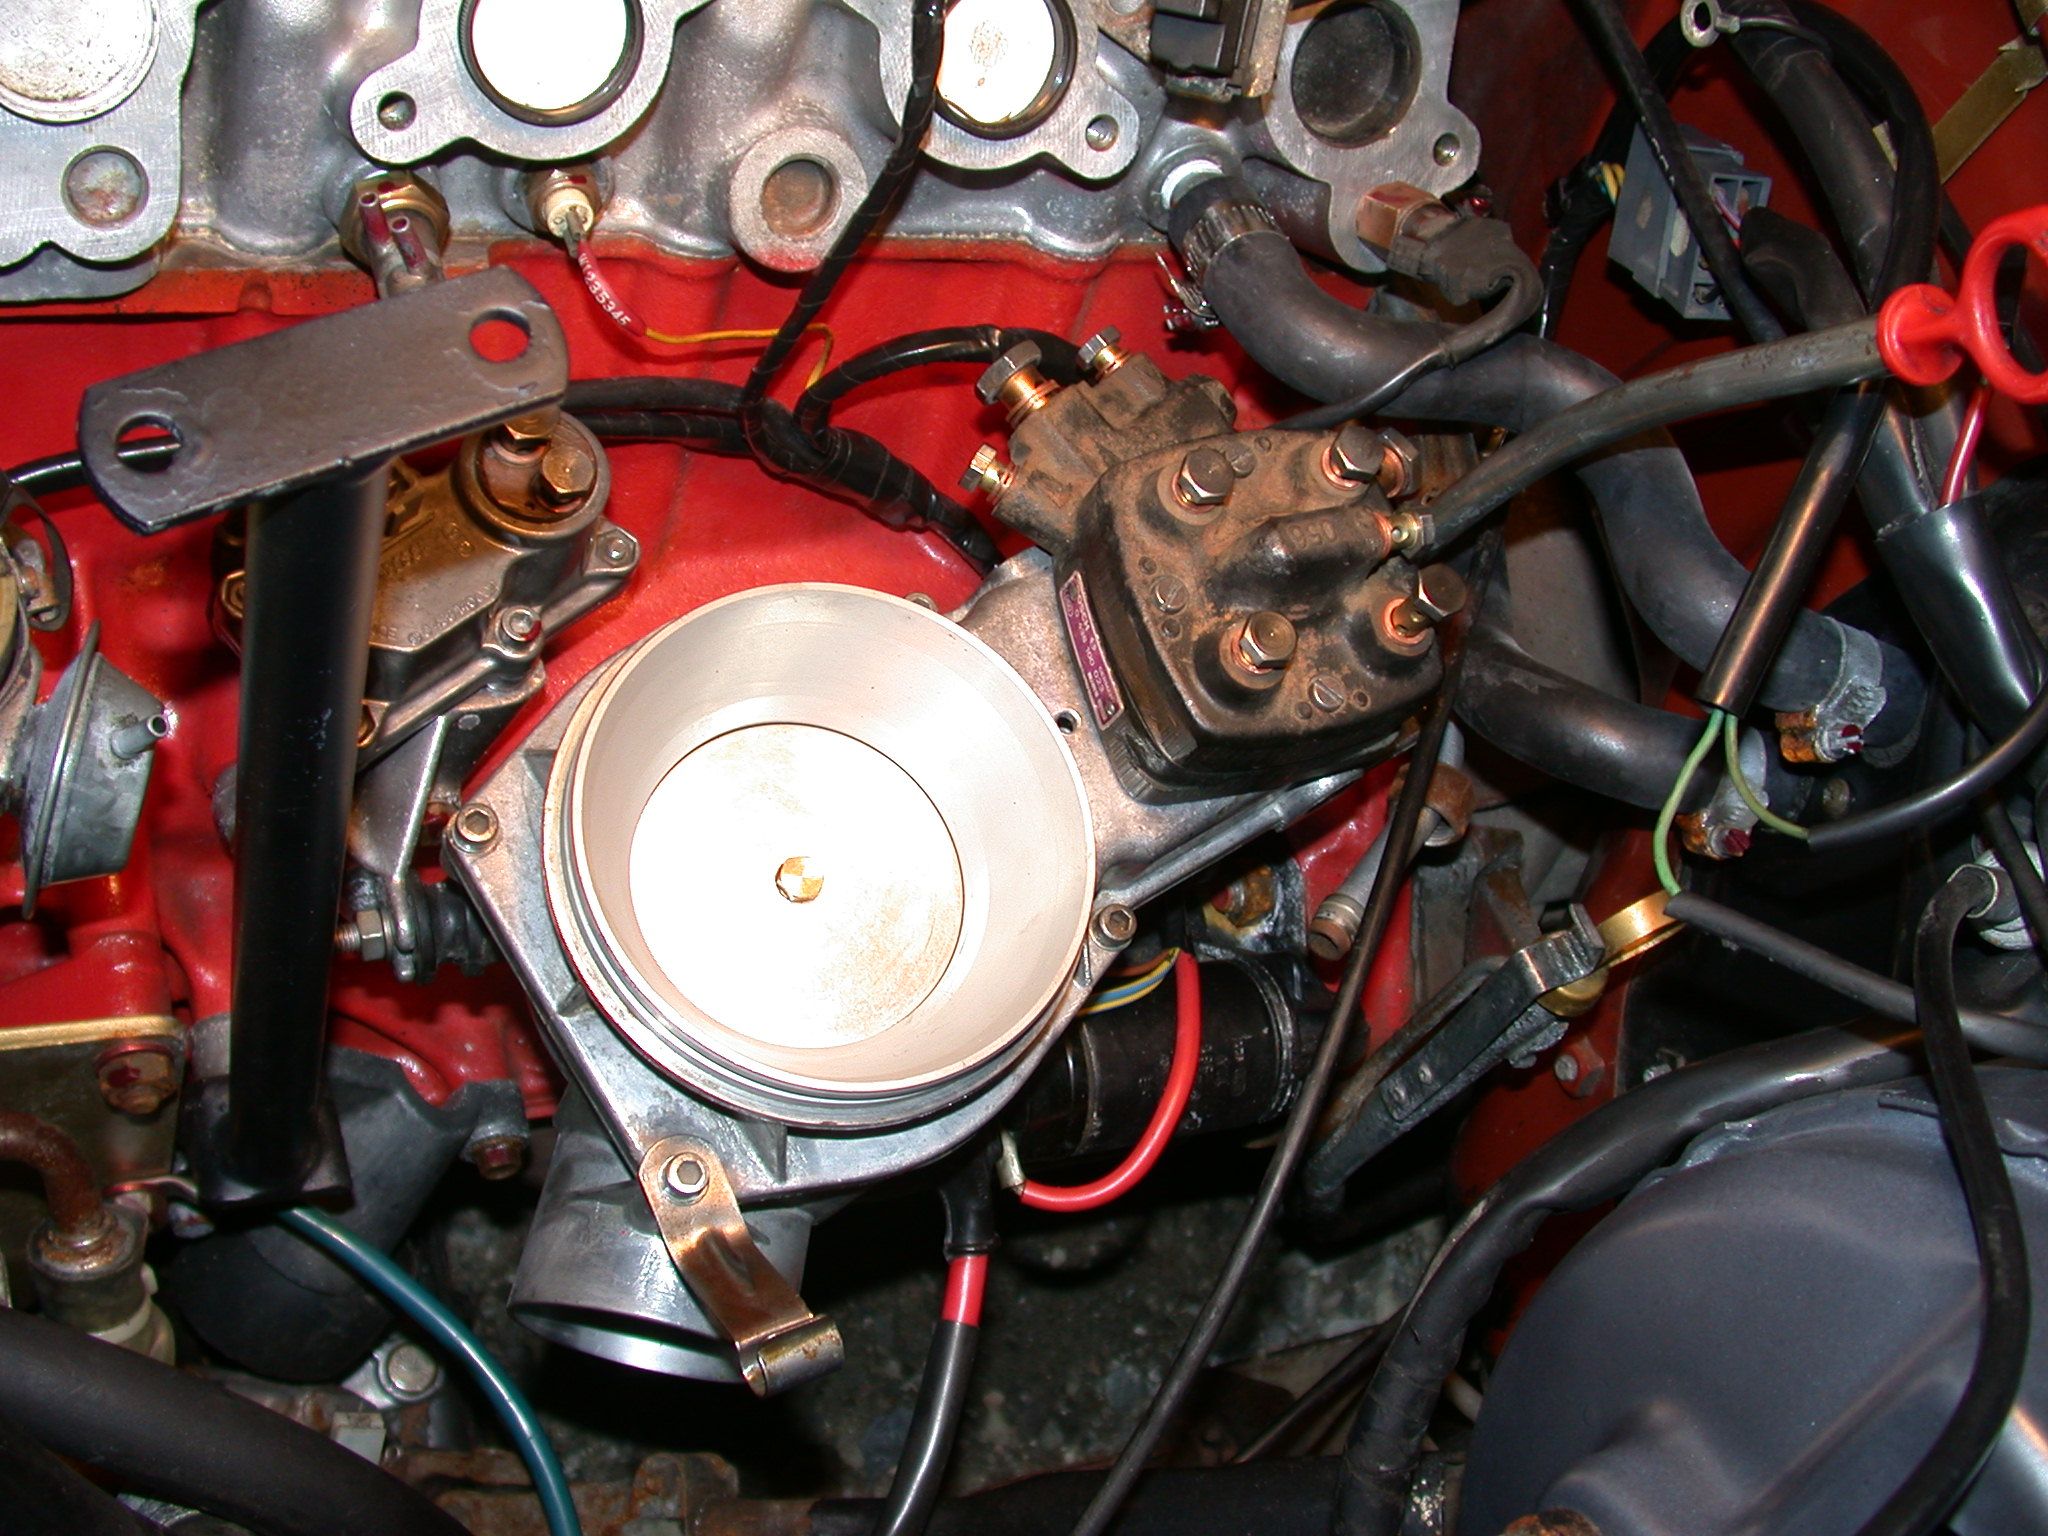
Alright. After adding about 1/2 gallon of distilled water, I idled the engine until it got up to temperature. No noticeable leaks with the heater on, but when I switch it off and rev the engine, I get my very own coolant geyser coming up from under the intake manifold. Looks like that confirms the cracked or loose hose.
|
|
|
|
|
B21 or B23 engine ?? I don't remember the engine but Sounds like to me that hose under the intake manifold is shot at least on a B23. Also there is another short another hose off the back of the head. Here's a link to show you what you need.
https://www.fcpeuro.com/products/volvo-heater-hose-upgrade-kit-do88-performance-kit64s
|
|
|
|
|
B21F. Looks like you were right. Did some poking around and confirmed that it was one of the hoses under the intake manifold. Got new ones ordered. Should be up and running in a few days.
|
|
|
|
|
Good, I'm glad you located this problem. It's easier to just cut off the old hoses after determining that you received the correct hoses in the mail. After replacing these 2 hoses ...I would still do some investigation in the interior of the 242 for coolant leaking in there since it's a old car.
Duck
|
|
|
|
|
Thank you for the detail. I got the car relatively recently, so working through everything not taken care of by the PO has been quite the project. Radiator and hoses at the front are all new - old metal fan punched a hole when the bolt sheared a few months ago. As for region, I am in the pacific northwest. I know the car was purchased in Alaska, but shows remarkably little rust. Only significant spot is in the left "buttcheek." It has little chips in the paint that I need to take care of, but mechanical issues have taken priority. I'll get those photos uploaded.
|
|
|
|
|
The intake manifold does not get removed to change the heater hoses. You can access the clamp through the split in the manifold runners and you can reach the hose from underneath to pull it off the outlet. - Dave
|
|
|
|
|
My son-in-law impressed me a few years back by changing that hose on his wife's 91 without disturbing the manifold.
I just checked to see if I left the clamp accessible from above on my '79. Nope. Because I had the manifold off, I did not take care to get the clamp in the right position to reach it through the runners.
Old picture:

--
Art Benstein near Baltimore
GREAT TRUTHS THAT LITTLE CHILDREN HAVE LEARNED:
1) No matter how hard you try, you can't baptize cats.
|
|
|
|
|