posted by
someone claiming to be Mike
on
Tue Dec 14 16:17 CST 2021 [ RELATED]
|
|
Have a 93 240 - Automatic and the lines are in bad shape (corrosion) so need to be replaced. Also will do the 2 elbow connections at the tranny - weeping and rusty. Questions:
Is the transmission body steel or aluminum - wondering if the threads are easy to strip or thread sealant advised on elbows - but I think they have O-Rings.
Also, how much fluid will leak out when the elbows are disconnected? Maybe should have some on hand.
Am going to do it in conjunction with a new rad so all connections will be fresh.
Recently replaced the O/D solenoid with the IPD cover - works great
Thanks to those that have done this.
|
|
-
|
|
|
I'm in the middle of replacing the lower line on my 93. The lower at the rad, is the front line at the trans.
Mine had a major leak at the trans. The elbow is not the typical brass fitting that I assumed. It's steel and does have an O-ring at the trans. It is three separate pieces formed together as 1 unit. It's a one of a kind, don't break it.
If your leak is at the trans, first use a 17mm wrench on the nut that is directly against the trans case. That will seal the O-ring to the trans housing.
Both lines are available from FCP Euro for $78.99 each. There is debate on line about the flare connections. Some say use teflon tape, others say no tape, but oil the threads. The key is if you use tape make sure it does not cover the mating surfaces.
--
Bruce S. near D.C.
|
|
-
posted by
someone claiming to be Mike
on
Sat Dec 18 03:41 CST 2021 [ RELATED]
|
|
I just got new lines from Volvo Toronto - $96 - and have a good used set of elbows coming just in case.
Another concern is the condition of the pan itself - its a 93 240. Some corrosion on pan but has a lot of oil/undercoating on it - so hard to tell if its brittle.
Any sure way to tell if its on its way out - knocking on it and listening to it for weak spots?
Be horrible to replace all the lines and then have the pan fail. I have a source on a used one with the dip stick attached for easier installation - but a pain to ship.
Thanks
|
|
-
|
|
|
I have done it (twice) but it has been awhile, so from what I remember...
I bent my own replacements. You need to find a supply store that carries 5/16" steel lines. The originals are 8mm but they interchange in this application.
Once the lines have rusted enough that they need replaced the fittings at the transmission will be rusted to the lines. Cut the lines at the fittings. You will need to reuse the fittings at the transmission and the radiator. You may have to drill out the fittings that were rusted solid to the lines at the transmission.
I checked my maintenance records and it took one 12" and 2 60" pieces of 5/16" line. You will need a fitting to connect one of the 60" to the 12" tube. They will already have male fitting on the ends. The 12" piece should be closer to the transmission rather than near the radiator.
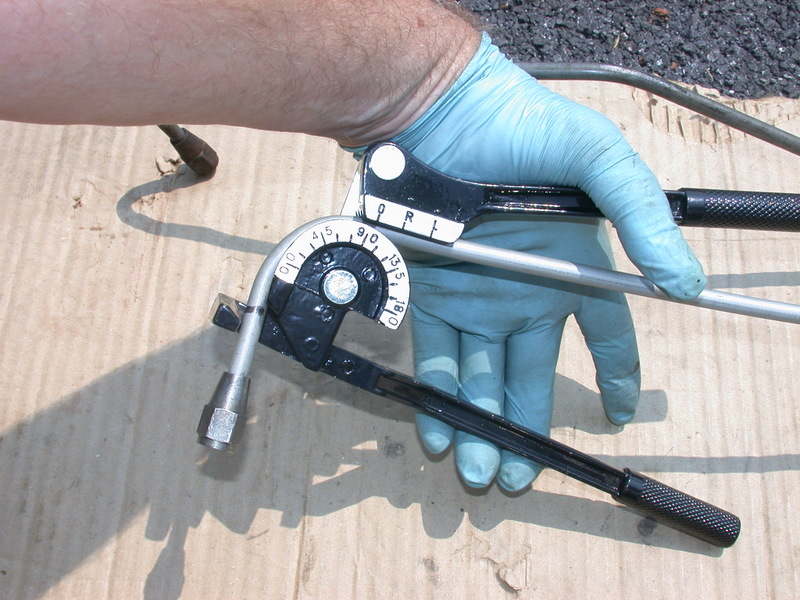
Once you have the old lines off you can bend the new lines to the same configuration (more or less). Bending the tubing is a bit tricky. You will need a tool similar to this one shown on Northern Tool's site:
https://www.northerntool.com/shop/tools/product_200396151_200396151
It is very easy to collapse the tubing as you try to bend it. Especially so with the bends that approach 90 degrees. It might be best to clamp the tool in a vice. With the tool in a vice you can concentrate on keeping the tubing tight against the tool with one hand while you apply the force to bend it with the other hand. If the tubing is allowed to come away from the radius of the tool the tubing will collapse.
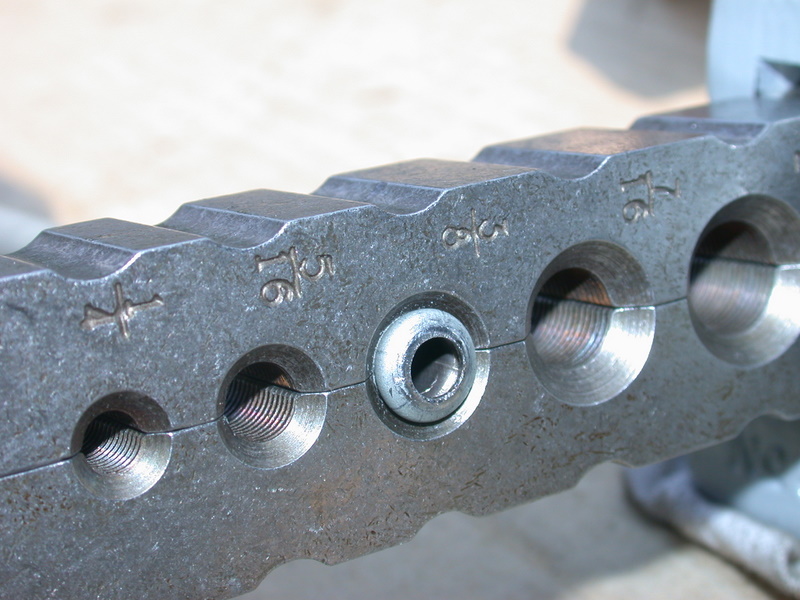
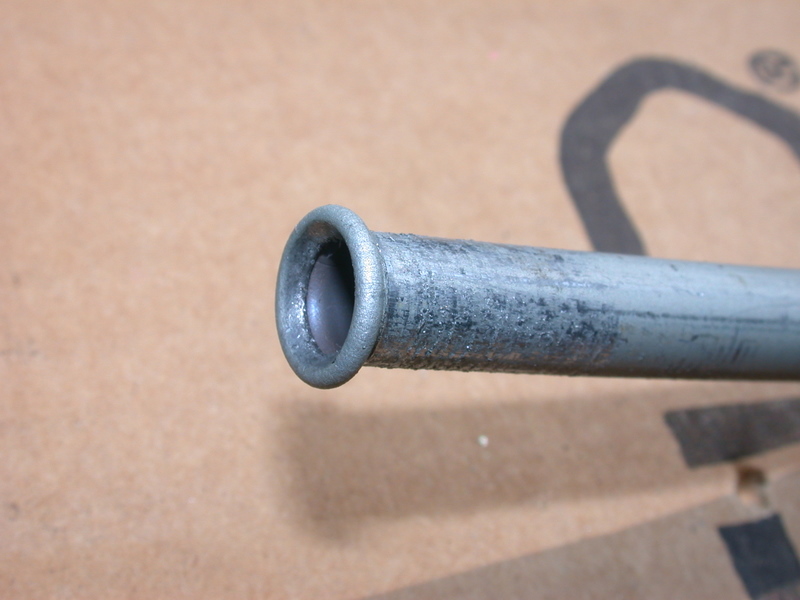
Cut the supplied fittings off of the ends of your newly bent lines. Replace them with the fittings off of your old lines and flair the ends. Match up the new flare with the flare size at the radiator fittings.
I was always able to just leave the 90 degree fittings in place at the transmission. You suggested yours were rusted and leaking. Perhaps you will find that it is the line that is leaking in the area rather than the fitting on the transmission.
I would attach the lines at the transmission first and then the ones at the radiator. You will probably need to do some final flexing/bending of the entire length of the lines to get a good alignment with the fittings on the radiator.
--
Any twenty minute job is just a broken bolt away from a three day ordeal
|
|
-
-
|
|
|
Hi Art!
I see we are watching yet another thread talking about automatic transmission fluid lines.
Sharing the love we are!
I finally got around to putting in my fitting with a Side Port and Flare Cap.
Very neatly on the top line to the radiator cooler fitting.
Shoved the line backwards just over an inch by hand. Lots of length from the bottom up!
I can now draw off fluid, whenever I want, instead of dropping the pan.
The fluid can be exchanged along with the engine oil intervals.
Actually, Easier than doing the engine oil!
I added a female flare fitting and 1/4” ball valve with the tubing like you suggested.
So the fluid goes right into a jug for recycling.
No mess!
The clear tubing let’s me see the change in color progress.
I did one gallon, a quart at a time, as I was afraid to suck air from the sump?
I don’t know much about automatics running the sumps too low?
But now I have done it once, I’m thinking, maybe two or three can probably come out in one shot. Just watch bubbles and just turn off the valve!
I never shut the engine down, just let it all circulate.
It shifted more smoothly right away.
Not that it was that bad @30K, but now it’s going to be a perpetual thing!
This is going to make my manual shifters cars very jealous! (:-)
Yes, it can happen they are man made creatures with each their own individual characteristics! (:-)
If this thread owner wants to install a whole new line he might want these same features?
I came up with a tee fitting that looks like this:
https://www.discounthydraulichose.com/6602-05-05-05.html
Optional fitting to that ball valve was this:
https://www.surpluscenter.com/Hydraulics/Hydraulic-Adapters-Fittings/JIC-to-NPT/JIC-Female-Swivel-to-NPT-Male---Straight/JIC-5-Female-Swivel-x-1-4-NPT-Male-Straight-6505-05-04-Adapter-9-6505-5-4.axd
I didn’t buy any from them above, but from a local industrial contractor, that sell and repairs pressure washers.
This was an old time man cave of a place I found! A niche of a joint!
Crowded to the hilt with stuff but with up to date prices, you betcha! (:(
Last years small business handouts sure stocked them up ahead of inflation!
Talking about back room dealings for survival, it’s happening in parts houses!
I paid more for it than what was listed for those above!
You start looking at minimum orders and shipping from these industrial places, you might as well be ready to grab the belt holding up your pants!
Don’t even think about Stainless Steel. Unbelievable differences!
Your right about McMaster-Carr even 12 years ago!
I looked at hand flare tools tonight and their not taking any prisoners with other businesses either!
Chain reactions!
Our cars are worth ever so much more now for simplicity!
My deal was directly into my hands from some cabinet drawers.
Altogether, I spent $38 with taxes but hey, it was an adventurous birthday present to myself!
Sort of fun, tracking down the right place to get FITTED up! (:-)
Phil
|
|
-

|
|
"Our cars are worth ever so much more now for simplicity!"
Don't I know it. Try to replace one.
Hey, this might be stretching the topic a bit, but can you explain the term "swivel" as it relates to hydraulic fittings? Can these swivel joints actually twist under fluid pressure, or do they lock down after you install and tighten them?
Have a look at the drawing and specs on that Surplus Center straight swivel. Don't they have the End1 and End2 mixed up?
--
Art Benstein near Baltimore
All I wanna do is have some fun
Until the sun comes up
Over Santa Monica Boulevard
Cheryl Crow
|
|
-
posted by
someone claiming to be Mike
on
Fri Dec 17 14:16 CST 2021 [ RELATED]
|
|
I am thinking of replacing the trans oil pan. Am told where the dip stick threads in can be difficult to remove. Have a source on a used one with dip stick attached - is that the way to go?
Thanks
|
|
-
|
|
|
Hi Mike,
Sounds like you've done your research pretty well. That tubing nut is easily distorted by an open-end wrench, and even a line wrench, the proper tool, can struggle. Yes, if your pan replacement doesn't depend on removing the dipstick tube on the old one, you'll be ahead of the game. The starter bolts are a bear to break loose, but this tube nut can result in damage.
--
Art Benstein near Baltimore
“Never underestimate the difficulty of changing false beliefs by facts.” --- Henry Rosovsky
|
|
-
|
|
|
Hi Art,
Cannot say we are off topic when all we do is an education in progress!
Yes, the illustration is labeled backwards according to the specification sheet below it.
Your alertness is what has kept you smarter than the average bear in the woods!
If you thought that was bad, you should see this, that I didn’t send out.
We got to be careful about what we find on the Internet.
https://www.discounthydraulichose.com/6602-05-05-05.html
I kept looking at this thing saying, yes it’s the right configuration, but those are looking like left hand threads on the body to me. I couldn’t stop blinking at the darn thing!
I sincerely doubt they make left hand hydraulic fittings and if they did, they should put a notch cut ring around the corners of the wrench flats like on acetylene and propane gas fittings.
Yes the swivel has to “lock down” on the flare to seal to work.
The term swivel pertains to allowing the fittings body to rotate and locate within 360 degrees of orientation.
It’s just like a hose end fitting that allows you to NOT keep rotating the hose around and around or the unit it’s being connected too.
I put my port out horizontally but even more upward might be slightly better, if you want a drop or two to drain out of the flare cap or in my case the area between the fitting and the ball valve.
You can buy a plain flare fitting with a barbed hose end and not have a ball valve.
But you have to be ready to go shut the engine down to stop the flow.
The female portion allows some extra wiggle for easier alignment to the threads but you should always get your tubing a straight in alignment, as you can, to any connecting fitting.
These are angled fittings, not ball joint fittings. (:-)
Besides these lines are connected to a plastic radiator tank.
Some more experienced or hard knocks education here!
There was one caveat about buying male flare fittings from that bulk storage drawer. Those parts can get bumped or thrown back together.
On my side port, that I cap off, had a very slight leak of an occasional drop, over a week was an ounce, that I had to fix.
I couldn’t tighten and loosen it enough times or see anything wrong!
All surfaces have to be smooth and clean so I even buffed the flare cap with a Dremel sized brass wire brush for good measure. Not good enough as that fluid is thin!
Since I no longer have a high need for a tube of Dykem Hi-Spot or Prussian Blue in my tool box.
I grabbed a Sharpie pen and wet the inside of my flare cap.
I worked the cap on/off to show me low spots on my male flare end.
Actually it’s a high spot that creates a non contact low spot.
I used a fine grade of India stone and buffed off the high area to get a track all the way around.
Just a couple minutes of human intervention corrected the randomness or chaos in a quantitative manner.
Yep, I can never figure out which causes which, or is it the same, as all things are mass produced!
Just like in the illustration or photo, it’s LIFE everywhere!
Phil
|
|
-
|
|
|
>I tried to document the bends in a 240 (89) replacement set in the hope it would help me next time
As I mentioned I did it twice but each time my thoughts were "I sure hope I don't have to do this again!"
That is a very nice bending tool. My first effort with a tool like the one I posted the link to resulted in a collapsed tube. After a cold beer and a significant time lapse I learned the lesson.
Is it perhaps safe to assume these lines are no longer available? It might make sense for someone with the needed skills to offer these, but my guess would be shipping would be a nightmare. Imagine the potential for damage/destruction in shipping.
--
Any twenty minute job is just a broken bolt away from a three day ordeal
|
|
-
-
|
|
|
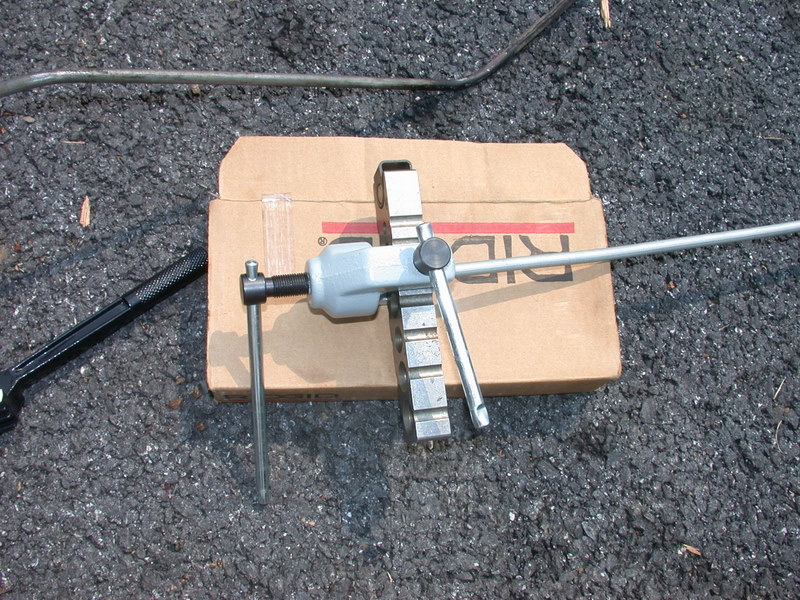
I inherited a flairing tool but it can only do a single flair. It works just fine on the transmission cooling lines because of the low pressure.
I would not have guessed that your tubing bender was a Harbor Freight tool. What a bargain! I probably paid that much for the cheapo device I got at the auto supply store.
--
Any twenty minute job is just a broken bolt away from a three day ordeal
|
|
-
posted by
someone claiming to be Mike
on
Thu Dec 16 04:39 CST 2021 [ RELATED]
|
|
Thanks for the help.
How do you tell if the pan needs replacement - mine appears rusty/corrosion - but has a lot of tranny fluid/undercoating on it too - so its hard to tell. It may just look nasty with all that gunk on it.
|
|
|
|
|