|
|
|
I had a look at the FAQs and they are helpful. But. . . My driver's side window will go up and down but I have to get into a real dance to make it happen, particularly when I want it to go up. I press hard, press hard forward, press hard backward and sooner or later when it has decided to move, it does. It is obvious the switch contacts are misbehaving.
Can I take one of the rear window switches and exchange it with the driver's side switch? I read in the FAQ that cleaning the contacts, etc., does not last very long. And I know that the rear circuits probably are only used on rare occasions. If I could just exchange a switch. . .but I expect the driver's side switch will have differences to the other switches.
Just thought I would ask.
|
|
|
|
|
The only difference between the Driver's switch and the left rear door switch (a good substitute as you can still open that window from the drivers seat)
Is that the 4 switches in the driver's cluster each have keys that only allow them to be located in the correct position.
I just cut the key off the rear door switch to install it in the cluster.
When I rebuilt my window switches, I turned the contact strip around because the down contact has a less work to do over the years than the up contact.
When you refinish the contacts, file them to the correct contour and finish them off with a fine file and a burnishing tool. The shape is important, kind of a flattened hemisphere.
The burnishing tool is made to polish contacts and can be found at a good tool store or an electronics store. Mechanics used to use them on contact points as old cars needed their points filed several times a year.
I learned this process in the Army at a 5th echelon shop - we fixed EVERYTHING.
|
|
|
|
|
Thanks very much for your input James. I will make decisions about whether to use one of the other switches once I have it apart.
One small question. What kind of burnisher tool were you using. I looked online and got a lot of responses, ranging from a simple cheap one at Lee Valley Tools to various electronic burnishers that were more expensive. I would like to get one that could perform the function you laid out.
muskox37
aka Bob
|
|
|
|
|
I purchased my burnishing tool at Sears when I was in my teens, about 55 years ago.
It was an inexpensive one, it was just a strip of metal with a slip on plastic handle.
The metal had a grainy look to it, but you could not feel any grit to it.
My best friend's dad told me how to burnish ignition points to make them very smooth.
A rough contact does not make as good electrical connection as a rough one.
|
|
|
|
|
It is well worth trying to clean problem switches and it's not that hard to do once you’ve got the switch out. Just make sure to keep the switch facing up as you lift off the switch cap after urging the sides of the caps off the side pins so you don’t lose the little parts inside (two pins with springs behind them set into the cap and two wee copper contact strips lying flat in their slots in the bottom). Upwards facing switches more easily collect dirt and can get quite grungy in the bottom where the tiny rocker contact strips live. Although likely not overly critical, note which way up the contact strips face -you can tell from the wear areas. Once you’ve got it apart and cleaned up with something like contact cleaner or isopropanol, it should be reasonably obvious how the spring loaded pins cause the contact strips to rock. I usually add a wee bit of dielectric grease (silicone ignition lubricant) to reduce wear, as was seemingly originally present, which also helps hold the parts during reassembly, but at the risk of it becoming a future dirt magnet.
The contacts can also get a bit pitted, especially the more frequently used driver window, so you can try smoothing that out a bit with whatever little file or bit of emery cloth you can get down in there.
Note in the FAQ that you can use a rear door switch in the driver switch pod, but you will likely need to use a jumper wire between pins 3 and 5 as the switches are usually (but not necessarily) slightly different internally as noted. You can determine if that’s going to be needed using a meter to see if the switch is already jumpered internally. The rear switches are also not illuminated like the fronts, but that is likely of little concern.
If you can do a half-baked decent job of cleaning up and restoring functionality of the driver window switch, consider switching it with a less used front passenger door switch that is also illuminated.
--
Dave -still with 940's, prev 740/240/140/120 You'd think I'd have learned by now
|
|
|
|
|
I have the top of the window operating switch removed now. From the bottom they all look identical. It looks like I could take any one of them and switch them around. I would however like to keep the original arrangement if at all possible, i.e., I would rather not have the rear window switch thumb knob working as the front knob.
I will see if I can separate the black thumb physical knob from its white electrical operating mechanism.
I will give the driver's side mechanism a good clean regardless.
|
|
|
|
|
Yes, the four window switches in the driver door switch pod use the same connector and are electrically identical, and all will interchange, but do note that the two forward switches are internally illuminated through the little white window image in the cap (which is not connected to the dash lighting, but rather illuminates whenever the windows have power with the ignition switch in KP-II). That's why I suggest simply switching the identical driver and less worn front passenger switch after you've got the driver switch cleaned up and working again. I don't recall the 740s having illuminated front row switches, just the 940s, but they are otherwise identical power window systems.
To remove the caps you need to spread them open just enough to release them from the side studs on the switch body. No need to pry, just push in a small slot screwdriver blade between the cap and the side of the switch to release it. With two screwdrivers inserted, one on each side, the cap lifts straight up. Remember my caution, keep the switch upright as you carefully lift the cap off so the little parts inside don't fly all over and get lost and as long as you keep the switch body still you'll also be able to see how it's assembled with contact strips in slots at the bottom. It's not at all complicated, as long as you've got all the bits I'm sure you can figure it out. The plastic isn't overly brittle, but do try to be careful. I've yet to break a cap.
I'll mention again what I tried to say in the FAQ article for the future reference of others who may find this thread as this is useful to know when needing to source a used switch from a yard. You can use a window switch from any of the other doors at the driver door (to replace any of the four switches), but you will need to jumper pins 3 and 5 to get it to work at the driver door. You cannot use a driver door pod switch at any of the other doors. The driver door pod switches have an internal jumper between pin positions 3 and 5 (you can actually see the bridge through the white plastic, there is actually no pin 3 sticking out of the switches, it's one of the blank studs). Although all the power window switches are similar and use the same connector, only the switches at the driver door have that bridge instead of a pin 3. The other switches have an actual pin 3 that's separated electrically from pin 5. To use a switch from another door in the driver door switch pod, you simply need to externally jumper pin 5 (the black wire) to pin 3. There is normally no corresponding wire in the driver door connectors, so if needed you can try soldering a wire directly onto pin 3 and feed it through the hole. Why Volvo didn't just use the same switch everywhere and do the needed jumpering in the wiring harness connector at the driver door is totally beyond me.
If you were really gung-ho, you'd clean up all the switches on the driver door pod now that you've got them accessible, but for a first effort maybe just do the driver window switch for now.
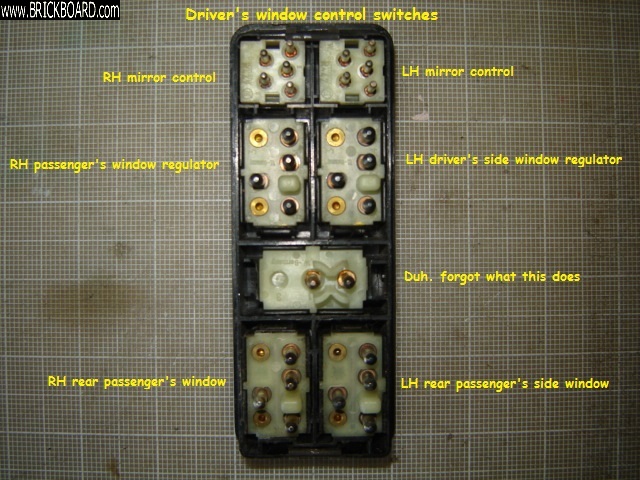
The "Duh" switch in your pic is the rear window lockout switch, otherwise known as the rear window childproof safety switch. I'm sure there have been people who figured their rear power windows were broken if they didn't know about that switch as it's easy to accidentally depress it.
--
Dave -still with 940's, prev 740/240/140/120 You'd think I'd have learned by now
|
|
|
|
|
I have a bit of 1200 bit emery paper around. I was thinking I could use that to burnish the points. What do you think?
|
|
|
|
|
Having a burnishing tool or a suitable Dremel accessory would of course be ideal, but failing that I'll often resort to whatever I've got handy that will fit down in there, everything from emery or sandpaper on the end of a screwdriver to scraping with the end of a small hobby or ignition file. It's not like these are the two mating contacts in distributor points with ignition high voltage arcing across every second the engine is running. Polishing it all nice and flat is all well and good, but just getting the carbon trace and oxidation off the contacts and smoothing out the high points of the pitting will be a major improvement.
--
Dave -still with 940's, prev 740/240/140/120 You'd think I'd have learned by now
|
|
|
|
|
It took me a little while to figure out that the ball bearings rest on top of the contacts and not underneath them and then when I got everything back together the culprit switch continued to refuse to raise the window so I took it out again and polished the contact with my wife's sandpaper nail file this time and now everything is good. I have switched the driver's side switch over to the passenger's side and it is working to move the window on that side and all other switches are now working. One more snag gone!
I got my new plastic stapler tool in yesterday so I will spend a little time with the 240 strengthening the plastic pan that fits under the engine.
Then I will have a go at the locking mechanism in the front door. Never finished with this car. But I do enjoy the journeys.
|
|
|
|
|
Which plastic stapler did you get? Post back with how good a job you think it does on the belly pan as I've got a couple in mildly sad shape.
Glad you finally got your window switches figured out and fixed.
Speaking of switches, one of my 940 wagons must have been following this thread and thinking it's being ignored as I've been extrememly busy on other matters, also abusing it by making it haul numerous trailer loads of boulders, dirt and gravel up over the Malahat, rather over the rated load limit in some cases (the overload coils and ipd sway bars help). I just discovered the backup lights are only working when the shift lever is feathered at just the right angle. Obviously needs the PNP switch bust open and cleaned, a fun area to work on as you well know. Can't remember if I've already done my trick of replacing the push nuts on the plastic studs with acorn nuts -would save me a fair few minutes work and frustration. I thought giving it a long overdue car wash and topping up the tire pressure last weekend would appease it, but apparently not. Usually it just tries to beg for my attention with the Service light, so I imagine that's next.
--
Dave -still with 940's, prev 740/240/140/120 You'd think I'd have learned by now
|
|
|
|
|
It seems that your cars have personalities somewhat similar to mine. My cars love to snag up immediately after a repair just to show me that I am not winning this game.
Anyways, I used the stapler once more on the grey plastic door pocket that runs along the bottom of the door. Like many I have seen, including the passenger side door panel on this car, it was seriously cracked. I bought a used one from Chapman's for the passenger side but I thought I would try to repair this one using the stapler.
Like with the belly pan it did manage to 'sew up' the crack and it does seem to have don the job. BUT this plastic is much thinner than the belly pan version and I ran the staple right through the plastic and created a couple of new holes as a result. I also managed to make it bulge on one of my efforts. And this is all visible stuff.
So the result is mixed. The panel is stronger and the crack is not going any where now. But the crack is still visible and there is the additional small holes and bulges caused by my two bungled efforts.
So I am going to cover the whole thing with some extra leather I had left over from another project and I am in the process of doing that now. I hope it will look half decent when I am finished with it.
|
|
|
|
|
I bought one from Walmart---a very irregular purchase for me because I usually avoid the place like the plague. It is, of course, a Chinese version and it came relatively cheaply, about forty bucks, to my mail box.
I used it yesterday to mend the worst breakaway area, one of the bolt holes was splitting along several cracks and the central bolt area was pulling away from the rest of the plastic.
I had thought that the staples were driven through and then stapled on the other side but I was wrong on that assumption. They are kind of 'branded' onto the plastic and pushed down into it and this is where the connection happens.
I was able to do this and I inserted four staples in and around the broken bolt hole. I then cut them off with some side cutters and this proved to be hazardous because the broken off pieces came flying up at me at a good speed. I used safety glasses to do the job. Then there were sharp ends left behind that I had to file down. I used a file and a Dremel grinder to eliminate the sharp ends. I do not want to cut a finger the next time I have to take this guy out.
It seems to be solid but only use will prove whether the fix will last long. I am going to staple a number of other cracks tomorrow to finish the job. I will get a couple of pictures when it is finished.
Would I recommend the tool? Not absolutely sure. It does not have side holes to allow for ninety degree stapling like some of the better tools and I was surprised at how wide the staples were to the width of the tool openings. But maybe they are all that way. It did heat the staple up and I was able to push them into the plastic and i did not have to worry about finish because this part is never seen by anybody but folks like thee and me. A "smoothing" tool came with the kit and I used it to push some of the plastic over the visible staples and hopefully to strengthen the bond between the plastic and the staple.
Will get back with pictures next time.
And oh, the luxury of opening and closing windows!
Bob
|
|
|
|
|
I cleaned up the white plastic part as much as I can using a Jobmate clone of a Dremel and a burnishing bit. It did melt a bit of the plastic but I caught the damage in time. Even at 'slow' speed this thing runs very fast. I could not get to the contact near the lightbulb so I resorted to a toothpick and a bit of the emery paper.
I will clean the two 'rocker' contacts today using the Jobmate and I am considering a reversal of the contacts. They seem to be identical and could be reversed and I suspect there is less wear in the contacts that were not heavily sooted.
I don't know what I would do with myself these days if I did not have an amusing Volvo puzzle to keep me occupied.
But the lawn is not mowed and the dishes are piling up in the sink.
|
|
|
|
|
Failed to show the image. Keep my fingers crossed it will work this time.
|
|
|
|
|
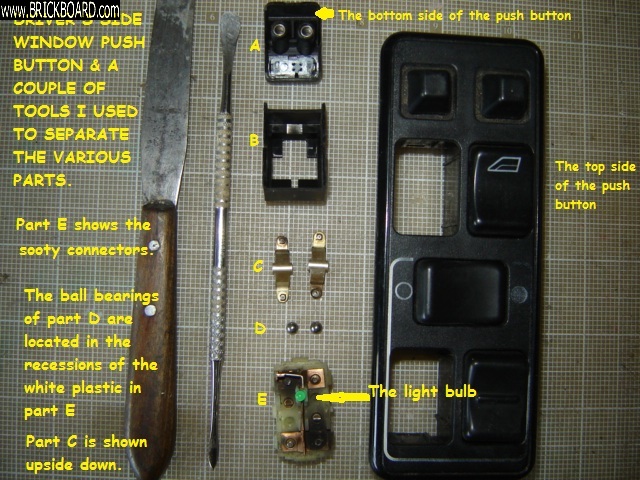
Here I am showing the sooty contacts of the driver's window control button with the switch pulled completely apart. I plan to clean up the rocker arms and their contacts on Part E and then I will do a similar cleanup for the other switches.
This switch would work but only after a lot of pushing in various directions.
|
|
|
|
|
Hi Dave,
I haven't yet separated the last white pin part from its holding black part. Looking forward to this next adventure in Volvo repair. I need to get some kind of a burnisher to clean the contacts properly.
Will keep you in the loop as I delve into the switch even further. Have to say I am enjoying the journey. So far. Haven't lost any ball bearings or springs so far.
Bob
|
|
|
|
|
I thought I might be able to short circuit some of the general messing about by simply switching the LH driver's switch with the LH passenger switch and I was very careful not to turn the driver's switch over when I separated the physical black thumb switch from the white internal wiring part.
But then I knocked it as I was trying to get the rear passenger switch together and the contacts and ball bearings are now cockeyed for both switches.
Just as well now that I have read your latest dissertation and come to the conclusion that I should clean up all of the switches and do a real job on them. Given the essential difference between the driver's master switch and the others my cheap fix would not have worked anyways.
I will now get busy trying to clean up and polish contacts for all of the window switches. I will reread your initial instructions and try to follow them to the conclusion.
Thanks once again Dave.
|
|
|
|
|
Unless you broke plastic or lost a bit, with a little more patience you should be able to try again and get the switch back together with the ball bearings, contacts and springs all in place. I'm trying to remember if I used a trick, like using dieletric grease to help hold things in place while putting the cap back on and making sure everything is vertical. I always do this on the work bench with the switch clamped in a vise, never in the car. I've also been editing and adding to my last post, so maybe go back and re-read it to make sure you've caught all my thinking
--
Dave -still with 940's, prev 740/240/140/120 You'd think I'd have learned by now
|
|
|
|
|
Hello Dave,
Thanks once again for your valuable advice. I will keep you up to date as I progress through the fix. I can now report that the big three snags, i.e., the transmission indicator light, the high mount brake light, and the horn, are all now functioning properly, thanks in no small degree to your information.
The horn was fairly easy on me. Works fine, pressing either side of the steering wheel. I probably spent a couple of hours getting it installed and wired in. Just hope my crummy soldering doesn't start to act up.
Bob
|
|
|
|
|
Yes, they are interchangeable. I have done this on my 93 940 turbo wagon.
|
|
|
|
|

