|
|
|
I have removed the transmission cover on this 1995 Volvo to get at the parking brake adjuster. No problem with the adjusting. The brake is now operating.
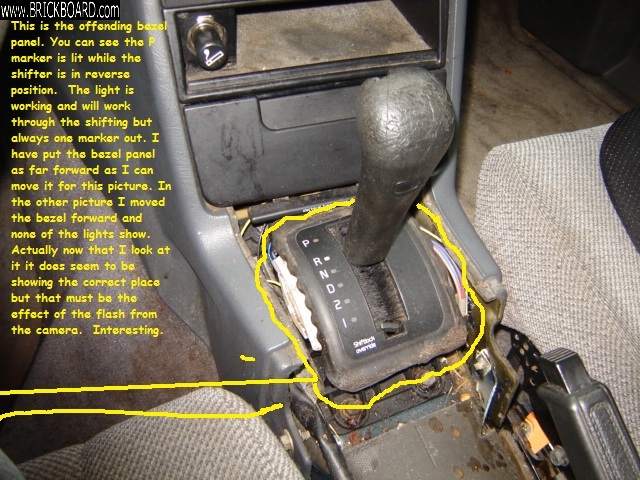
But I have had this car for a number of years now and it has always misread the place the shifter is supposed to be in. This is the surround that the shifter plunges into.
The indicator shows P,R,N,D,2,1. Below is how it lights up:
PARK no light
REVERSE P is lit
NEUTRAL R
DRIVE N
2 D
1 2
I can get a picture up but I thought while I have the cover off I would throw out the question first. The small cover panel beneath the shift lever is loose and I can move it about a quarter of an inch back and forth but even with this I cannot get a proper reading of the appropriate gear setting.
Not quite sure what holds this small panel in place and given ancient plastic I don't want to break anything. I can live with the misreading if needs be.
Bob
|
|
-
|
|
|
Hi Bob,
A few things seemingly going on here:
First off, the parking brake adjuster shouldn't require removal of the trans shifter assembly bezel at the base of the lever. The adjuster sleeve is accessible from the rear of the tunnel console behind the rear ash tray. You should only need to lift the tunnel console for access, lifting the rear of the console up high. Now if you're talking the Park interlock cable from the ignition switch then that's another matter, but still doesn't require removal of the shifter assembly bezel, although it does make it easier.
Now if the shift lever bezel at the base of the lever is loose then that's another matter again. There are tabs on the back of the bezel that fit to ears on the shift lever assembly. Those can easily get broken. The simplest fix is just to put the bezel back down onto the shifter assembly with some black mastic putty. As long as it's being held down tight with the plastic console insert plate the bezzel should stay in place.
Second is the shifter assembly detente positions and lighting behind the indicators. If you're having problems, the first thing to think about is worn/disintegrated nylon bushings in the trans lever linkage underneath. It's very common for those to wear out. The resulting slop causes exactly such issues as you describe. If the bushings are in good shape and you are still having such issues then the next thing to pay attention to is the trans linkage adjustment with the lock nut on the threaded linkage rod. You adjust the rod so that the detente positions in the transmission best match the lever positions in the shifter assembly. It's described in the FAQ, basically the end play beyond the "D" detente position should equal the opposite end play beyond the "2" detente position when moving the lever back and forth.
If you are having shift indicator lighting problems beyond that where more than one indicator is lit or badly off centre then it's most likely the plastic blind in the PNP (neutral safety) switch having broken and gotten out of place. It's very common for that plastic blind to break and cause all kinds of indicators to have back lighting problems, and for whatever reason especially in the 1994-1995 assemblies which are slightly different. It's a bit of a nuisance to replace, basically you pop off the outside half of the PNP selector switch on the left side of the shifter assembly and replace the long thin plastic blind in the slots. Be warned that the switch is held by clip nuts and the plastic studs easily break when trying to remove the clips (go easy, post back if they break). Be sure to keep the little white pop-out when replacing as that's not included with the replacement blind.
Another problem might be the PNP switch itself that's on the left side of the shifter assembly being either dirty, worn or possibly even broken off its pins, but that's got more to do with other issues.
Hope that helps.
--
Dave -still with 940's, prev 740/240/140/120 You'd think I'd have learned by now
|
|
-
|
|
|
Hello Dave,
I will try to deal with the points you raise consecutively. Firstly, I found the centre console is quite easily removed---but I did not get the rear ash tray bulb pulled out and it pulled itself out and does not work anymore. I took a look at the bulb and it looks like an expensive unit. Hmmm.
This car just had an expensive transmission job done by the way. I just got it back about a week ago. New radiator, torque converter, and master oh kit/steels [whatever the hell that is!].
I will try to attach the two photos I took. Excuse the yellow line drifting off at one point. But I was trying to ensure we are talking about the same bezel panel. As I show in the two pictures, I can slide the panel forward and back about a quarter of an inch. When fully installed it is loose and moves slightly when the shifter is being used. I am taking it that this is the 'shift lever bezel' of which you speak. My light is working, by the way. The shift/lock thingie seems to be loose and dysfunctional also.
The shifter does seem to go into its lock positions effectively and stays in them when driving. The transmission is fully functional. I would expect the transmission tech would have checked that out when the transmission was out of the car.
The only problem with the light is that it provides incorrect information and I thought I might be able to correct this while I have the console out of the car. As I reported, regardless of the two positions, i.e., fully forward or fully back, the information provided is inaccurate. I wondered if I could remove the bezel if I remove the shifter knob and try to pull the bezel up. To quote you, "There are tabs on the back of the bezel that fit to ears on the shift lever assembly. Those can easily get broken." It is probably these tabs that are holding the bezel in place at the moment. I can lift it up at the front end but not at the back. That would seem to indicate that the tabs are still functional.
As always, thanks for your valuable input. Will get back to you later. I will try to attach the pictures.
Bob
|
|
-
|
|
|
As per usual with brickboard I failed to get the pictures uploaded. I will try again here.
|
|
-
|
|
|
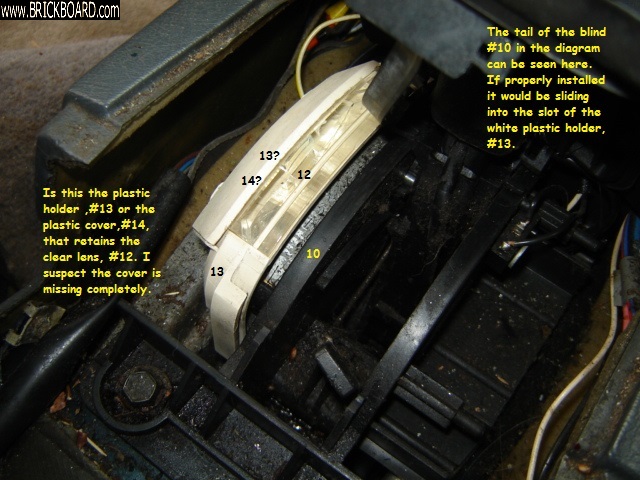
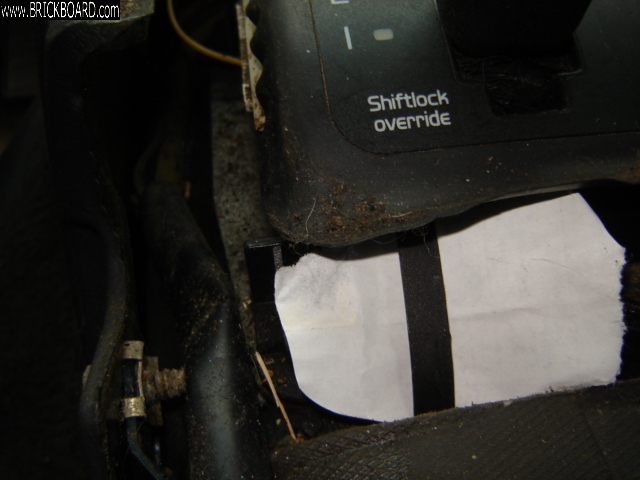
I tried moving the panel and the shifter fully backward and found a piece of black plastic strapping emerge under and aft of the bezel. I take it this is used to block the light from the positions not being used.
But I am confused by the white marker which moves with the shifter and is actually marking the correct position on the scale.
I will see if I can get the shifter knob off. I think the bezel is completely free and will pull off if I can get the knob off.
I really should just leave well enough alone!
|
|
-
|
|
|
You absolutely don't need to remove the shift lever or pull up the rubber handle off the stalk to replace the broken shifter blind. In fact as much I've tried to remove that handle cover I've always stopped one step short of disaster, the worst being popping out the shift lock release button assembly in the handle -no one should go that far unless they really have to. The only reason to remove the shift lever cover is to replace it and for whatever reason they do now seem to be disintegrating and need replacing after all these years. I've got one still in good shape, one in not so good shape where I've kept the pieces together with RTV sealeant, and by the look of yours it's somewhere in between.
You seemingly clearly have a broken shift lever blind in addition to the shift lever bezel not clipping down onto the shifter assembly. Both are common situations.
I've done the shift lever blind a number of times, attacking it by two different means, including that which I described in the FAQ which I no longer even attempt.
What's happened, the shift lever blind has that white tab in the middle that attaches by slotting into the base of the shift lever, with two long flat black tabs that extend out into slots to keep the light blocked under the other characters. One, and or both, of those longs flaps eventually break off at the base, for whatever stupid design and manufacturing reason, with the later 940s seemingly being far more susceptible to this than the 740s with a similar blind (I thought they were identical to 740 ones for the AW shifter assemblies, but parts fiche fitment says perhaps not, I'd have to do more research). Order yourself a new blind, p/n 3549927 exactly as Spook says, either from a local dealer (in your case Docksteader over in Vancouver may possibly have that part, although more likely there aren't any in Canada at the moment, but Docksteader can still get it from the US) or an online parts house that sells Genuine Volvo (FCPEuro is where I've always gotten mine, they come from regional Volvo stock in the US).
To replace it, you just need to have the bezel up enough (as you already easily can do) to access the PNP neutral safety switch assembly on the left of the shifter. Carefully pry underneath (first using something like a jeweller's screwdriver or sharp pointy awl to bend out one or two of the teeth) and rotate off at an angle those two clip washer nuts so as not to break the plastic studs (you'll have to use long, thin sheet metals screws if those break). It may help to improve access undoing the four bolts holding down the shifter assembly so you can lift it up a wee bit out of the case or to take the left side console panel off (requiring radio removal).
The outer half of the PNP switch that holds the clear plastic lens in place will separate from the inner half (a small obvious clip). You don't have to remove the main part of the switch or the lens itself. Then you can extract the broken bits of the blind and spend the next 30 minutes fiddling around with the new one trying to get it into the slot and nested into the shift lever tab while you try to put it all back together. Try not to buckle it or you'll just hasten its early demise. I've tried putting a drop of RTV in the corners of the blind to help reinforce it, and so far so good, but I don't think the RTV is bonding enough to make a major difference.
Bonus tip for reading this far: When putting the PNP switch back together, use suitably sized acorn nuts on those plastic studs rather than using the orginal washer nuts. HDepot has them in the small fastener bins. I forget the exact size, something like 3/16" or 5/32", it's somewhere in a brickboard post I once did, or just buy a selection. Use a nut driver to easily put the acorn nuts on and just snug them up so as not to strip the plastic. Works like a charm for later removal when you'll have to replace and/or clean the PNP switch itself. Oh, and one more caution, the wires to the shift indicator illumination bulb holder underneath are rather delicate, so don't ever bend them around any more than needed or you'll end up having to do some in-vehicle soldering.
That's it, I've done it so many times I can almost do it in my sleep and no matter what it's always a fiddly job.
--
Dave -still with 940's, prev 740/240/140/120 You'd think I'd have learned by now
|
|
-
|
|
|
I don't know why it has taken this long for me to figure this out but it suddenly hit me today that there is nothing wrong with the car. The problem lies with the operator. What we used to call 'finger trouble' when I was an air force instrument tech.
I am reading the instrument incorrectly. I am thinking the lit light should be where I am at, i.e., if I am in Park, the light should be lit. WRONG. The white marker attached to the shift lever tells me where I should be and when I am in Park, the white marker is correctly placed. When I move to Reverse the amber light at Park shows me that I am no longer in Park. The white marker is now at reverse. When I move to Neutral the light opens in Park. And so on through the shifts. As I write this I am thinking it is a little bizarre. Is this how your light system works in your cars, David? and Spook?
Wherever a light shows, you are NOT in that shift position. Right? Say yes, pretty please. Very confused.
muskox37
aka Bob
|
|
-
|
|
|
Hey Bob, I'm having a minor chuckle as you try to figure what is and isn't wrong with either you or the car (the answer is both, lol).
Based on what you just said, the far end tail of the shifter blind is clearly broken off, likely with the piece hanging out the Park end of the shifter assembly much like that tailpiece you see at the other end in your posted pic. The white tab remains clipped to the shift lever and doesn't get out of position, but the far end of the shift blind is no longer attached so not covering the P-R-N windows when you move the lever into the Drive position. This is an all too common problem and is in my top-50 list of 740/940 idiosyncracies.
So another long Stevens post is about to follow here with lots of, hopefully valuable, information for you and others who may later follow this thread:
Here's the shift selector indicator blind for Volvo 940 w/AW7x auto trans p/n 3549927:

Note that the white (sometimes blue in 740 GLE) indicator is a separate little square tab that inserts into the middle opening and is not included with the replacement part, so don't lose it.
To better see what you're up against, here's the parts schematic for the 1994-1995 940 shifter assembly (the earlier shifter assemblies are extremely similar, just not identical):

With full Volvo parts details here
https://www.volvovancouverparts.ca/p/Volvo_1995_940-4DRS-SR-23l-Fuel-Injected/Blind-Gearshift-Shift-Control/42898096/3549927.html
(I pre-selected Docksteader in Vancouver as a local ordering source for you.)
The blind p/n 3549927 is item #10 in the schematic and the PNP neutral safety switch is on the left side of the shifter assembly as item #32. The shifter blind lives in the white/ivory plastic holder #13 with the slots at the end for the blind tails. You can easily pry off plastic cover #14 that retains the clear lens #12 and extract the blind. My note in the FAQ describes my attempts to wiggle the new blind back into place and get the tab to engage with the base of the shift lever without having to unfasten the PNP switch. You will soon discover it's extremely difficult to accomplish this, especially without breaking the new blind. I no longer recommend doing it the way the FAQ describes, so don't bother trying, you'll most likely break it and just get frustrated.
You will want to remove the holder #13, which requires removing the mounting clips on the plastic pins that hold the PNP switch assembly. Be extra careful removing the starred clip nut washers #33 so as not to break the plastic mounting pins as previously noted. Even with that holder now free, you will still have more than enough fun trying to get the holder back into place with the blind still clipped properly to the tab at the base of the shift lever while also keeping the tabs of the blind down in the end slots.
Getting proper access to the PNP switch clip nut washers is non-trivial, having to raise the shifter body #2 up a bit out of the tunnel housing #2, requiring removal of lever #9, one of the reasons these broken blinds don't get replaced too often. If you've previously replaced the clip nut washers #33 with my recommended acorn nuts on the PNP switch plastic pins then you wouldn't have to do this just to replace the blind.
Please refer to this post from a few years ago for additonal information on procedures (see also the addendum post)
[RWD] Neutral Safety Switch and 1994-1995 Transmission Shifter Assembly 900 1994
--
Dave -still with 940's, prev 740/240/140/120 You'd think I'd have learned by now
|
|
-
|
|
|
Hi Dave/Spook,
This is my latest picture. After looking at the schematic more closely I am guessing that the plastic cover #14 seems to be missing completely. It should be mounted on the inside of the white plastic holder #13, not the outside. I have been prying on the holder itself I think. Luckily I did not break it.
Using a mirror I can see the jamming style holders#33 that fasten the holder#13 in place. The pins are black plastic.
I moved the tail of the blind to one side to take the picture. To extract the blind you say that I will have to remove holder #13 and this would bring me to the difficulty in removing the starred clip nut washers#33.
I had been thinking I could remove the lens#12 before I took out the holder #13 but now I can see I have to get the star clip washers off first and then I will have to try and remove the holder#13.
If and when I get the washers off, is there any danger of breaking the tab at the base of the shift lever when I attempt to pull the holder#13 away? Not quite sure how the blind is attached to the shift lever tab.
|
|
-
|
|
|
The questionable part is indeed #14, the cover.
You're not missing anything, in fact quite the opposite. I think I'm missing the completely obvious here.
Now with that cover/bezel/plate/surround (or whatever you want to call it) at the base of the shift lever completely out of the way, as in your photo, tell me now, isn't the blind now a piece of cake to install? Can't you just bend the end tabs of the blind down and slip them into the slots in the holder then push the centre window down to click onto the tab at the base of the shift lever? No further removal of the cover, holder or PNP switch retaining clips is required? Am I missing something other than just the usual few marbles?
The difference between what could now be an extremely simple install for you and all the gyrations I go through and have tried to describe is that the cover/bezel/plate at the base of the shift lever is out of the way for you, whereas for me I can't get it up more than 3/8"-1/2" and have to attack it from the side the hard way. Splitting that cover so you can get it off the shift lever is starting to sound like a good idea, just have to figure out how to do it nice and tidy.
--
Dave -still with 940's, prev 740/240/140/120 You'd think I'd have learned by now
|
|
-
|
|
|
So it would appear from your reply that the cover#14 is, indeed, among the missing. What is showing in the picture is the ivory plastic holder#13 and the clear lens#12. It would seem that the apparatus can work without the cover. Perhaps somebody else has preceded me into this setup or Volvo decided to dispense with the cover.
I was pondering your deliberations and thinking that if the car has an ugly nondescript gear shift knob like mine that it might be worth filing or sanding away the girth of the knob so as to allow the cover #27 to be pulled up without cracking itself. The knob on my car has broken away in places already and it looks pretty terrible so a little more ugliness would not be particularly noticeable. The knob material seems to be a rubber/plastic composite so I don't know exactly what would work to remove the material and leave the knob looking its usual nondescript self rather than completely rough and ugly.
Then the advice would be to first file/sand away 1/8 inch or so of the bottom two inches of the sides of the knob. Second, pull the cover#27 up. Third, take out the broken blind#11. Fourth, install the new blind#11. Fifth, push the cover#27 back into place. It will not go this easily of course.
I have not received my new blind yet so am still unsure as to how it is connected to the tab on the gear shift lever. I will continue the commentary when I receive it and try to install it.
|
|
-
|
|
|
There's no cover missing for item #14. Item #14 is used to illuminate all the gear letters PRND on cover #27 when the console/dashboard illumination is switched on.
Just install the blind into item#13 and attach it to a plastic tab on gear shift lever.
In mine, the plastic tab on gear shift lever (where the blind is anchored to) is broken so nothing is left there to move the blind according to gear lever position.
On a still functioning setup, the blind will only alllow light from clear lens #12 to show what gear position you're in.
Amarin.
|
|
-
|
|
|
Dave and I are operating off a schematic diagram of the complete assembly, Amarin. I have all the parts except item 14 that Dave describes as a plastic cover. I have the new blind,#11, the clear plastic lens,#12, the ivory coloured holder,#13, and the tab emanating from the shift lever, [the part that would seem to be broken on your car].
As I reported to Dave, it is functioning properly now but if I try to shift into first gear the tail of the blind will come loose and pop out of position. This is where the cover would come into play to prevent that happening [I think!].
I never use first or second so I am safe for the time being. I will be trying to get a cover from suppliers. Thanks for you input.
Bob
|
|
-
|
|
|
I don’t see any missing parts in your last pic. You have cover #14 in place. What keeps the blind down is the bezel #24 when it’s clipped down. I take it I was mistaken in thinking your bezel was broken and could be lifted up far enough for proper access? Attacking it from the side as I originally suggested is the better option IMO rather than trying to get the shift lever cover up and off as Spook described. That’s frought with issues like the OD switch wire and the shift lock release tab. There is no need to chisel some of the cover when you go from the side.
I'm starting to think this would be faster to just drive up to your place and help you do it rather than me having to visualize exactly where you're at, remember how everything looks, and trying to keep descriptions simple. LLOL!
--
Dave -still with 940's, prev 740/240/140/120 You'd think I'd have learned by now
|
|
-
|
|
|
Regardless, I am enjoying the exchange of ideas. I THINK I have everything back in place and ready to go. I thought that I would detail my experience a little and give alternatives to others who are trying to replace blind#10. I am totally with you on not removing the shift knob and I was saying that if the shift knob is trimmed slightly the cover bezel#27 can be lifted high enough to get at the blind and its holder.
Given the rather unobtrusive crack in my cover#27 I was able to get it up and out of the way. But if you have an uncracked cover it might be better to shave the shifter knob so as to allow the cover to be brought upward and out of the way. Thus operations on the blind and its holder could be performed without getting into the can of worms that is the shift knob#28.
If I wanted to change the knob#28 I would follow Spook`s directions to the letter.
Thanks for all of your input Dave. I could not have done the job without you.
muskox37 aka Bob
|
|
-
|
|
|
For my own satisafction, I just went out and removed/replaced a blind to make sure I wasn't dreaming how easy this can be once you've got the PNP switch assembly loose. Removing four screws in the console (two in the storage cubby, two under the brake handle) and the clip under the ash tray is what it takes to remove the entire tunnel console insert under the brake handle, disconnecting the seat heater switch wiring for easier access. No need to unfasten the "bezel" surrounding the base of the shift lever, although as mine has broken tabs and is only held by mastic, it easily lifts up a bit giving me slightly better access and visibility.
Because I've had the PNP switch out before, I've now got two acorn nuts retaining the PNP switch assembly rather than those stupid clip nut washers. I can easily slip a socket over them and spin them off with my fingers, just being careful not to drop them down out of sight. The PNP switch holder #13 (piece with the slots) can now pull out a bit so I can fish the blind out. I did not have to remove cover #14 which just retains the plastic lens in the holder.
For reassembly, alignment of the finger tab that sticks down from the middle of the blind is the entire tricky bit. With the ends of the blind now tucked into their end slots in the holder, it took a few tries to push the PNP assembly back into place while having the finger tab staying properly engaged with its notch at the base of the lever. Half a dozen attempts and it was all back together, ready to have the acorn nuts snugged back down on the pins using a socket in my fingers.
The key of course is having those acorn nuts and not having to spend significant extra time trying to get those damn clip nut washers off without breaking the pins. That's where the extra time and frustration comes in doing it this way from the side, which is still a lot simpler and safer than trying to removed the handle off the shift lever so you can lift the shift lever bezel.
BTW, the rubber gear shift lever cover #29 p/n 6843562 is still available in the Volvo parts chain and at under $10 it's dirt cheap. As noted prior, dealing with the OD switch and shift lock tab is a major impediment to replacement. I've had that tab out once and had great difficulty getting it back together. If it wasn't for that tab, I'd consider replacing mine, but will now wait until they're a lot more ugly.
--
Dave -still with 940's, prev 740/240/140/120 You'd think I'd have learned by now
|
|
-
|
|
|
Dear Dave Stevens,
Hope you're well. "BTW, the rubber gear shift lever cover #29 p/n 6843562 is still available in the Volvo parts chain and at under $10 it's dirt cheap."
According to the diagram in Volvo Vadis - a superseded dealer parts/service database - part #6843562 is a small plastic collar (or bezel), that surrounds the shift lever's square steel core.
The shift lever's rubber-covered plastic knob (into which is mounted the over-drive switch) sits atop the collar (or bezel). The rubber-covered plastic knob is part #6843471. At a U.S.-based Volvo dealer, full retail is about $120.00.
Item #29 on the diagram is a "retainer" (part #945719), which secures the shifter's "intermediate arm" to the "retaining ring bolt" (the shifter's main shaft).
Hope this helps.
Stay well!
Yours faithfully,
Spook
|
|
-
|
|
|
Oh my, thanks for checking that, Spook. I should have known better than to post something like that without double checking my lookup. What was I possibly thinking that such a part from Volvo could be under $10, let alone even under $100?
--
Dave -still with 940's, prev 740/240/140/120 You'd think I'd have learned by now
|
|
-
|
|
|
Hi Dave,
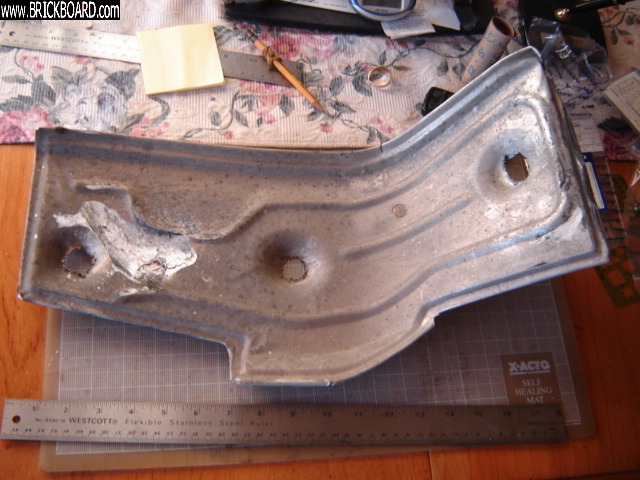
At the risk of being a pest and on another topic altogether, could I ask if you have any idea of where this heat shield fits on a 944? Mine came rolling out of the car a couple of days ago [I think this car has other ideas for its future than mine].
|
|
-
|
|
|
Off the top of my head, that particular heat shield lives above the cat. You should see the three sheet metal screws still there with whatever is left of the torn aluminum. The simplest thing is just go into your scrap aluminum metal bin and fashion a couple of aluminum fender washers to act as retainers (any good sized square cut aluminum tab with a hole punched in the middle will more than suffice). Heck, a beer can folded over four times would probably work in a pinch. I can't seem to look up a Volvo p/n for the beer can.
As long as you're crawling underneath there, be sure to check the integrity of the trans shift linkage nylon bushings. If there's any slop in the shift mechanism then they're likely badly worn or even disentegrated and missing.
On a similar thought, I use slightly more sophisticated technology for the plastic belly pans that are most certainly by now either cracked or missing tabs. I make long retaining bars of thin aluminum/steel to cover over all the broken bits which I help keep held in place with the black mastic ribbon caulk I mentioned.
--
Dave -still with 940's, prev 740/240/140/120 You'd think I'd have learned by now
|
|
-
|
|
|
I haven't been under the car yet--not a propitious time because it is bloody well freezing outside.
I do expect the transmission hookup to be okay because I am taking the car to the folks who did a number on it a few weeks ago and I suspect they made sure the hookup was fine.
I am going to ask them to get a picture of the heat shield situation while they have the car up on the hoist. They touch nothing but transmission issues however.
OK Tire has located a replacement shield for $180 plus shipping. Not sure where to go with that.
|
|
-
|
|
|
Dear Muskox37,
Hope you're well. This item - a "protecting plate" - is #3528808. It is not a heat shield. It is affixed to the under-body, above the right-side axle. A replacement can be had from a Volvo dealer. In the U.S., the list price is about $100.
Dave Stevens correctly instructs that it can be re-affixed. If the studs - on which it was mounted - are still there, then use internal toothed washers to secure the plate. Position the plate, and press the toothed washers onto the studs.
If the studs have corroded completely, use butyl caulk to fasten the plate to the under-body. Clean the plate's underside and the under-body with a solvent (e.g., methyl ethyl ketone) to remove dust, grease, etc. Apply the caulk and press the plate into position. That should secure it.
Hope this helps.
Stay well!
Yours faithfully,
Spook
|
|
-
|
|
|
Hello, Spook,
Thank you again for an informative email. I would take it from your comment that the piece in question, not being a heat shield, would be some kind of sound insulator. Do I have that right?
muskox37
|
|
-
|
|
|
Dear muskox37,
Hope you're well. I don't know the purpose of this metal piece. I reasonably presume it serves a useful purpose, so would want it to be present.
On the firewall of 940s, there's a black rectangular part, about 5" (125mm) square and just under an inch (25mm) thick. It's there to damp certain vibrations. That's reason enough to ensure that it is present.
Hope this helps.
Yours faithfully,
Spook
|
|
-
|
|
|
Hello Spook,
On the back side of it there are a few gaps in the aluminum foil cover and an insulating type material is sandwiched between the foil and the front aluminum metal you can see in the picture. It is obvious that this is the side that lived between the pictured side and the body.
I am in touch with the local Volvo dealer's parts department and I did ask the parts man to find out if I could buy another one, using your part number, and he did say he could get one for me for about $130CAN. I am going to try and resurrect the old one if I possibly can however.
I am buying a bulb for the rear ashtray in the centre console---a thirty dollar part would you believe. The bulb he originally supplied cost four bucks but it does not fit the socket. My fault because I supplied a part number for him to order from. Just thought that now that the console is out I might as well get the bulb working and in place.
Nice to hear from you again.
muskox37
|
|
-
|
|
|
Dear muskox37,
Hope you're well. The price quoted (C$130) is about equal to the full retail price at a U.S.-based Volvo dealer.
Hope this helps.
Yours faithfully,
Spook
|
|
-
|
|
|
Sorry, I’m getting a bit confused here. Is that picture with part #s of your car?
--
Dave -still with 940's, prev 740/240/140/120 You'd think I'd have learned by now
|
|
-
|
|
|
Hi Dave,
I am looking at your schematic diagram. The relevant parts are the following:
10--the shifter blind
11--the shift lever tab
12--the clear plastic lens
13--the white/ivory plastic holder
14--the the plastic cover that retains the clear lens12.
All of these items are present on my setup BUT the plastic cover14.
Using my method of getting the bezel/cover 27 up around the shift lever knob I was able to easily access the blind and the tab that connects the blind to the shift lever knob.
It was easy to lift the blind tab up and to disconnect it from the shifter tab. I then removed the broken blind.
I fitted the two ends of the blind into the holder13.
I tried to push down on the new blind's connector [over the shift lever tab] but failed to get a connect.
I then pulled the new blind leftwards [towards the port side of the car] away from the shift lever [about a quarter of an inch] and managed to slide it in place that way. The blind, happily, is fairly flexible.
After getting the cover27 back in place I was able to shift and show the proper gear position but when I attempted to use position 1 the tail of the blind10 popped out of position.
This is where I think the cover14 would have come into play and prevented the blind10 from popping out of position.
I never use positions 1 and 2 when driving so I think I am good for driving the car over the next while.
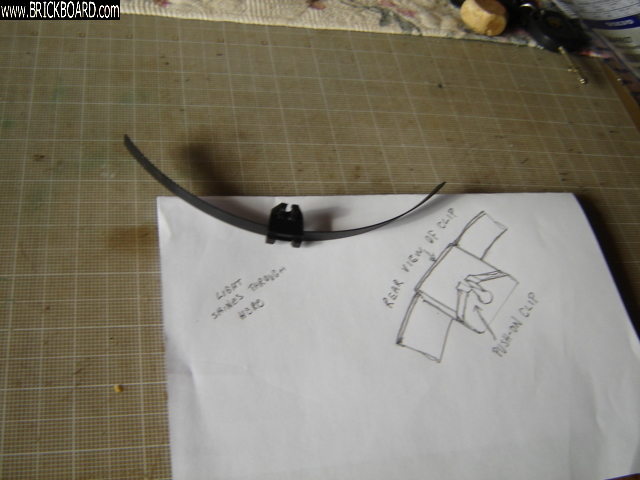
I tried to take some pictures of the blind connection to the shift lever but they did not work out. I do have a picture of the blind10 and a drawing of its back end to give an idea of how it connects.
I would like to get a cover if one is available for sale and then I think I can really button up this job. Do you have any suggestions as to a parts source?
|
|
-
|
|
|
The knob⎨] is about 1 1/8 inch wide at its thinnest point.
The bezel ⎧] opening is one inch wide.
So if you wanted to bring the bezel up you would have to remove 1/8 inch of material from the knob width. This is only 1/16 inch on each side. The knob does increase its width from bottom to top but only marginally.
Rasping or sanding the knob for about an inch or two of its length would permit the bezel to be lifted high enough to get at the blind and associated parts and to avoid removing the clip nut washers ⎭] and the ivory plastic holder ⎙]
I can't see any connectors holding the bezel in place in the diagram and I couldn't see any in my particular car.
What is the flaw in my thinking, Dave?
|
|
-
|
|
|
Dear MuskOx37,
Hope you're well. Doing any work insider the shifter housing is made hugely harder if the bezel - the uppermost cover, which holds two "brushes" on either side of the shift lever's shaft - is not removed completely. This part #9122830. It isn't available from Volvo but a salvage yard may have one.
To do remove the uppermost cover, you need: (a) a small pointed wire nippers; (b) a soldering iron and some rosin-core (electrical) solder; (c) some muscle.
To remove the shifter's knob, the overdrive switch has to be freed from its harness. The wires to the switch's tabs need to be cut as close as possible to the tabs, without touching the tabs. Once that's done, the overdrive switch can be removed. Once the switch has been removed, the knob can be removed by pulling upwards strongly. It will suddenly "pop" free.
The bezel - held in place by tension, as you've found - can be removed and replaced.
If the rubber shell of the shifter knob has deteriorated (cracked, etc.), a salvage yard may have a replacement.
To replace the uppermost cover, use your fingers to push the front and back edges towards the center. If finger power does not suffice, tape the edges of the cover with sever layers of duct tape, and use a large C clamp to compress the cover.
To replace the shifter knob, press straight down, having first used a piece of seine twine to pull the overdrive switch wires out of the rectangular opening in the switch knob.
Use a small amount of solder to connect the overdrive switch wires to the tabs on the switch itself.
Hope this helps.
Yours faithfully,
Spook
|
|
-
|
|
|
Hello again Spook. Nice to hear from you.
I was trying to propose an alternative to shift knob removal because it looked to be like opening another can of worms. Dave had given me some idea of the problems working with the bezel cover27 down in place so I thought I would offer an alternative way of getting at the blind10 without removing the shift knob. If the shift knob had been replaced by a nicer version then my suggestion would be inappropriate. But my shift knob is quite pedestrian, even ugly, and a little modification need not be terribly obvious.
By pulling the bezel cover27 up a few inches the 'works' of the blind10 setup are revealed and it can be fairly easily worked on. As you point out, knob removal is fairly complex and open to various 'fatal' errors.
It is a bit of a crude solution but if somebody wants to change the blind10 out it might be simpler to shave the knob and lift up the bezel cover27.
Dave insists that part14 the cover is in place in my situation but I just can't see that part. I didn't remove anything to get the blind10 out and to install the new one.
I ran into a small 'emergency' in a parking lot with somebody backing out towards me yesterday and I jammed the transmission into position 1. I think it might be okay because the display is still showing correctly. I thought that might bring the tail of the blind10 out of position. But not so far. Keeping my fingers crossed.
Once again, thanks for your input.
muskox37
|
|
-
|
|
|
I had another go around with plastic cover 14, prying it at both ends from the top with a thin painter's scraper tool. I don't fully understand how it is connected to 13 and 12 and don't want to get too violent with it.
The diagram is unclear as to how it is connected. I assume there are a couple of lips or there are a couple of plastic push-in plugs.
The cover bezel 27 is cracked at one end and that allows me to move it up the lever knob a fair ways so that I can get at the blind mechanism.
I will keep trying and perhaps ask my mechanic friend to have a go with it.
|
|
-
|
|
|
As memory serves, cover #14 just clicks into place to hold the lens, but don't go destroying it based on my feeble recollections. Isn't there a little click tab opening on the side that's the key to removal? Or maybe you have to have the entire holder #13 loose before it comes away.
And yes, the bulb in the holder underneath the lens illuminates the entire area of letters and the little windows next to each, with light being blocked by the blind from these windows except for the light illuminating through the white indicator tab in the middle of the blind at the base of the shift lever (a blue indicator tab on certain models, such as later 740 GLE).
Removing the four corner bolts so you can lift the shifter assembly up a bit gives better access. I usually also remove the left console side panel for even better access (requires radio removal). You need adequate room to be able to safely work the clip washer retainers off the plastic pins holding the PNP switch assembly without breaking them. You need to be able to loosen holder #13 to properly set the blind in place.
Now I've usully got that whole shifter assembly up and half apart as I generally only replace those broken blinds when I'm removing the PNP switch for service/replacement, a bit of a major undertaking. When replacing the PNP switch, there's usually not enough side clearance to be able to get it off the plastic mounting pins. You usually have to tip the shift lever assembly to the right in the mounting case to gain enough clearance. In order to do that, you need to remove lever #9. In order to do that, you need to be able to lift the whole assembly up a bit into the cabin. And in order to do that, you normally have to disconnect the trans linkage from underneath (making it a golden opoportunity to check replace the little nylon bushings in the linkage). Now having scared you with all that, as long as you can get the clip washers safely off the PNP switch pins then you should have enough room to slide the holder out enough to do the blind without having to go to all that extra effort. I mentioned about using acorn nuts rather than those clip retainers. With acorn nuts there, you don't need near as much access, just enough access to get a socket on them for removal and snugged back up using your fingers on the socket.
As for the split in your lever base bezel/cover plate, someone probably decided they needed better access or else forced it and cracked it. I've been sorely tempted to split it on a few occasions to gain a bit more working room. To remove that bezel properly requires removal of the shift lever rubber sleeve, another non-trivial task. In fact, now that I think about it, if you can now get your bezel up and out of the way then you may have much better access for replacing the blind from above rather than totally from the side and having to go though a lot of the trouble I describe above. Please post back if having that bezel/cover plate up and fully out of the way makes blind replacement a simple job.
--
Dave -still with 940's, prev 740/240/140/120 You'd think I'd have learned by now
|
|
-
|
|
|
Thanks again Dave.
I will give it another try today to see if I can at least get the plastic cover off. This time I will take a mirror with me to see if I can get some idea of just what is holding it in place.
Having this much trouble with the 'easy' part of the process is unnerving, to say the least.
I will keep you in the loop, regardless. Maybe I can find some other routes to success!
I would love to see one of these covers off. Think I will do a search on google. Good way to waste another three hours!!
Bob
|
|
-
|
|
|
I have ordered the shift indicator blind from Volvo Victoria and i took another look at my situation in the car.
I managed to pull the bezel ⎧ in the diagram] up the shift lever knob a fair ways and that gave me more access to see 12, the plastic cover. You say i can easily pry off the plastic cover 14. I gave it a brief try but now that i look again at the diagram i think i was prying on 12 rather than 14. i will tackle it again today and hopefully will be able to pry it off without breaking anything.
|
|
-
|
|
|
Thank you Dave,
I will work through your directions and see what I can do to extract the broken blind. Looking at the schematic it would appear that the bezel cover [#27 and 27a] are not connected to anything so I can feel free to pry them up far enough to effect the repair. I will be careful regardless about how much pressure to put on this ancient plastic.
I am giving Volvocars Victoria a chance to show their stuff but if they cannot supply the part I will go back to the Vancouver Volvo website that you supplied.
The schematic is wonderful.
I asked my transmission mechanic if he had removed the gear shift knob when he took out the transmission but he told me he disconnected everything at the transmission itself and did not touch anything up top. Wise!
The shift knob itself is crumbling but still usable and given the dangers inherent in removing it I will probably just continue to live with its ugliness. This is my winter car after all.
I've sold and loaned the car to four purchaser/lenders over the last four years, the last being my nephew. And the poor old dear has been badly treated I am sorry to say. I had to rescue it from Vancouver the first time around and I think my radiator troubles [and later transmission issues] emanated from the couple I thought could use a hand up and who instead drove it like a maniac through a potholed trailer park road and jumped the radiator out of its holders and then returned it to me because somehow they had come into money that allowed them to buy a truck.
But she still starts and runs like a champion. Thanks in part to folks like you and Spook.
Bob
|
|
-
|
|
|
Ricky Luptak at Volvo Cars in Victoria is a good guy and will even source aftermarket for you, as well as from Volvo dealerships in the USA. If you are able to come down Island and drop by there for pickup then a great option, otherwise Docksteader over in Vancouver is usually better as they actually have a small parts stock beyond oil filters and sometimes a better price discount. Buying Genuine Volvo out of the USA is almost always a better option until you have to deal with shipping and brokerage. -Cheers
--
Dave -still with 940's, prev 740/240/140/120 You'd think I'd have learned by now
|
|
-
|
|
|
Hello Dave,
I haven't heard back from Victoria Volvo yet but in the interim I did want to clarify with you exactly what lights up if I can ever get everything back the way it should be.
I would take it that the only thing that will light up will be the centre white portion of the shift indicator blind. This would indicate the correct placement of the shift lever. Do I have that right? Seems obvious but so did my earlier conclusion.
Bob
|
|
-
|
|
|
I had earlier printed Spook's information on removing the transmission knob and had decided that I had better not go that way. In particular I was worried about breaking the wires which were described as delicate. Better to live with what I have than to get into that problem.
I have taken a picture showing the plastic blind tab emanating from the back of the shifter panel when I have the shift lever fully back in the '1' position. I have placed a piece of white paper behind the plastic tab to make it stand out better.
This would indicate to me that the tab is functional and does not need to be replaced. I take it that this is the p/n 3549927 that Spook is referencing. Please advise me if I have that wrong.
Continuing with your commentary: "the PNP neutral safety switch assembly on the left of the shifter" ?? The only switch I can see is the shiftlock override switch which is at the base of the shift lever and which disappeared for a while when I was messing with the bezel panel . So, stupid question number one: what is the PNP neutral safety switch? Is it the shiftlock override switch or is it something else?
Remember you are talking to a point and click moron here!
|
|
-
|
|
|
Dear muskox37,
Hope you're well. In the FAQs, you should find a procedure to remove the shifter handle. If I'm in error, so post and I'll set forth the procedure.
The "piece of black plastic" is a fragment of the "blind" - a thin plastic strip - which limits the light from the bulb to the letter or numeral for the gear selected.
The "blind" is part #3549927. It costs about $14 at a Volvo dealer.
Hope this helps.
Yours faithfully,
Spook
|
|
-
|
|
|
Thanks again for your input, Spook. I will try to put up a new picture of my situation. You can see the black plastic tab in front of a piece of white paper I put in behind it. At this point the shift lever is in the '1' position, i.e. fully back and you can see that the black cover tab is sticking out and apparently not broken. Advise me if I am wrong on that.
My main problem here is that the cover bezel panel is loose and will shift slightly back and forward and the shiftlock overrride switch seems to be loose as well and will disappear under the cover panel. The 'advice' from the panel is and always has been wrong, out one position through the range of shift available. Park has no light showing. Select Reverse and the Park light shows, etc. Even playing around with the panel I can never get the Park light to show when Park is selected.
I reread your information on knob removal [I had printed it out a while ago] and am a little concerned about breaking the wires to the switch. So I will probably live with the incorrect showing of gear placement.
The cover panel is loose and I suspect its connectors have broken off. I think that if I could get the knob off I could simply lift it off.
I had the transmission seriously serviced over the Christmas break at an automatic transmission shop and I am wondering how they got the knob off---they would have to remove it to get the transmission out would they not? They replaced the torque converter and the master oh kit/steels [what is that!] and also installed a new radiator. Apparently the radiator had been leaking coolant into the transmission and causing seals to break down. I will be seeing them in about a week so will ask them directly at that point about how they dropped the transmission without removing the knob.
Fun to chat with you again.
|
|
|
|
|


