|
|
|
This is a 1991 Volvo 240 wagon automatic transmission with 145,000 miles.
About two years ago I had the timing belt replaced by a general repair shop. I provided the belt kit and the seals (FCP Euro, lifetime warranty). Starting several months ago I've been noticing an oil leak from the front of the engine coming from under the timing belt cover which is becoming worse (have to keep adding oil) and blowing back onto the engine compartment. I loosened the upper plastic cover and discovered that there is a film of oil on the outside of the timing belt. I presume this means that a seal(front camshaft seal?) is leaking. It leaks only when the engine is running. I plan to repair this myself.
QUESTIONS:
1. How many months can the timing belt last before it self-destructs from oil contamination?
2. Is there more than one seal under the timing belt cover?
3. Given that this could be the result of faulty installation, or even a properly inserted seal that just happened to fail, should I be concerned about what brand of seal to install? (I plan to buy the kit from FCP Euro and return the previous one under the lifetime warranty.)
4.Is there is a tutorial that thoroughly lists the steps and tools involved in this project?
5. What specific tools/skills will I need to be assured I remove and install the new seal properly?
6. What is a reasonable amount of time to plan for completion of this job?
|
|
-
|
|
|
Verify a free and easy breathing, yet well sealed, PVC.
How I do it description:
https://www.brickboard.com/RWD/volvo/1636420/220/240/260/280/pcv_glove_test_question.html
At essence, the engine vacuum at idle or on overrun with high manifold vacuum should draw away more sump pressure than the engine produces. I do not know the values should you check engine manifold pressure for Inches of Mercury. Manifold vacuum drops to nearly zero when 'flooring' the gas pedal. Something one does not do with the factory configured RWD Volvo without Turbo very often.
Oil can leak with nearly 30-year old seals whether orange Victor Reinz (I guess the brand) or the early grey or brown viton (the material, not the brand) seals as my 1991 240 had. Yet more so is the paper thin paper gasket under the 'timing cover' that carries the intermediate camshaft and the crankshaft seals.
I've also found after years of vibration and lubricated, I guess as a cause, from seeping engine oil the 'timing cover' plate retainer hardware loses torque. On a few replacements and checks at salvage yards, the hardware is barely to snug or finger tight. The paper gasket, as with the intake manifold to cylinder head gasket, embrittles and shrinks, and loses seal.
I cannot find my post detailing the 1991 240 engine well basted in oil at the front and along the exhaust side as engine bay turbulence pushes the engine oil from a leaking timing cover out from under the timing belt cover and towards the engine rear. I have images.
Before the timing belt and oil seal replacement in 2014 or so, the PCV breathed freely and was sealed. I also use a Group III Mobil 1 10W40 synthetic engine oil, so so the PCV flame arrestor sieve or the engine block mounted oil breather separator box do not clog.
Images of this conundrum from May 2010 I posted to the BrickPix:
1991 240 Oil Basted Engine Images from May 2010 or so - 6 Images.
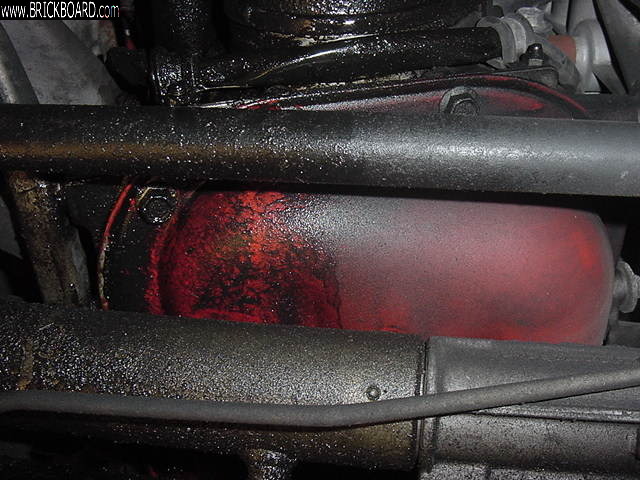
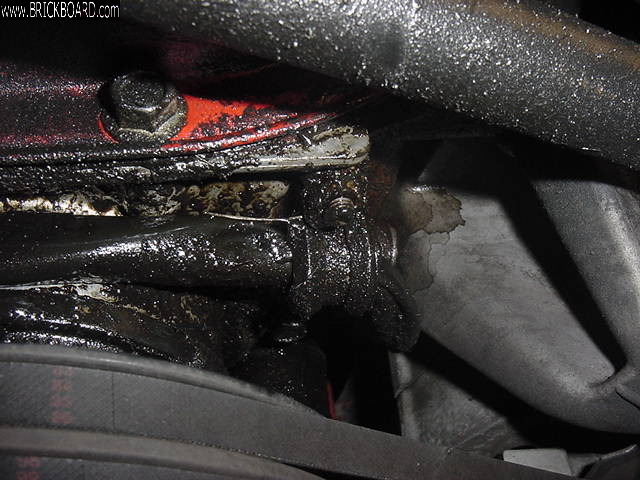
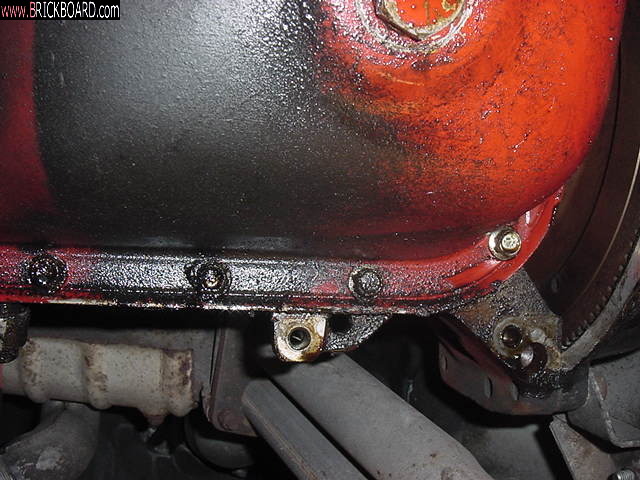
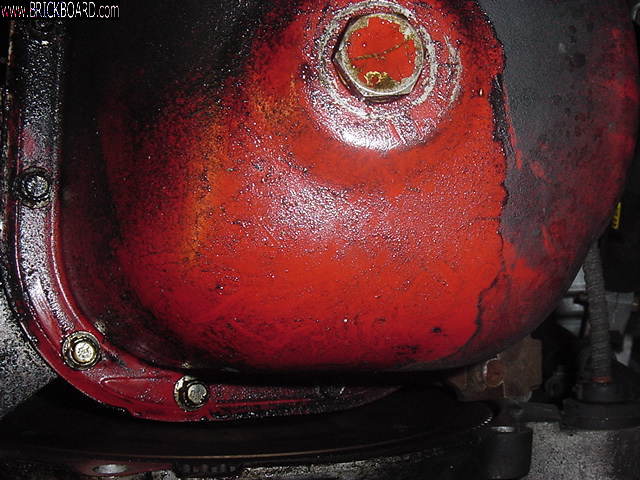
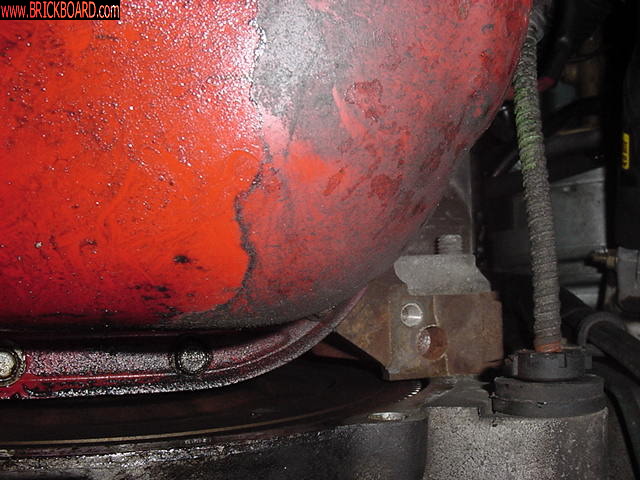
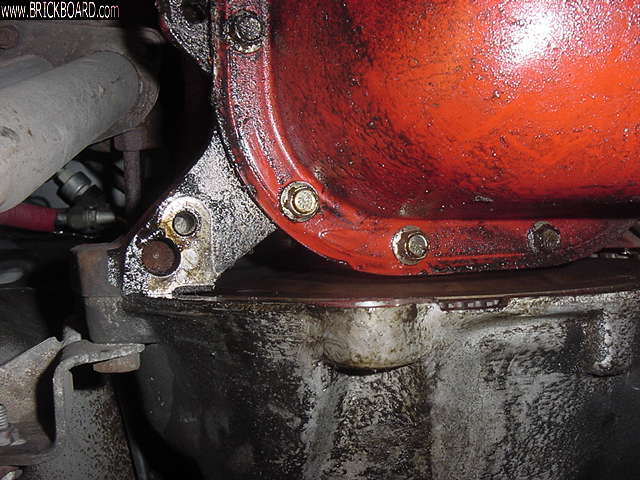
The leak formed while the PCV breathed easy and free and did not leak.
Images of me futzing with the PVC on my 1992 240 GL as the PCV stack of pipes and the flame arrestor sieve
1992 Volvo 240 GL with New Straps to Seal PCV Assembly - 3 Images

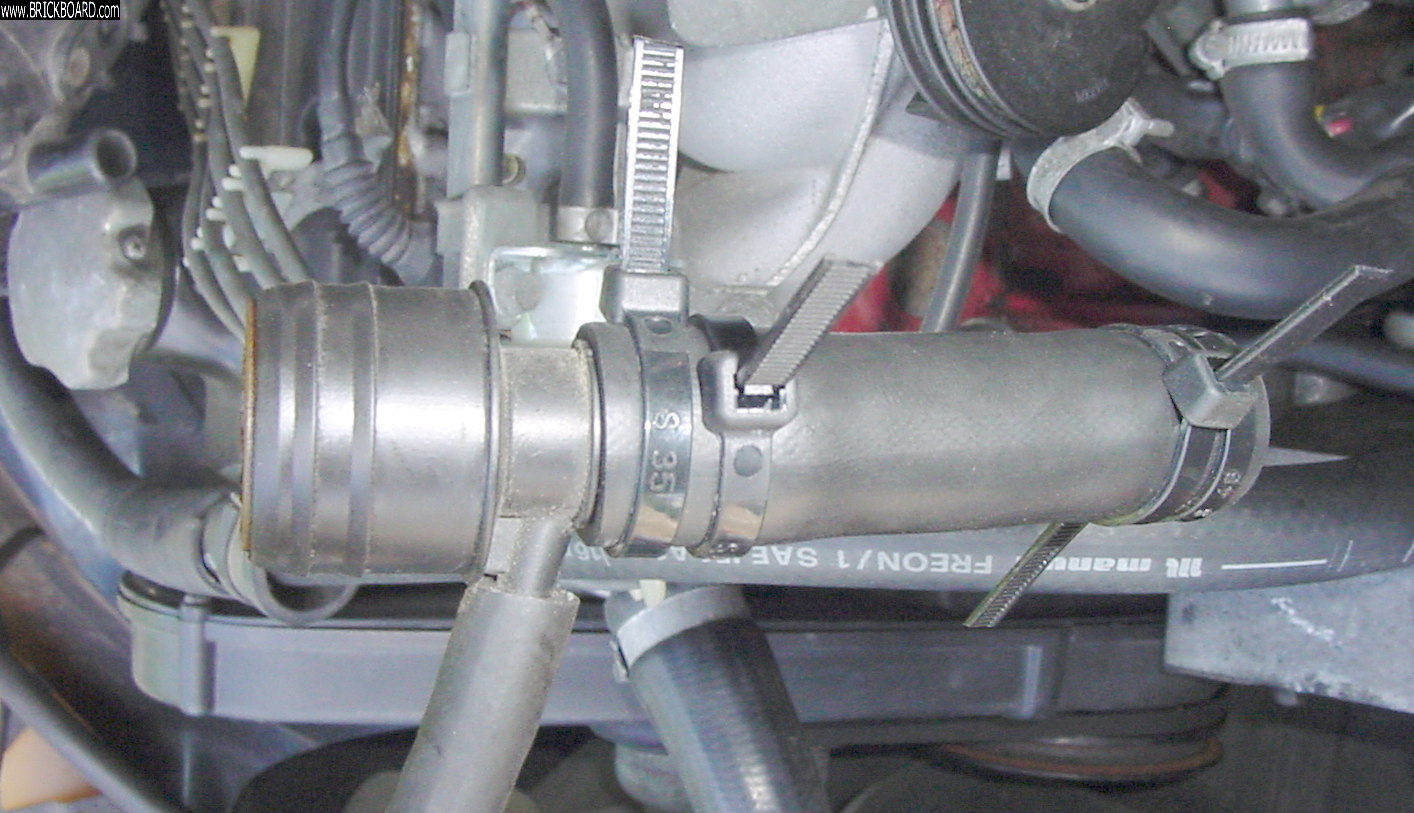
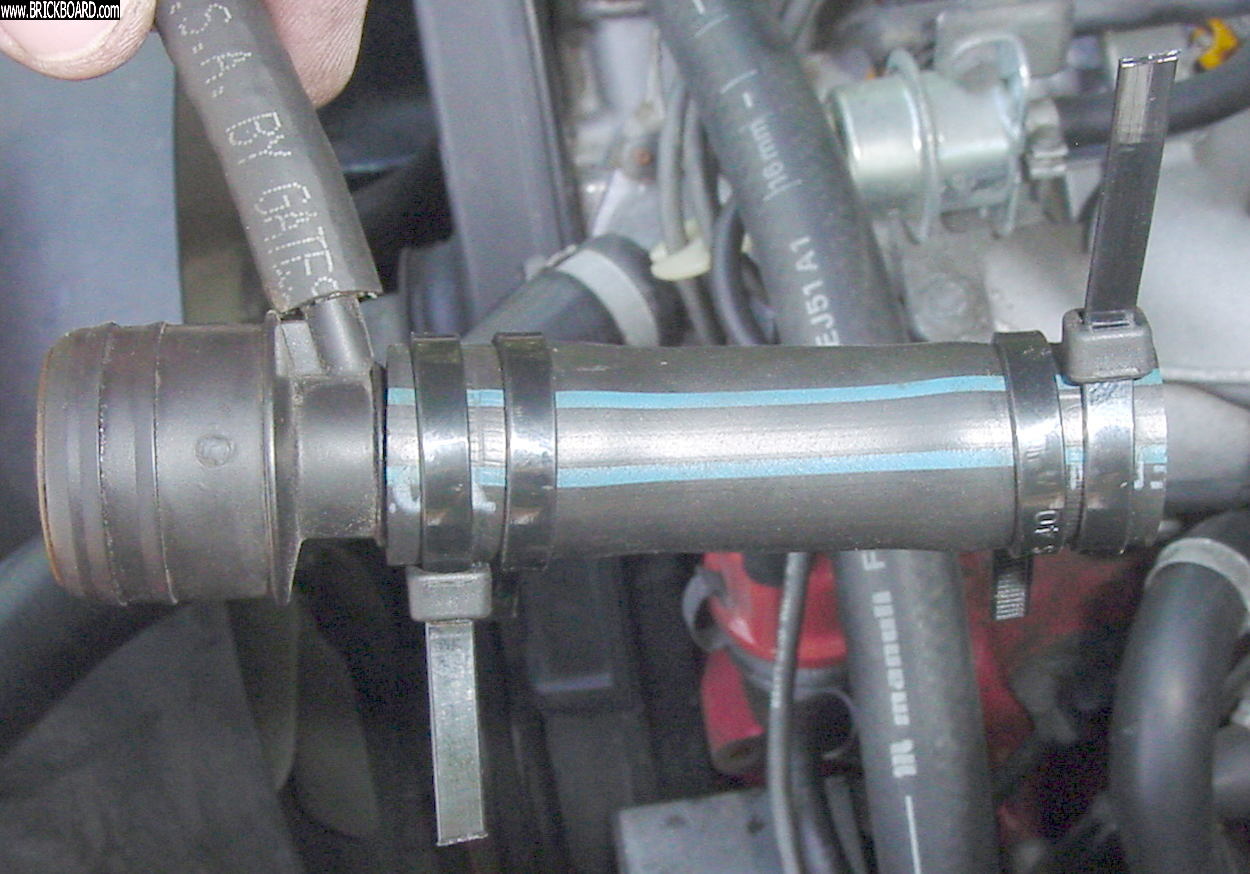
The blue stripe PCV vacuum line is factory original and remains more or less supple. Yet does not seal well in the assembly. So, durable temperature and UV resist plastic zip ties. Can not ever get the tie perfectly sized for secure seat and seal. I go too loose and than one click too tight. Remove and start over.
Art Benstein's How to Post Images Graphic

Use the green Volvo or Victor-Reinz I (I guess?) o-ring under the PCV oil breather box should you need to replace. And at this date, if you remove it, get Volvo OEM and not any aftermarket PCV breather box.
Questions?
Hope that helps.
--
Donate NOW! Give your brickboard.com a big DONATION!!! Find the  on brickboard pages! on brickboard pages!
|
|
-
|
|
|
As for the oil separator box, good thought and yes, the seal will almost certainly need replacement if you remove the box after all these years. These seals can be dirt cheap from on-line suppliers, but the shipping will kill you. I thought I'd mention when looking in local parts houses the 240/740/940 oil separator box seal is Volvo p/n 969330 and is the same as the 740/940 rear mounted distributor shaft seal (same or similar p/n). A fat regular rubber o-ring likely won't be up the task what with all that oil and heat.
Often times you'll see it recommened to replace the oil separator box rather than try to clean it when they start to become clogged with caked carbon. On that basis, I had a new one standing by as I figured the original would likely not be salvagable or would be brittle and break. I did not at all need it, but a shop would likely put in a new one just to save time. With enough poking around with screwdrivers and a stiff wire (actually my preferred spring steel strip salvaged out of old wiper blades), in amongst repeated flushings in a paint thinner bath and I was able to get it satisfactorily clean.
Getting the oil separator box out can be a bit tedious and hard on the back with all the bending over. The job can become quite a bit more difficult if there is a frozen EGR valve blocking access as is the case with some of the later B230s, possible yours. Those can be a real bear to get loose often requiring multiple goes with penetrating oil and suitably large counterheld wrenches. Think about using a large Crescent-type wrench or carefully using a plumbers pipe wrench if you get desparate as they often have a slightly shorter handles than a large combination wrench. As with many counterhold situations, having the handles just off from parallel and squeezing them together often gives you better leverage in awkward locations such as the EGR fittings. Once you get the rear fitting open, you can disconnect the other end up at the top end of the tube attached to the intake manifold rather than trying to separate it at the EGR valve. Don't forget to replace the connector wire on the EGR valve like I did. The Check Engine light came on some time later during driving when the engine finally got warm enough for the ECU to go looking for the EGR sensor -looking up the DTC code immediately told me what I'd missed, two seconds to plug it in and I was good to go after clearing the code.
--
Dave -still with 940's, prev 740/240/140/120 You'd think I'd have learned by now
|
|
-
|
|
|
Hi Mr. Stevens,
Yes Sir. I know. Thank you for the details!
My hope to to rid the 1991 of EGR.
I preserve the EGR function and have serviced it a few times. I have spare EGR pipes between the exhaust manifold and the rear of the EGR valve as that stainless is rusting outwardly.
Though the connection you mention at the EGR hole in the manifold were coming loose! Some action to lube the tread with penetrant (Blaster, then I guess?) and was able to loosen, remove, inspect and reassemble at both ends securely.
I also have spare vacuum servos, EGR valves, some new old stock that relocate the EGR temp thermistor, and the second EGR pipe between the EGR valve and the intake. I also have several used EGR thermistors.
I have spare green Victor-Reinz OEM O-ring for under the oil breather separator box. Yet two of the three 240s uses synthetic as Rotella or Mobile 1 (what I use exclusively now).
Yet every time I'm at the yunkyard I forget to pull the complete PCV assembly from the box upward.
What would you suggest as quality PCV piping? I have a section of the Volvo blue stripe vapor line or hose that installs between the breather box and the the flame arrestor housing assembly.
The silly chain auto parts stores here in lousy Saint Louis would not know fuel line from vapor line used for EVAP or PCV line or hose.
The stealership and Tasca offer sections. So does iPd as part of their sort of cheapo (to use an Old Duke Aphorism) PCV relocate kit.
I merely want the pipe Volvo OEM blue strip pipe in longer sections as it embrittles over time and does not seal. Require use of clamps. I use heat and UV resist plastic zip ties on the 1992 as you see in the images I linked in this thread. yet one click to loose or one too tight and either way fiddly bits to remain secure and sealed to the breather box top snozzle output.
I want to remove the EGR and install the non-EGR ignition ICU and the fuel injection ECU. Have yet to verify control pinouts again.
IIRC the wire harness control pinouts are extensible with the EGR connection being a mere extension to the pinout set on non-egr ICU EZK116 and LH-Jet 2.4 wire harness connectors.
Though I worry of nearly 30-year old electrolytic and other capacitors on the control unit PC boards. Maybe time for a cleaning and more DeoxIT-D grease again at these connectors. When in the oak and elm tree jungle of this middle of midwest area.
Thanks.
Earl Grey Tea Boyeeeeee, with merely Milk.
--
7 240s total since 1984. 3 240s today and rotting away.
|
|
-
|
|
|
Hi Kitty. My reply tacked to your post was more for the benefit of the OP and FYI to others as I figure you have navigated your way down the oil separator box path a number of times.
As for that short connector hose between the oil separator box and the flame trap -p/n 3501708, avail a number of places as genuine Volvo or aftermarket. If the flame trap is living between the intake runners then I think it needs to have that slight S-bend otherwise there may be too much tendency for the hose not to sit square on the nipples, hence your need to use nylon ties? -SS ring clamps would presumably also work. If you're wanting to raise the flame trap for easier access then a straight length of hose should work fine, like the blue striped one in the ipd relocation kit. As for finding bulk hose to use, all I can think of that might work is trying to find suitably sized heater hose that might be up to the task of living next to a hot engine block and being exposed to oil, but I'm not so sure it would last any longer than cheap aftermarket connector hoses. I've only had to replace one or two of those connector hoses over the years and managed to have spares that came with flame trap kits that I'd purchased as I went through a period of perpetually breaking the small brittle hose nipples off the top of the flame trap until I learned to be extra careful. The aftermarket hose connectors may not be as good as genuine Volvo, but seem to last reasonably well in my experience, but then I keep my engine compartment clean so there is less oil nd dirt on hoses and wiring.
Thinking of flame traps, I can remember the original style spiral copper flame trap elements. I still occasionally see those in the aftermarket. A horrid design, perpetually plugging as engines got older. Those were in the B20/B21/B23 days when you could do the oil filler cap suck down test to see if they were plugged. Thankfully they realized that a bunch of 3/16" (or whatever) holes in a solid element was a suitable flame arrestor. FYI to others, inter-cooled turbos do not need a flame arrestor -a straight through flame trap housing is used, but a regular one can be used with the element removed.
--
Dave -still with 940's, prev 740/240/140/120 You'd think I'd have learned by now
|
|
-
|
|
|
Thanks to those of you who took the time to respond with information from your experience. Not sure if I need to say this, but I feel I should explain why there are long intervals between my responses. Right now I am jammed with a number of things that require my attention. So I have precious little time to look into fixing this oil leak, or even to deal with other automotive concerns. In any case, I am taking things one step at a time as time permits. I'd like to determine if I have excessive pressure in the crankcase ventilation system (CVS). I examined the flame trap gizmo with the little holes in it, but I could not get that part out of the hose without breaking it. It did not look clogged. I will get another flame trap and install the new one later.
Next I started the engine, cold, and loosened the oil filler cap. It danced happily in place and rattled. I then turned the cap upside down and put it on the opening. It would not stay in place without me holding it. Then I placed my gloved hand over the filler opening and seemed to get some pulsing pressure. Definitely did not feel any vacuum. I am concluding that there is some degree of pressure in the breather system. My next step will be to order a new flame trap and oil separator box. Given my lack of available time and the difficulty of removing and replacing the oil separator box as described by Dave Stevens in his submission of October 31, I am thinking of paying a mechanic to do that job. After that is completed, I am planning to change out the timing belt, seals, water pump, and fan belts myself. After considering what you all had to say,I am assuming that either the PCV system pressure, the Elring seals, or a combination of both led to my leaking seals.
QUESTIONS:
1. For "kittysgreyvolvo". You wrote on October 18, 2014 under "PCV Glove test question... 200 1993""
" I'd read some merely unsure the oil fill cap, so you can lift it away, yet start the engine. A proper PCV vacuum through the engine sump spaces means the oil fill cap remains on the valve cover without rattle.
I pull the PCV hose off the clean air intake pipe, and remove the small vacuum hose and plug it. Remove the oil fill cap, and blow. Air should travel through the sump and out the oil fill cap hole thingy.
Replace the oil fill cap and secure it. And blow. Should be hard as heck to blow through the engine sump space."
1. My question is how exactly do you blow into the system?
2. Can I expect any general auto mechanic to perform the R & R of the oil separator box competently?
3. Do I assume a new seal for the oil separator will come with the box?
4. machine man on Sat Nov 2 2019 wrote about the issue of failed seals. I have heard this from other sources about Elring seals. My preferred online supplier, FCP Euro, includes Elring seals in the timing belt kit. I will order another full kit. What brand of oil seal might be recommended, preferably one carried by FCP Euro?
5. Oh, one more question. On this 91 Volvo California car, the flame trap is sorta under another hose. It would be more convenient to have it a ways above everything else. Is there an easy, proven way to have it stick out above to make it easy to check?
Thanks, guys. I am interested in any comments you may have.
|
|
-
|
|
|
before you buy from FCP or IPD or Tasca or any where else
call/email these guys for prices.
The are NOT big on-line sellers...but they will be straight with you about what they have. Unlike sellers who claim Orig Volvo part -- which may be just a part in a Blue(Volvo)Box.
voluparts.com call and talk to a real person.
|
|
-
|
|
|
To kittysgreyvolvo and others following this thread. Here are the ambiguous results of testing the PCV system with the "blow" test you recommended. Following your instructions, I blew into the hose that goes from the flame trap to the throttle body area.
With the oil cap off, I was able to blow into the tube. It was not particularly easy, but not too hard either. I then did the same with the oil cap on. That had about the same amount of difficulty blowing in, but when I took my mouth off the tube, some, maybe all, of that air came right back out. Tried that four times, same result. Having some (or all?) of that air come back out suggests that blowing into the tube builds up some pressure.
What do you think? Am I drawing the correct conclusion? Should it be easy to blow into the tube when the oil cap is off? By the way, the connection between the small hose and the nipple on the flame trap is not tight. Air may be leaking at that point. Not sure where to get a replacement for that hose. I think the flame trap end of the correct hose has a smaller inside diameter in comparison with the other end, but not sure.
My next step will be to get a new insert for the flame trap and either clean or replace the flame trap. Then I will do another blow test. If I still have resistance with the cap off, I will conclude that the oil box is at least partially clogged. That will make me want to change out the box before replacing the timing belt and front seals.
Incidentally, I called around to price the cost of replacing the oil separator box from someone knowledgeable about 240's. The going labor rate is a one or two hour job at $100 per hour. I would provide the parts. One experienced mechanic suggested that the first job to do is change out the seals to determine why they are leaking. Could be improperly inserted seals, defective seals, etc. He made it sound unlikely that the oil box would be clogged at this mileage (140,000). He said if the oil box is that clogged, I surely have another serious problem. He was not inclined to believe that there is any concern about Elring seals ("Don't believe everything you hear on the Internet"). He said they are still the go-to seal for this application.
|
|
-
|
|
|
Hi faof2,
Sorry for the late reply.
I'd wait to verify crankcase pressure passes from the engine through the PCV piping and into the engine before futzing with seals and such unless you know or your service schedule mandates front seals replaced.
With oil cap off you blow into the tube and as you exhale you should hear air displaced from the sump and out the open, uncapped oil fill hole. While not easy, the air volume passes through the vent (lager) and drainback (smaller) hole that comprises most restriction when forcing air through from where the formed PCV hose or pipe that secures at the accordion air intake hose near the throttle body.
You are two seal or plug that small vapor vacuum line that connects at the side (nipple) of the flame arrestor housing to the air intake port must be plugged at the air intake port end. Something conical. Yes, these hoses do fail after 29 years of service.
The PCV vacuum line that connects small nipple here at the side of the flame trap or flame arrestor housing? Plug the opposite end that small vacuum line that connects to the air intake manifold. You are concerned with verifying whether air passes through the PCV system.
The small diameter PCV vacuum line is used when the engine idle to use engine manifold vacuum to draw crankcase or oil sump pressure into the engine.

(From https://www.fcpeuro.com/products/volvo-flame-trap-nipple-240-740-940-3501707)
If any vacuum line without a clamped end is loose, trim it and try again if length allows, or replace it with new PCV vapor line of snug-fitting inside diameter. ID I used is 3'16" 30R7 fuel line. The dumb-dumb retail chain stores would nto know whjat a PCV is lest it boomped their boomer or hipster car.
Also used this for the vacuum connection between the FPR and the air intake manifold.
The breather / separator box:
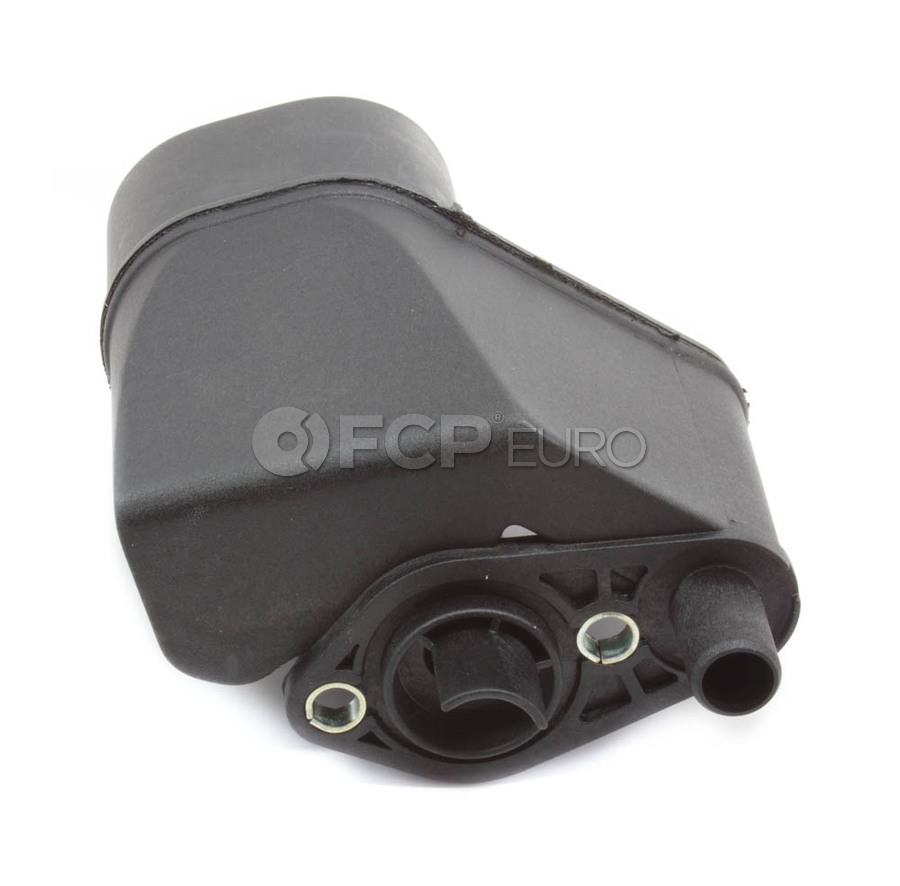
(From https://www.fcpeuro.com/products/volvo-pcv-oil-trap-240-740-760-780-940-genuine-volvo-3501160oe)
Looking down at the two holes with a performance manufacturing marking the two holes.
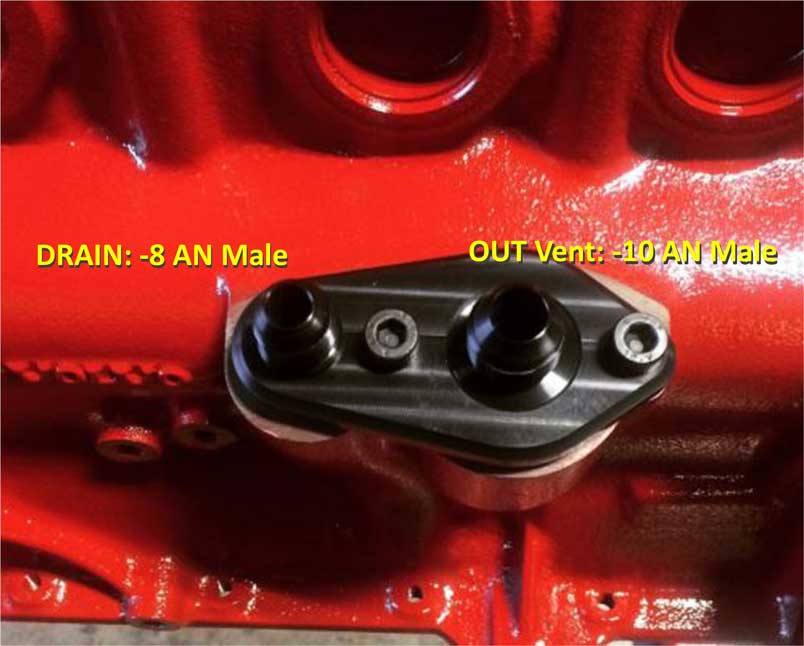
(From https://www.240turbo.com/catchcan.html --- Some will install a catch can to omit PCV from the air induction intake system for performance or the engine creates to much sump pressure as the engine compression rings wear or other cause for engine cylinder compression blow by)
I plug the small and blow through the large PCV pipe. I do this as the glove test and the loose oil cap test for PCV was not so conclusive.
When I do this, and exhale, forcefully, through the PCV hose at the end that secure to the accordion style near the throttle body, reveals an obvious difference. With oil cap off I can hear and feel with hand the air displaced through the oil fill port with cap removed. With cap on, the effort is nearly impossible, yet you are compressing air into the oil sump and when you release air will release and come out at the hose where you were exhaling.
Replacing the engine oil seals (five of them total excluding gaskets) Determining why the seals are leaking is not a way to determine the leak cause.
"An experienced mechanic" does not mean an honest one.
I'd verify whether the PCV system is clogged or not.
You can verify the flame arrestor sieve at visual inspection. Easily cleaned yet 30 years of service can embrittle the plastic and hose bits. An image of the flame arrestor sieve in my 1992 240 GL:
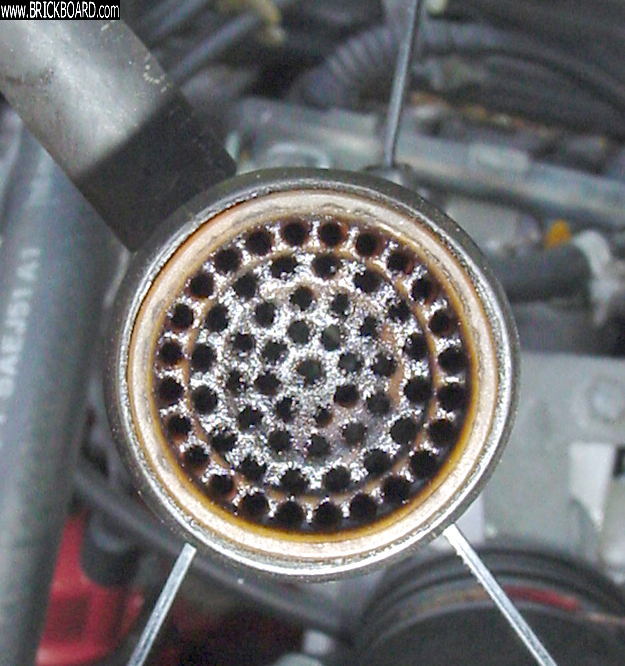
Though coated, the holes are clear.
The FAQ page with the section on PCV in the (copy and paste URL)
https://www.brickboard.com/FAQ/700-900/EngineSealsBeltsVent.htm#Crankcase_Ventilation_A_Treatise
That stated, please remember your 1991 like my 1991 240 is around 30 years of age. So seals do fail and leak oil without excess crank pressure. As was the case in my 240 with the very thin and brittle gasket that seals the (what some call) the timing cover that carries the lower two front engine seals - intermediate cam and the crank seals. The hardware that secures the timing cover was barely to snug. I guessed engine vibration and oil seeping that lubed the threads caused the hardware to loosen. I've remove the timing plate from other four cylinder overhead cam redblock engine and the retaining hardware was at a proper torque more or less.
Too bad I don't have my 1/4" and 3/8" torque wrenches.
Never lend tools out. Ever. Or books, records, or money.
Questions?
--
Jonathan Harshman Winters III: The Mightiest, Greatest, & Most Powerful North American Comedian & Comedic Actor in Perpetuity
|
|
-
|
|
|
Hi "Kittysgreyvolvo".
No need to apologize for a delayed response. Most of my submissions have been late. Too many other things demanding my attention. I'll get to this job one of these days. By way of context, the reason I am planning to replace the seals is that I have a serious leak of oil coming from the under the timing belt cover. The reason I am paying attention to the PCV system is that excess pressure might be the reason that one or more engine seals blew out. In fact, you already sent information on how to check if the PCV system is clogged. With the engine running and the oil cap off, I put my hand over the oil cap hole in the valve cover and felt pulses of pressure. At no time was there any vacuum. I looked at the flame trap and saw that the gizmo with the holes in it did not appear to be clogged. As per your instructions I pinched off the small hose from the flame trap, then disconnected the large hose from where it enters the bellows. With the oil cap ON, I blew into the hose. It was hard to blow into, and when I let go, some of the air came right back out. Next I took the oil cap OFF and blew into the hose. It was just as hard to blow into this time. The only difference was that no air came back out when I stopped blowing. This tells me there is a clog in the PCV system. Would you agree?
I have instructions on how to clean the oil separator (aka oil box, breather box) with solvent and compressed air without removing it from the engine block. At some point I plan to do that in addition to replacing the now oil soaked timing belt and accessory drive belts, the water pump, the tensioner, and maybe the accessory mounting bushings. I just now got around to reading Dave Stevens December 11 response. I plan to respond to that in a day or two. Again, thanks for your interesting comments.
|
|
-
|
|
|
Hiya faof2,
Happy Holiday Seasonings!
Next I took the oil cap OFF and blew into the hose. It was just as hard to blow into this time. The only difference was that no air came back out when I stopped blowing. This tells me there is a clog in the PCV system. Would you agree?
Yeah, a clean to the oil breather separator box sounds a useful effort.
Yeah, you may need to replace the engine oil seals. There is the rear main crank oil seal in a carrier plate that uses a thin gasket from the factory. Also, there is, more critically, the rear round cam seal. (If we forgot to mention?) The rear cam seal can blow out in time with age and excess crank pressure.
The nearly 30 year old oil trap of PCV breather box may be frail from under-hood conditions. Also get the Volvo o-rings that seal the box to the block. Also, take great care with the drain back pipe that hangs by a rim. These embrittle and can be easily dislodged, falling into the engine oil sump, requiring oil pan removal to get. Dunno if you can get new.
44$ at Tasca + Ship.
https://www.tascaparts.com/oem-parts/volvo-oil-trap-3501160
The blow in the PCV pipe is not my idea. Randy Starkie's put the procedure in the 700-900 FAQ in the Seals, Belts, and PCV.
As you relate I'd guess some obstruction is in the oil breather / separator box.
https://www.brickboard.com/FAQ/700-900/EngineSealsBeltsVent.htm#Crankcase_Ventilation_A_Treatise
Do you know the timing belt age or miles? Oil exposure reduces timing belt service time. Also, while your square tooth timing belt should be replaced at 50k miles (Continental or Contitech) and INA brand tensioner at 100k, the timing belt has has an an age duration no matter the miles under the mileage change interval.
Also, you reset the timing belt tension (loosen nut, change the oil, tighten nut) regular. A new belt stretches so reset tension at 100, 500, 1000 miles.
Yeah, I'd replaced the accessory bushes with a set of new urethane and found recent replacements that were solid rubber and urethane. Helps. Two for the alternator hinge action, one for the alternator tensioner assembly where it secures to the block. And, forgetting, two for the AC and 1 or 2 for the power steering pump.
Have you visited your local self service car wash that delivers heated hot water for both wash and rinse? May take a few visits, yet a large jug of Simple Green in a good durable spray bottle with a good generous spray, and let rest for some minutes to a dozen or more, can help decrease the engine and the engine bay.
Front of B2xx engine with t-belt gear pulley cogs and water pump removed.
Front of B2xx with timing cover or plate removed
Interior side of the B2xx timing cover or plate with both seal bores shown with seals installed:
Images from the UK version of:
https://www.brickboard.com/FAQ/700-900/EngineSealsBeltsVent.htm
As:
https://www.volvoclub.org.uk/faq/EngineSealsBeltsVent.html
The two locations hosting the 700-900 Series FAQ. The UK site has other info.
The timing plate name may be wrong. What it was called on the over head valve redblock engine like on 120, 160 and more vintage as inside was the crankshaft to camshaft timing gears.
Have some white lithium grease or spray and relube the hood hinges, latch, and catch. Also, treat the door and trunk hinges and latches the same. Use the red straw to get into the door hinges. I let it remain though some may say it looks ugly. You can also get the more expensive clear silicon grease that does not look as bad yet attracts less grime and hangs on longer.
Do you know how old the timing belt is or how many miles ago it was installed?
Hope that helps. Sorry to go on so long.
Happy Eggnog Holidays!!!
Roasting Chicken and Seeking Technical Writer Work Boyeeeeeeee
--
Jonathan Harshman Winters III: The Mightiest, Greatest, & Most Powerful North American Comedian & Comedic Actor in Perpetuity
|
|
-
|
|
|
Hi "Kittysgrey - - - -",
Thanks for your interesting submission. You asked twice about the age of the timing belt in question. About two and a half years ago (less than 10,000 miles)I had a local shop change the timing belt, water pump, accessory belts, and seals. About six months ago the oil leak began and it has become increasingly worse. At first I thought it might be due to poor workmanship (faulty installation of the seals). Now I think it more likely the seals failed because of excess crankcase pressure.
Your submission dated December 12 raised two new questions for me.
1. The pictures "Front of B2xx engine with t-belt gear pulley cogs and water pump removed", and
" Interior side of the B2xx timing cover or plate with both seal bores shown with seals installed:"
Am I seeing another cover plate with more than eight holes that has to be removed? That would also mean I need another gasket, right? In all my studying up for this project I have not noticed that plate or heard mention of it or the gasket. Am I missing something here?
2. You mentioned going to the local self service car wash to clean the engine. Yes, I was planning to do that to clean the entire area that is now covered with the oil that has leaked out and has been blown by the fan all over the engine compartment including the underside of the hood. But now a new development. On the way home at night suddenly all the dash lights lit up. I drove the remaining two blocks home and in the morning I saw that the belt driving the water pump and alternator had broken. So now I can't drive it until that is repaired.
Now my question: After taking off the fan, that clutch thing, and the shroud, can I put only the fan pulley back on (without the fan and the clutch). It kinda looks like I can. Whadda you think? If that is doable, a belt could go on to circulate the water when the engine is running. That way I could drive to the car wash three miles away. I would not need the fan itself for such a short distance. The water pump would be essential.
By the way, I've noticed that the pictures you supply are always clear and distinct. I want to compliment you on that. It really helps to have clear, properly focused pictures. In this case it generated another question.
I do appreciate the help you are giving me in getting prepared for this project.
|
|
-
|
|
|
Hiya faof2,
Catastrophic!
About two and a half years ago (less than 10,000 miles)I had a local shop change the timing belt, water pump, accessory belts, and seals. About six months ago the oil leak began and it has become increasingly worse. At first I thought it might be due to poor workmanship (faulty installation of the seals). Now I think it more likely the seals failed because of excess crankcase pressure.
You reside in San Diego, CA? So hourly labor prices at like 100$+?
Is this repair service Volvo capable and tooling equipped? Installing engine oil seals or most oil seals without a proper seal press can lead to seal failure.
The images are from the perpetually useful 700-900 Series FAQ. You can see the link to the page, so check out the images in the context of the article about the engine seals, belts, and PCV.
Read this article if not already (copy & patse into new browser tab or window):
https://www.brickboard.com/FAQ/700-900/EngineSealsBeltsVent.htm
So thank the Volvo 700-900 FAQ creators and editors (none now) and Jarrod Stenberg for hosting this site. I'm able to use HTML to link images for display in articles. Some of them silly.
I would not drive a RWD Volvo without cooling system fan.
As already described to you by folks way smarter than me about RWD Volvo, replace the accessory belts and the alternator with known good used or new. The factory alternator sounds seized from your description and as other responders here have replied to you.
Yet the engine oil leak you describe sounds catastrophic. I'd refrain from driving it as an abundance of engine oil coating the engine bay can lead to engine bay fire. I'll guess the engine bay smokes, mostly around the exhaust manifold.
As for an alternator, the current new Bosch alternator for 240:
AL157X
You may need to or have the alt pulley swapped from old to new.
A less expensive option is using a Bosch (no other rebuild service) rebuilt alternator.
The other option is to locate a useful and trustworthy (HA!) electrical auto service to rebuild the alternator you have. New bearings and other bit. Research the electrical auto service. Probably more $$$ than new Bosch.
Less expensive is finding a new Bosch replacement from 240 at a salvage yard. I've been lucky as I have found newly replaced Bosch brand alternators with not so much wear.
If you mentioned you used a repair service to replace seals, belts, earlier I missed it. The seals should not have failed you unless, yes, excess crank case or oil sump pressure. Cause may include excess compressing passing by the piston rings. Yet you may want to clean the breather box as other here responding to your posts recommend.
You may be able to find a Volvo Penta marine service shop to rent you the 1986+ crank pulley counterhold and the counterhold for the two camshaft pulleys (can use same counterhold on 1985 and older two number 4-cylinder redblock engine like B21, B23, and so forth in North America.
The condition you relate in your engine bay worries me that you will be able to pass CA_state emissions (smog) check.
PCV is an emissions control. So you may very well fail on the alone, no matter the exhaust emissions check.
Questions?
Art Benstein's bright and happy instructions.
Hope that helps.
Eggnog Boyeeeeeee.

--
Jonathan Harshman Winters III: The Mightiest, Greatest, & Most Powerful North American Comedian & Comedic Actor in Perpetuity
|
|
-
|
|
|
Hello kittysgreyvolvo,
Every time I read one of your submissions I learn of something I had not previously considered. So thanks for the most recent missive. It had not occurred to me that the broken fan belt could have been caused by a seized accessory. I wondered if it might be caused by the oil weakening the belt. I also considered the possibility that debris might have been thrown up from below, as I have no plastic guard piece underneath. So I just now ran out to check if the alternator is turning. To my relief it does turn smoothly. Is that sufficient to establish that the alternator is not seized?
As for the smog test, I was fortunate to find a random "test only" facility which was willing to test the car despite it having a leaking exhaust pipe and would leave oil leaking on to the shop floor. It passed. I'm now good for two years.
You asked about the qualifications of the shop. No, they are not Volvo qualified, nor do they have the seal installation tool. Because of an error they made on this job, I will only use them in the future for simple jobs, like maybe a tail pipe replacement.
I am willing to purchase at least the crankshaft seal installation tool,if only I could find a seller. The most recent place I checked (in Paradise, California, don't recall the name) said they no longer sell Volvo tools. I have an inquiry in to Volvo Penta but I do not anticipate they will be willing to rent the tool.
Changing subjects, I have a question. When I logged on, there was tribute to Art Benstein. I'd like to read what he sent in, but do not know how to find that. Do you have a link?
Thanks again for the informative comments
|
|
-
|
|
|
The alt - water pump - crank pulley belt may have been old, under excess strain from too much tension.
Thank you. Glad to help. If not always correct.
Also, on 1991, like my 1991, uses two matching alt - water pump - crank pulley belts.
Yes, exposure to oil will lessen lifetime. Same to the other belts, mostly so the timing belt.
You passed CA-state smog with an exhaust leak? Hmm, well, you and the shop got away with violating CA-state emissions control laws. Fix the exhaust leak.
Old Volvo ownership value is best realized as the owner can learn or knows how to inspect for faults as you trace symptoms the fault causes. And then apply repair. The other way is ensuring you have a very full bank account and spend the hourly rate and parts markup. I'm wary that some shops will buy cheapo quality and markup to premium prices. The shop you used appears incompetent or dishonest or both.
See the SHOPS link on the main page. You also have the Click and Clack Car Talk website that lists shops promoted by the radio show listener. There is also the Volvo Mechanics site. Where you are located the rates are premium.
You may want to find the "belly pan" or lower engine splash pan I guess as iPd calls it. Though treat the exhaust leak. Using the Bentley 240 manual and the many articles here treating the repairs you plan to make, you may be well equipped to effect quality repair you may not need, and should not need, to revisit.
You mean this thread as tribute to our Art Benstein?
Open letter to Art Benstein re. the future (copy and paste URL in new browser tab or window)
https://www.brickboard.com/RWD/volvo/1664165/open_letter_art_benstein_re_future.html
The main brickboard page posts active or favored posts through the use of the thumbs up  when clicked. Also, Jarrod Stenberg may choose articles that he links to the home page. when clicked. Also, Jarrod Stenberg may choose articles that he links to the home page.
Hope that helps!
--
Jonathan Harshman Winters III: The Mightiest, Greatest, & Most Powerful North American Comedian & Comedic Actor in Perpetuity
|
|
-
|
|
|
Hi "kittysgreyvolvo",
Again, your pictures are outstanding in clarity. That helps me.
Two "last" questions.
1. On December 12, you wrote: " Yeah, you may need to replace the engine oil seals. There is the rear main crank oil seal in a carrier plate that uses a thin gasket from the factory. Your submission had three pictures of the front of the Volvo engine entitled:
A. Front of B2xx engine with t-belt gear pulley cogs and water pump removed.
B. Front of B2xx with timing cover or plate removed
C. Interior side of B2xx timing cover or plate with both seal bores shown with seals installed:
Am I correct in assuming I do not need to remove this front cover plate to change the front engine seals?
I am somewhat confused because the Dealer's parts diagragm (exploded view) shows a cover plate and gasket on the front of the engine. In your comment above you mention a rear oil seal in a carrier plate with gasket.
2. Is your 91 Volvo a California car? If so, I assume it has an EGR valve like mine does.
The picture I attempted to attach did not.
|
|
-
|
|
|
Firstly solve the PCV clogging issue or whatever is causing the excess engine oil sump pressure.
I guess we have resolved, based on the symptoms you report that the:
- Your 1991 240 engine exhibits excess crank pressure. Clogged PCV or combustion blow by.
- The repair shop you paid good money for did not perform a use repair with the front (all three?) engine oil seal replacement. They probably did not make use of a seal press.
The combination is resulting in catastrophic oil loss.
1. So, "On December 12, you [kittehs Grey OvLov] wrote:
"Am I correct in assuming I do not need to remove this front cover plate to change the front engine seals?"
You may want to remove the front color (what some may call the timing plate) to replace the gasket underneath. The gasket is paper thin and embrittles (become brittle, like the air intake manifold gasket) in time. Embrittles sooner if the engine uses regular dino mineral oil and the oil is not changed regularly.
The plate, this thing in the images attached to the front of the engine carries the two lower front engine oil seals. Sometimes also called a carrier plate or cover as the two lower engine oil seals install into it.
You do not need to drop the engine oil pan gasket. Though the two front flange bolts of the oil pan secures the bottom of this plate or cover. The plate or cover gasket is long so you trim the gasket to fit before re-securing the cover or plate. You then press in the new seals.
I have read of others removing the plate, pressing the oil seals in using a flat surface, and remounting the plate or cover to the engine. Yet in doing so the oil seals encounter the crank and intermediate cam shaft surfaces causing the oil seal inner diameter (round) compression spring to dislodge.
No, you do not need to remove the gasket.
You must use a seal press, however. Not your fingers or a section of some flat surface something.
I've replaced this seal on several of my 240s with the low friction 1989+ engine and twice in the not so low friction engines up to 1979 model year 240. The seal is brittle and was leaking. Each time the gasket leaked in different place yielding different oil leak behaviors.
The same for the rear main bearing crank seal (requires transmission removal for access). That rear main bearing crank seal carrier plate uses more or less the same gasket. Larger, wider gasket, yet paper thin. The (usually orange, Victor-Reinz, Elring or the other OEM? I forget the OEM names now as usual) rear main bearing seal wears where it contacts the the crank shaft pulley section the flywheel secure with.
The stealership exploded view diagrams? Know your i-net resources and use them well before spending a $.

Image is here:
https://www.volvopartswebstore.com/showAssembly.aspx?ukey_assembly=242020&ukey_product=1152652
1 SEALING FLANGE PN 1276155
What some may name the timing plate or cover that carries the two lower front seals. Volvo in this era was terrible, a bit, at naming parts. Something lost in translation?
4 Gasket PN 1378493
SEALING FLANGE gasket.
I'll guess you can gather the three front seals. Two are duplicates: The overhead cam seal and the intermediate cam seal. And these are Sealing Ring
Part Number (PN) 6842273. This newer part number uses the viton material and not the orange semi-synthetic rubber material used on earlier seals. (Supersession(s): 1306333; 1306334)
I'd suggest that you clear the excess crank pressure cause first before replacing seals. Phil Machine Man and your other respondents have advised the excess crank pressure cause is a clogged PCV system. Specifically the oil separator breather box or oil trap or whatever the cool kids today call it.
Be prepared for the box to be brittle. Get the Volvo OEM box and the Volvo OEM seals as nothing else will do.
2. Yes, EGR. 1991 model year. Imported by United States Air Force officer in the late 1990s after his (with family) Europa continent deployment ended. German market also required EGR at the time, of course, like CA-state.
Does that halps?
Wish me into a technical writer job with a 2020 hourly wage. Need to get new tires on the 1990 240 DL (li'l red) Wagon. May go for Hankook. Made by Cooper Starfire SF340 appears NLA or at at least out of production. Usually do a Walmart or may try Amazon when the big bucks roll in unabated.
Questions?
Sorry to go on so long. The LOL Cat Earl Grey Tea has me replete with theobromine. Same stimulant as in chocolate.A little caffeine.
Vivaldi Chromium-based browser seems okay. Chokes a bit on video stream where FireFox and Google Chrome do not.
WINDOWS 7 FOREVER. Windows 8x and 10 can eat sewer effluent. Or, back to Linux. Yet better, Windows NT 4.0 SP 6.0a is better, if primitive. UI/UX perfection in Windows NT 4.x. Nearly.
Spare a Thumbs Up, please?
--
Jonathan Harshman Winters III: The Mightiest, Greatest, & Most Powerful North American Comedian & Comedic Actor in Perpetuity
|
|
-
|
|
|
Hi "Kittys Grey - - - "
Honest, I am not trying to set the record for the longest thread. Your responses contain information I have not previously considered which generates more questions in my mind. So, thanks for that. Based on your contribution of December 29, I have some questions:
1. How do I give you a thumbs up? (Spare a Thumbs Up, please?)
2. Wish me into a technical writer job with a 2020 hourly wage. I am hereby sincerely wishing you the best in securing a position in technical writing with good wages this year. I hope responding to my questions is keeping you in practice.
3.. "Sorry to go on so long". Not a problem for me - the more you write, the more likely I am to learn something.
3." No, you do not need to remove the gasket". Not sure what this refers to. Do you mean no need to remove the old gasket when removing the front cover plate? Just put the new gasket over the old one? You have talked me into removing that cover plate and installing a new gasket as a preventive measure to avoid having an oil leak from that area. (I have not yet started this project, so at this point I do not yet know the source of the oil leak. I'm guessing it is one or more seals.)
4. "You must use a seal press" I'd like to. As you likely know, it is no longer being made, according to the Volvo dealer, and cannot be obtained through the dealer. I contacted SPX Corporation, Sir Tools, and, at your recommendation, the local Volvo Penta dealer. I even asked the guy in the "Snap On" truck. No luck. If you know of a source, I'm interested. From my asking around, most just put the seals in by hand and gently tap them in.
5. When I start this project this month I suspect I will have questions and will want to consult the Brickboard (with a new thread). I need an easy to follow step-by- step guide to submitting photos on the BB. Art B's instruction was too technical for me to know what to do. Does BB have a tutorial? Any ideas on that?
Again, thank you for your valuable comments.
Happy New Year!
Jerry
p.s. I just noticed that when I typed this out in WORD, even though I tried to highlight your questions by changing the font and the color, those changes did not transfer to this writeup.
|
|
-
|
|
|
Hi faof2 Jerry,
Want to say Fafnir for some reason. Like Fafnir in MechWarrior or in Irish Celtic legend.
Remember, first perform your PCV system repair.
Again, take GREAT care not to disturb or dislodge the drain tube under the breather box drain hole (one of two holes). The material is probably rather brittle now yet appears to endure for more than a few 100,000s of miles if not disturbed.
Should you want details, I performed a PCV repair from atop the breather box to the intake manifold using new parts from the iPd >1988 non-turbo PCV relocation kit I got some years ago. I've replaced the breather box when clearing a clog in it for another person many years ago. The used dino oil and did not change it regularly with poor driving habits of short trips and engine control fault leading to rich running. It was terrible. The guy never lubed the hinges (hood, door, trunk lid) and corresponding latches.
The flame trap housing and flame arrestor sieve is new. Yet the material is not the best and the molding is sort of terrible.
I used hose clamps, and applied a very gentle torque so it seals. I was using UV resistant plastic zip ties, yet these continued to fail, with a resulting OBD-1 socket 2 (fuel injection) fault code of 2-3-2 for low air intake manifold vacuum causing the lambda oxygen sensor to report an imbalance of what the engine eats (air, fuel, spark) and the emissions production in the exhaust.
The Volvo blue stripe PCV vapor hose inside diameter is smaller then the 1989+ orifice tube atop the 1989+ oil breather separator box.
Freely breathing yet sealed (no loss of manifold vacuum) PCV may resolve a major cause and portion of engine oil loss.
Keep in mind you may need to replace the PCV oil breather separator or oil trap box. Use the Volvo OEM box should you replace it and use Volvo seals, o-rings, gaskets.
Same is true when replacing the water pump. You can use Volvo OEM, yet read through posts here on this and other forums as the Volvo blue box water pump, the last one I got was made in England, ended up leaking coolant from the inner seal through the lower weep hole. The anti freeze leak was so slight I could not smell it until the end. The antifreeze leak (green Prestone and distilled water, NEVER tap water) ruined the factory Bosch alternator electrically. Bearings were fine and a recent set of Bosch brushes. The diodes were fine so said the electric digital multimeter.
Huh, nomenclature.
1. When you read a published board on this brickboard, your eye-bulb wanders to the bottom of the article. Below the message find the line:
Was this posting interesting or helpful? 
Click the thumb you choose. No need to at all for me or anyone. As you like.
I'm perpetually wanting and recall how and why not to want.
2. Thanks. Been asking since like 1994 or so. More proof prayer or faith does not work.
3. I meant no need to replace the front timing cover plate gasket as you ask. Merely a suggestion. Same for the rear main bearing crank seal carrier plate. Gaskets like seals fail. I'd replace the paper gaskets.
No, do not replace the paper gaskets if you do not want to do so. You indicate a lack of intuitive mechanical skills and auto repair experience.
The Bentley 240 Service Manual bible may be best for you if not already. You can find these Bentley 240 service manuals used on Amazon and elsewhere. The paper back service manual is a lower price.
You may find method discussion for how to repair using the search feature on the main brickboard RWD forum page. There exist other forums like the UK Volvo Enthusiast forum and maybe Matthews Volvo Site that may contain the information you want.
As for any reference with procedure, the Volvo 700-900 Series FAQ may contain it. I've posted the link that may contain it (copy and paste URL in new tab or window)
https://www.brickboard.com/FAQ/700-900/EngineSealsBeltsVent.htm
The article recommends using the seal press.
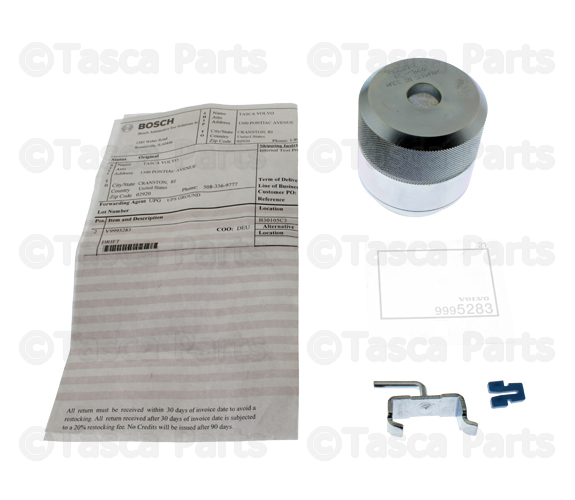
Crank seal press, what Tasca Volvo parts names as a Mandrel:
https://www.tascaparts.com/oem-parts/volvo-drift-mandrel-9995283
The note "Please Call for Availability" may suggest the tool is a classic Volvo part and comes from Sweden.
Same from the Volvo Parts Webstore:
https://www.volvopartswebstore.com/products/Volvo/Drift/11133770/9995283.html
Tasca Indicates the cam seal press tool is NLA:
https://www.tascaparts.com/oem-parts/volvo-press-tool-9995025
You may want to contact the local stealership as there exist the Volvo Dealership network or somesuch. There may be a new old stock on thshelf in North America or at least in the US.
iPd USA and FCPEuro no longer sell these tools. SPX as mentioned in the Volvo 700-900 Series FAQ no longer handles Volvo tools like these seal presses. Seem to sell for Volvo truck engine.
From my asking around, most just put the seals in by hand and gently tap them in.
Yes you can do this. Some get lucky, I guess. Most will dislodge the round compression spring that maintains the inner seal against the rotating cam surface. Some will make a quasi seal press using PVC, a large washer, and use the timing belt cam cog or crank t-belt gear retaining bolt to press the oil seal.
The advantage of using the seal press is how the oil seal fits over the seal press, compressing the inner seal while enlarging the inside diameter of the seal with distorting the oil seal inner sealing edge.
When you slowly press in the seal to a depth that is different then the prior sealing polished mark, as you want the new seal to contact the rotating surface not contacted by a previous seal.
Yet first, service the PCV system. We can hope (HA!) the repair service did install the seals correctly or in some fashion the oil seals work. So you halt or greatly reduce oil loss.
I doubt the front engine oil seals were properly installed from your description and what you revealed through the dialogue in this thread.
Art B's instruction was too technical for me to know what to do. Does BB have a tutorial? Any ideas on that?
Our Uncle Arty B. provided instruction to you or does Art's cleanflametrap.com site include a page on engine oil seal replacement?
The Bentley Volvo 240 Service Manual bible is your best bet. Haynes 240 Service manual is next. Chilton and Clymer may be next.
There also exist the Volvo 240 green manuals from various years around the i-net. Yet these clearly indicate the use of Volvo tools and the illustrations show the tool and the part number. Bentley and Haynes and Chilton and Clymer (and others) will reuse Volvo factory green (or the newer blue cover) service manuals at times.
Also, see YouTube for many instructional videos on this and other RWD service topics for the same engine. You need not merely limit yourself to 1993 240. Something like B230 engine oil seal replacement or water pump replacement or the like.
MS Weird:
p.s. I just noticed that when I typed this out in WORD, even though I tried to highlight your questions by changing the font and the color, those changes did not transfer to this writeup.
If copying the text from MS Word editor, you copy the text and not any sort of HTML formatting.
Does not work so well if you save the content as "Filtered HTML" or merely "HTML". You would learn to merely make use of HTML expressions to display image files, color, bold, italicize text.
Draft and check in MS Word. Then use past into a simple WYSIWYG HTML editor to select the content, apply color and formatting, save as simple HTML. Do not use Cascading Style sheets. Yet as with auto repair, take a class or learn for yourself.
You can use some html in your brickboard posts to apply formatting.
As with our Art's infographic on linking images:
Try here. I-net is replete with resources. Maybe
https://www.w3schools.com/html/
Also see you YouTube for simple HTML formatting. Your HTML editor need not be WYSIWYG. Merely apply the HTML tags to at the start and at the finish of the test you want to change.
You can do this in brickboard with about two hours of time to edit before you can't edit.
Yes, I need more useful keyboard time. Yet a brickboard or facebook is not the same as formal illustrated technical, procedure, process, policy, SDLC (systems or software), manufacturing, or other documentation.
Does that help?
Questions?
No worries. Many more long topics here that are much longer.
Don't forget to subscribe or donate to the brickboard!!!!! Jarrod Stenberg deserves it and I hope his IT and other consulting businesses make him a mint in RWD Volvo autos, or an ongoing pile of Platinum, Gold, and Palladium bullion, or a mountains of paper currency or cryptocurrency units that exceeds inflation and monetary unit devaluation.
Happy New Decade. Starts with the year ending in zero.
cheers,
MacDuffy's Buttermilk Tavern - wants to go back to mighty WA-state. MO-state sucks. Or North Idaho or Western MT or NW Michigan and the Michigan UP at Houghton.
--
Jonathan Harshman Winters III: The Mightiest, Greatest, & Most Powerful North American Comedian & Comedic Actor in Perpetuity
|
|
-
|
|
|
Hi "kittys - - - "
Wow, what a fast response. Okay. Let's go.
I now see the up and down hands at the bottom. Gave you an upper.
About the tech writing. If faith/prayer do not work for you, have you considered asking a knowledgeable friend to critique your writing, or to get suggestions from someone employed with that skill? Just a thought.
Interesting that you bring up fault code of 2-3-2. For several years that was an occasional visitor to my CEL. That and several other codes stopped after I cleaned the throttle body a few months ago.
I have the Bentley book. I find it not sufficiently detailed.( to change accessory bushings.- remove accessory, push out old bushings, insert new bushings. replacement is the reverse of removal). But it is helpful to a point.
I have been reviewing the Volvo 700-900 Series FAQ. I find the detail helpful.
Thanks for the tip on the crankshaft seal tool from Tasca. I'll call them. It looks to me that this tool is different from the onesI've seen pictures of. Have you used this one? Do you know if it will (in your words) ") fit over the seal press, compressing the inner seal while enlarging the inside diameter of the seal with distorting the oil seal inner sealing edge."
I got Art B's instructions in yellow from one of your submissions. Just like the one you attached here.
So far I've looked at quite a few You Tube videos. Some are good, some not so good.
I have taken note of your advice to do the PCV job first.
I guess I'll have to leave learning about HTML and such for another time. I need all the time I can get to do this job.
Happy New Year!
Jerry
|
|
-
|
|
|
Hi Jerry,
A sloe (gin) reply this day. Sorry.
Oh, I know I am good to excellent at all matter technical writing. My portfolio is extensive with examples from the early 1990s. The more recent examples are what I include with the application. My resume, examples, and work history gets consistent rave reviews. 'Snuff of emmoi.
Volvo changed seals from the orange Victor-Reinz, Elring, or Mahle? I forget what brand is preferred (yet I may need to perform a cylinder head gasket replacement on one if not two of my 240s, and forget the cylinder head gasket everyone prefers).
Yet one or all of these named manufacturers make the thinner (grey / brown) viton oil seals. I forget what one of t6hee are preferred. Whomever make the OEM for Volvo.
So you have old school seals that are thicker, and use older seal presses that usually do not need a seal press to open the inside diameter. These seals may be what people write you can tap in or use a flat surface like a section of flat wood or plate metal. Some will use a diameter or heavy PCV pipe where is presses on the back of the seal. Less chance of the inner diameter sealing surface or sealing "lip" that contact the rotating crank or cam shaft rolling back causing the spring to pop out as you press or tap in the older style seal.
I'd not installed the older style seal using those Volvo or after market seal presses since the late 1980s or so on 1970s 240s. So far as I recall, however, the seal bore and rotating shaft dimensions are the same through the production run for all four cylinder overhead cam redblock engines from the factory.
Yep, the Volvo tool for the front crank is meant for the thinner viton material seals (grey or brown color). The image from Tasca for PN 9995283.
Yet we have here in this Turbobricks forum discussion on seals, seal presses, and install method. I'd also clean the bore and use a sealant on the seal exterior.
The image from I guess Brickboard's Eric Planetman? I'm unsure.

Please note Turbobricks cleanflametrap (Art Benstein) using tool he fabricated for the thick orange seal press.
Turbobricks thread URL containing this image:
front seals how to install
https://forums.tbforums.com/showthread.php?t=328865
From left to right, (left) old orange thick cam seal press tool, (middle) older orange thick front crank seal press tool, and (right) is the modern crank press seal with small diameter at front you mount the seal onto (with a little oil) with. In this image all of the seal presses are shown in the seal press direction with the front (open) end of the seal facing toward the engine.
The image does not show the NLA Volvo PN 9995025 meant for both (intermediate and cylinder head) cam seals.
Here is an image as illustration in a GIF image file:

Image is in this page here:
https://www.etoolcart.com/9995025-seal-installer.html
The feature of these two front engine seal presses is the small diameter step to accommodate the inside diameter of the engine oil seal, open the inner diameter, so you press the seal in straight, and in removing the tool by un-threading the center bolt so the seal inner diameter closes against the rotating shaft.
So far as I recall, you can use the newer seal presses with the step for the older, thicker seals.
What is critical is pressing the seal in straight and at a depth in the seal bore wear the seal inner diameter is not pressing on the wear mark of the seal you removed.
You may want to search here using the RWD forum page search. Without an account login, you can find useful information on the
Turbobricks Forums > Mechanical > maintenance & nonperformance forum.
Can help with a Turbobricks account as you get access to performance info and the classifieds.
The cam seal press for the intermediate cam (drives oil pump) and the cylinder head oil seal is the same. Is NLA, and appears as such with facility to install the viton (grey or brown, thinner) seal.
I see your post about accessory bushings. The alternator uses three. One for the long shaft hinge side and another for where the alternator-waterpump-crank pulley tensioner bolts to the block.
What is the condition of the harmonic oscillator damper crank pulley? At your miles and age, the bushing material between the outer pulley belt section and the inner section the crank pulley bolts passes through may be in question. Unless replaced already.
If a crank pulley counter hold, get or use the black anodized one. There is another counter hold for both cam t-belt gears. You do not want to stress the mechanical method the crank pulley t-belt gear and the two cam shaft t-belt gears align to the rotating shaft. Though I forget the tool PN used for the two intermediate shaft t-belt cogs.
HTML is easy. It is a markup language through HTML5 makes it an object oriented 'mark-up' langauge.
Jarrod Stenberg uses CSS (cascading style sheets) so you are limited to simple markup.
You use the brackets < format you want like bold > The text you want bold and then the closing bracket with the < and then the forward slash as / and then the >.
Though no spaces between the expression inside the brackets
I cannot use the deprecated code format tag here in Jarrod's editor.
Yet see how to make a bolded bit of text at some point. Open a text editor, save the file at name (dot) html, yet you can open the file in the text editor, and give it a whirl.
I can't write object oriented source code that is complied into a binary application or is put into a format like Java as a zip file or the current state of JavaScript. I can read it to make reference when producing software API reference guides, yet it is the software coder to provide properly formatted and tested API integration code so the client can build the corresponding API library, now usually a rest API, on the remote server or other secure deployment.
Though my foray into manufacturing, CAD (SolidWorks, AutoCAD, Revit, and others), for assembly, and customer facing hardware deployment and service guides has perpetually damned me from returnbing to software.
I had hoped by now to work with SCADA (software controlled and reporting) for power systems hardware. Energy Storage, Hydroelectric Dams, wind farms, DC-DC or AC-AC or the like integration.
I blame the Volvo from the 140, 164, to 240 and 700-900 for being good with the nuts and bolts and the power systems, at least for product and documentation.
'Snuff about emmoi.
Does that help?
Melatonin Hangover Boyeeeeeeee.
--
Jonathan Harshman Winters III: The Mightiest, Greatest, & Most Powerful North American Comedian & Comedic Actor in Perpetuity
|
|
-
|
|
|
What about the bushings for the alternator, the compressor, and the power steering pump?
I have decided to change the timing belt and seals myself when I get some time. Given that I will have to loosen the four drive belts to get to this work, should I consider replacing the bushings in the three parts driven by belts? I ask because the driven pulleys do not line up exactly right. I suspect the bushings may be worn. Would this be expected at 140,000 miles? Is this a doable job not needing special tools?
|
|
-
|
|
|
Hi,
There is nothing special in the way of tools to replace rubber bushings in all the brackets around the engine thats holding all the accessories.
They are all identical and inexpensive because it is a poor and cheaply designed way of getting around making the units, made by other manufacturers, to fit onto the engine.
The bracket for the alternator is a aluminum casted unit. It was only machined on the engines side so it would bolt flat to the engine, mostly because they were there to put the bolt holes in precisely.
The trouble is holes, that hold the bushings, were left as casted. They were left out of round and not very well aligned in relation to each other in the sand mold. The axial alignment is crooked.
On my 91 I bored the holes for the bushing out and made up some solid stock PVC bushings because my casting was so far off it needed the rubber idea to be discarded. PVC Plastic was easier to machine and on hand to make up oil seal pushing rings of which I usually use Polyethylenes for.
Poly Vinyl Chloride, LDPE and HDPE are this “poor mans” choice of plastics, until I get into technical restrictions of application environments.
The adjustment bracket, at the top, going over to the engine is about the only precision part of the whole mess and they even mounted it on a rubber bushing.
With the bottom bolt going through lower end of the alternator and the upper adjustment bracket fitting on that one bolt coming out of the engine block, is the only way it stays where it should.
Plan on changing the adjustment bracket arm bushing too as it gets squishy over time.
It is easily overlooked but protected as why it does not suffer so much.
That bolt and rubber bushing is crucial to help in holding that alternator straighter, because the lower bushings have got the rest of the weight and strain below with the crookedness going on!
.
Eventually the rubber gives up and allows everything to sag to the whims of the belts.
It’s not so much the miles but the years that the bushings are old! Time gets to everything and everyone!
Luckily, the opposite side was made better, when it came to the brackets on the power steering pump.
It suffers much less of the misalignment issues.
Have you tackled the oil seals?
What brand type did you decide to go with or were they just in there loose?
The cam seal and intermediate seal by Elring fitted to loose on the Outside Diameter for the previous ones I have found leaking.
If you have those try to use a sealant but not silicone!
Try out an aerobic sealant only on the OD.
I have read that it’s better.
Hopes this helps!
Phil
|
|
-
|
|
|
Thanks, Phil (Machine Man), for your response. No, I have not yet opened up the engine front to tackle that job. I am still in the phase of collecting information from various sources, mostly You Tube videos. I am hearing differing opinions from these sources on various aspects of completing this job. Some are contradictory.
I am still undecided about obtaining/buying the tools to insert the seals. The consensus seems to be that they can be correctly inserted without the special tools. Thanks for the tip about putting a sealer on the outer edge of the seals.
The information you offered about the bushings was a bit over my head. If I purchase the bushings and insert them, does that seem realistic? Is it a straightforward job?
|
|
-
|
|
|
Allow me to add a little to the excellent advice Phil gave you.
With new accessory mounting bushings in place and the belts properly tensioned (I now do it properly with a Krikit belt tensioning gauge), I still had my alternator and compressor pulleys slightly out of alignment with the crank pulley. It's nothing overly critical, but it can hasten belt squeal down the road as the belts wear and begin to glaze. BTW, belt squeal can also be aggravated by improperly sized belts that are too narrow (as too often happens when using cross-reference tables to SAE sized belts). When a narrower belts wears it may begin to ride in the bottom of the pulley groove.
To improve my pulley alignment, I actually resorted to shimming the bolts with washers between the large alternator/compressor mounting bracket and the block. You could even elongate the bolt holes if you really had to, but shimming was all I needed. Yes, it's a bit of work, but it does work and you only need to do it once. Some people go for poly bushings, such as available from places like ipd, as they're less likely to become deformed, but I prefer to stay with rubber bushings as I figure it's better at damping vibration that might hasten wear in the accessories, such as the alternator brushes. I figure Volvo probably chose rubber for a reason. If you have a choice, seek better quality bushings like genuine Volvo or well respected Meyle, over cheaper aftermarket brands like MTC or anything generic.
As for the front engine oil seals you've been discussing, I have to admit I'm not as much of a purist as Phil. I used to use homemade PVC seal presses as others discuss, but I've found it a whole lot faster and simpler just to carefully tap the seals into place, working around in multiple passes. Just be sure to use a reasonably thick, non-pointy tool without any sharp edges that might damage the face of the seal or dislodge the spring behind, i.e. don't use a screwdriver. My preferred weapon of choice for the job is a selection of finger-sized hardwood drifts I made, notched at the end to match the depth I want to set the seal, grinding/filing the tip in a curve to fit nicely between the recess in the block and the shaft.
If you ever see any signs of wear, scuffing or scoring on the shafts, you can set the seal a bit further in or out to avoid it, just so long as the seal remains fully inserted. If you look inside you'll see there's an edge to prevent the seal from going all the way through, just don't press the seal hard up against that edge such that the leading edge of the seal might be deformed. Use a little oil on the inner edge as lubrication, but I prefer to keep the outer edge dry so it will be less likely for them to blow out if the crankcase pressure should ever rise, such as when the PCV system is blocked with grunge. Using something like RTV sealant on the outer seal edge is optional, I've never bothered and I haven't seen any local shops that do.
It's not rocket science, just keep everything nice and square and don't damage the seal. I've never had any problems using Elring or Reinz aftermarket seals, they're both well known brands in industrial applications. Lately I've been going with the slightly more expensive Corteco crank seal that FCPEuro sometimes carries as it looks identical to the Volvo grey seal and the fine folks at FCP always do their best to carry true-OEM whenever they can.
--
Dave -still with 940's, prev 740/240/140/120 You'd think I'd have learned by now
|
|
-
|
|
|
Thanks Dave Stevens for your informative supplement to Phil's knowledgeable advice on these matters. I will want to take some time to read and re-read your advice to make sure I am fully understanding it. I want to prepare as best I can for the day (week?) I tackle this job. Since I have not yet been into this project up close and personal, I can only imagine what the area looks like when taken apart. I may have questions when I get to that point in a couple of weeks, but for right now I have a question. With regard to the bushings, let's see if I understand what you are saying. When I take off the drive belts, I will see a bracket mounted on the engine block to which the alternator is attached. I will remove the alternator from the bracket, then remove the bracket from the engine block. I will then replace the bracket, adding a steel washer between the block and the bracket, thereby moving the bracket and therefore the alternator about 1/8" away from the block. Ditto for the A/C compressor. Am I understanding that correctly? When you wrote "Yes, it's a bit of work" I wondered if it might be more difficult than I am imagining.
Do I need instructions for removing the bushings from the alternator? Or for inserting the new bushings? Is that a straightforward job? Do I squeeze them in, like in a vice? Do I need to lubricate any part of the new bushings?
On to the engine seals. This is the part of the job that intimidates me. I am trying to imagine what your "finger-sized hardwood drifts" look like. Are they hardwood dowels cut to length? Or more like a rolling pin(for baking and rolling dough) size? What diameters? Any chance you have a picture that shows where/how you notched the ends? Would softer woods work as well?
You wrote " I prefer to keep the outer edge dry" and "RTV sealant on the outer seal edge is optional". Would RTV sealant help the seal stay in place? If RTV is used, does that make it harder to remove the seal next time? For that matter, when a seal fails, does it break loose out of the circular hole in the block, or does the soft inner part fail to seal against the shaft?
For what it's worth, FCP Euro told me that they sell the Genuine Volvo crank seal and it is made by Corteco. He said they also sell the exact same part under the Corteco brand for considerably less cost.
Please know that I appreciate the knowledge and experience you (and others) have shared on this forum and for this particular engine repair. Likely, this is not the end of my many questions.
|
|
-
|
|
|
Hi Jerry. I think perhaps we're starting to overcomplicate things a bit for you here what with all our suggestions and details. This is getting to be a very long thread, so allow me try summarizing your project as I see it in a stepwise fashion:
1) You've mentioned noticing oil at the bottom of the timing cover, around the water pump and on the timing belt. That spells the front engine oil seals, the upper cam seal being most likely, and that the seal is likely pushed out a bit, not just weeping past a worn seal. This is almost always due to excessive crankcase pressure, which usually means the PCV system is getting blocked up with deposits. When it's enough to push a seal out, it's usually getting pretty badly plugged somewhere, not just something like the small hose going from the flame trap housing to the throttle body.
a) The most common cause is simply the flame trap filter element finally getting totally plugged. Checking and cleaning the flame trap is a routine service item, like at every oil change or every other oil change depending on how things have been in the past. That may well be the entire problem, or it may be more than just that. BTW, at that same service interval, be sure to give the throttle body a thorough cleaning -it's all related.
b) The next most likely area of the PCV system to cause such problems is the oil separator box plugging up, not necessarily totally plugged, but at least darn close to it. The oil separator box often only needs to be serviced once or twice in the life of the car, the question is this the day you need to worry about it? Now if you find the flame trap and its hoses aren't blocked (meaning the problem is seemingly elsewhere), or if the flame trap element is horridly grungy (meaning the engine is badly neglected), or if you've cleaned the flame trap area and oil continues to weap past a seal (given that a seal hasn't been pushed out), or if the oil separator box has not been checked/cleaned/replaced in living memory then now is indeed the time to think it could be behind your problems. You've had lots of suggestions how to check it to see if it's plugged by trying to blow air through it. It can get a bit subtle trying to diagnose the difference between a totally plugged box, a partially plugged box and the general difficulty of just being able to blow air back through the crankcase. If you're not sure if it's plugging up then you've got two choices, either just go ahead and remove it anyway for inspection and cleaning (it's likely at least very dirty after all these years anyway so not exactly a waste of time) or try to ignore it for now, hoping it was just the flame trap (you'll know within a month or two if you guessed wrong and the seals start to leak again). If you go after the oil separator box, there's no need to remove the intake manifold, but don't be afraid to remove other stuff to improve access, like the air tube, IAC valve, disconnecting hoses and wire harness, support brackets, even removing the alternator or throttle body if that helps. It's usually a horridly dirty job, so spend a few minutes with engine cleaner or solvent and a roll of paper towels so you can at least see what you're doing in good light. A mechanics or hand mirror can also be useful.
2) Having done your best with the first step to identify and fix the cause of any excess crankcase pressure, then it's time to focus your attention on the front engine seals and deal with them as needed. Remove the drive belts, crank pulley, timing belt and rear timing cover to allow inspection. If there's only evidence of oil leaking at one seal and the other seals are relatively new then you could choose to just replace it, or you can replace all three knowing you'll likely be good to the next timing belt. If you are uncertain about dealing with engine seals for the first time, I'm sure there are plenty of general Youtube videos and on-line tips to help you, maybe even a few for our Volvos.
3) If oil has been on the timing belt, always best to replace it. If it was a relatively new belt, clean it up with solvent and pack it as a spare. If you need more information on doing the timing belt in B230F engines, there's lots of information that can be found on-line, including videos, plus reference info in the 700/900 FAQ here (same/similar engine as yours).
4) Now that you've done the important stuff, you can add other things to your shopping list that are easy to do at the same time, many of which have been discussed.
-Replace timing belt tensioner, unless the old one is relatively new, like say less than 25K on it. Many people replace the tensioner at every T-belt change just to be safe. Some go every 2nd belt after carefully checking for bearing wear. Others may try going longer, but that's sarting to push your luck.
-Replace water pump? If you think it may be needing a new water pump in the next year or so then now's an easy time to do it. Some people routinely replace their water pump with every T-belt, but that's a bit excessive in my books.
-Replace all worn, cracked or heavily glazed drive belts (turn the belt inside out to expose the cracks). Continental belts are a favorite brand for many. You can go to the Continental web site and look up the proper fitments for you car, but it's justy as easy to check a reputable place like FCPEuro who sell belts in the proper metric sizes. Be wary of SAE sized belts as the closest equivalent a manufacturer produces may not be close enough -typically the length isn't too far off and is adjustable for, but the widths are often a problem, often being sold too narrow which means they tend to ride lower in the pulley and may bottom out in the groove when worn, leading to belt squeal.
-Replace all worn/misshapen accessory mounting bushings, esp. check the alternator as it's easiest and often worst. Should be relatively easy to push the bushings out by hand or with ordinary hand tools at the alternator, sometimes a bit more awkward elsewhere, a small F-clamp or C-clamp can sometimes be useful, even a threaded long bolt using washers to make a puller if you're desperate. Most of the effort is just accessing the nuts and bolts and working your way around other stuff.
-Check alignment of drive pulleys, especially if you have belt squeal issues. With the drive belt in place and moderately tensioned, place a straight edge on the face or edge of the pulley and sight to the crankshaft, you can also check the reverse. If alignment is off by say more than half a belt width then you've got a problem probably worth attending to. Avoid over-tensioned belts. When a belt is properly tensioned, a little misalignment due to deflection is normal. Anything more than that and you should at least be checking the mounting bushings for wear or deformity. If you are having belt squeal issues and new bushings don't improve pulley alignment to your satisfaction then you can consider other options like shimming bolts and behind the main mounting bracket or playing with the bushing mounting holes, but this is not at all normal practice and can be very time consuming, so try saving that for another day.
To answer a few of your other specific questions here:
-Sealant is not needed with the engine seals, in fact I would strongly recommend against it. The only time I would use it is if the recesses in the block were somehow scratched or damaged in order to prevent leakage. If the crankcase pressure should ever become excessive again and the front seals are glued solidly in place, it raises the possibility of blowing out the rear main seal, something you absolutely don't want, or blow out the half-moon plug behind the cam (something you've already exerienced). If I see a Volvo engine with sealant somewhere it isn't called for in the manual, like around the valve cover or the trans pan or a host of other places I've seen blue oozing out, then I know there was either an unusual problem there or someone other than a Volvo trained mechanic using Volvo quality gaskets has been working on the car.
-As for the little home made seal drifts I use, nothing special about them at all, just use a little ingenuity with what you have on hand, maybe 2" long of either 1/2" x1/2" square stock or 1/2" dowelling (hardwood or whatever so it can take a bit of tapping with a hammer without getting all dented up), cut a short notch to make a lip at one end to fit nicely between the side of the shaft and into the block recess to push against the seal, setting the length of the lip to match the depth you want to set the seal.
Good luck! I'm sure it will all work out and you can figure things out as you go. You'll be learning a lot about your engine in the process. If you run into unexpected problems at any of those stages, may I suggest you start a new post on that topic seeking help rather than adding to this long thread so that others may better find the discussion and help you.
--
Dave -still with 940's, prev 740/240/140/120 You'd think I'd have learned by now
|
|
-
|
|
|
Thanks, Dave, for your additions to the discussion. I hope to get to this project in January.
|
|
-
|
|
|
1. My question is how exactly do you blow into the system?
Disconnect the larger PCV (positive crankcase ventilation) hose from the black accordion pipe near the connection at the throttle body. The PCV hose connects from the bulkhead / firewall side. The other large hose connection at the top is the hose from the IAC (Idle Air Control solenoid valve). Place the PCV hose clamp aside.
Find the small PCV vacuum vapor line that connects between the PCV flame arrestor and the center of the air intake port manifold. Pinch or plug the end of that vacuum line.
Wat you disconnect, clean, and blow through.

Wipe the end of the hose, it is full of oil sump vapor condensate. Wrap a clean paper towel around the end. Or use some plastic wrap with a small hole for a better seal so you do not have to deal with PCV sump 'flavor'. With oil fill cap removed blow through the hose. Atmosphere your displace should come out of the uncapped engine oil fill. Restore and secure the oil fill cap and blow again. Should be nearly impossible to move any air. Though listen for leaks at any PCV assembly union.
Your concern is that you cannot exhale with oil fill cap removed and that the PCV is not sealed.
If the holes in the PCV flame arrestor sieve are clear, yet you cannot blow through the PCV, the oil breather separator box may be clogged.
FCP sells the seal as Volvo OEM with a link to the in the add to a black aftermarket.
I'd stick with the green Volvo o-ring.
2. Can I expect any general auto mechanic to perform the R & R of the oil separator box competently?
How many miles on your 1991 240?
Made with heat tolerate ABS / Nylon combination, the factory PCV boxes are durable. Yet at 30 years should need to remove the oil trap breather box, you can clean so it breathes. I worry the material is aged and having survived many heat cycling in underhood conditions, a replacement may be useful.
Though in other article I've read many articles where the factory original oil trap breather box is returned to service with merely a new seal.
If you buy Volvo OEM, conmsider checking prices at Tasca Auto Parts in Rhode Island. Their Volvo OEM prices can be cheaper then corresponding after market.
Breather box o-ring. I've seen green and black under the box. $6.36
https://www.fcpeuro.com/products/volvo-oil-trap-distributor-o-ring-949659-1
Tasca $5.38
https://www.tascaparts.com/oem-parts/volvo-o-ring-949659
Victor-Reinz After market. Though made in Vietnam, I'm wary of quality. I've used made in India / China seals around water pump and such and not so good.
https://www.fcpeuro.com/products/audi-volkswagen-vw-crankcase-breather-gasket-reinz-n90467301
3. Do I assume a new seal for the oil separator will come with the box?
No. Seal does come with oil trap breather box. (Not really an oil trap.)
FCP Euro 54$
https://www.fcpeuro.com/products/volvo-pcv-oil-trap-240-740-760-780-940-genuine-volvo-3501160oe
Tasca is 43$
https://www.tascaparts.com/oem-parts/volvo-oil-trap-3501160
BEWARE! The drain tube hanging on the oil drain down return inside the oil sump space. Do NOT disturb. The plastic material may be brittle. If this drain tube is disturbed and broken you MUST drop the oil pan and replace with new.
4. machine man on Sat Nov 2 2019 wrote about the issue of failed seals. I have heard this from other sources about Elring seals. My preferred online supplier, FCP Euro, includes Elring seals in the timing belt kit. I will order another full kit. What brand of oil seal might be recommended, preferably one carried by FCP Euro?
Uncle Phil Machine Man can better answer this.
You have several seal makers and two different seal types by material.
Orange Victor Reinz from FCP Euro (one for each camp, so two total)
https://www.fcpeuro.com/products/volvo-front-engine-seal-6842273
Orange Victor Reinz front crank seal:
https://www.fcpeuro.com/products/volvo-engine-crankshaft-seal-front-940-740-760-780-240-244-245-242
I have no direct experience with Corteco brand aftermarket engine oil seals.
In all instances, you must use the Volvo seal press to press the seals into the seal bore. Do not use finger, piece of wood or what have you. A seal press open up the inside seal diameter so you do not displace the spring that maintains a tension of the inner seal contact on the spinning crank or camshaft. Any other way or installing seals is folly and will result in leaks.
Seal presses:

You may be able to borrow or rent these seal press and other tools like the crank pulley counterhold from the Volvo maritime Penta service. Or from another RWD redblock Volvo owner.
Copy and paste the URL in a new tab or browser window.
https://www.brickboard.com/FAQ/700-900/EngineSealsBeltsVent.htm#Replacing_Oil_Seals
5. Oh, one more question. On this 91 Volvo California car, the flame trap is sorta under another hose. It would be more convenient to have it a ways above everything else. Is there an easy, proven way to have it stick out above to make it easy to check?
Yes.
iPd makes a PCV flame trap relocater kit for LH-Jetronic equipped redblock for 1987 and earlier.
https://www.ipdusa.com/products/5823/106506-volvo-pcv-flame-trap-relocation-kit-lh-aftermarket-106506
I have this kit as iPd said okay or 1988+ LH-jetronic engines. The hose that seals atop the flame arrestor and to the air intake hose near the throttle body was not made well and is finished in some coconut-smelling oil.
All after market save for the real Volvo blue stripe vapor vacuum hose.
1988+ non Turbo kits use an offset hose between the top of the breather box and what the flame arrestor housing slides and seals into. You may be able to use the section of Volvo line that is taller to raise up the flame arrestor.
My 1992 and 1991 and 1990 have a straight section of PCV vapor line with the blue stripe. You may be able to take that hose to an Advantage Auto Parts or some place that sells vapor line meant for PCV of that inside diameter. Must be marked for PCV or as vapor line for exposure to gas and engine oil vapors.
AutoZone has nothing. They tried to sell me 5-10$ high pressure fuel line.
Unsure where you get the blue strip hose.
The PCV piping embrittles after 20-30 years of service.
Questions?
Thanks, guys. I am interested in any comments you may have.
--
7 240s total since 1984. 3 240s today and rotting away.
|
|
-
|
|
|
Thanks kittysgreyvolvo for your detailed instructions for the PCV system "blow" test. I'll do that when I get a chance and report the results in a submission. My guess is that it will confirm that the oil separator is clogged.
Also, thanks for the advice to use the Volvo seal press. I'll bet the mechanic who changed the timing belt two years ago did not use those tools. Could be a contributing factor in my major oil leak.
Your clear Volvo engine pictures were much appreciated.
|
|
-
|
|
|
Thanks to 1908242DLa, Machine Man, and Dave Stevens for you helpful comments. My first task will be to consider and remedy what might be causing pressure to build up. By way of background, several years ago my rear plastic seal on the back of the engine fell out onto the street just as I was making a U-turn to park in front of the house. I was alerted by the trail of large oil drops. I picked up the seal off the street, placed it back in, and jammed it into place with a rag between the seal and the firewall. I sent away for the half moon metal cap and screwed that in place. (side point - the instructions say to take the valve cover off to change the seal/cap. Not sure why, as the cap can be put back in the hole from the outside.).That would seem to indicate that I had excess pressure. Last year I cleaned the throttle body ( which cleared up a variety of concerning symptoms) and cleaned the flame trap. That is the circular plastic piece with holes, right? That fits in a black tube coming up behind the intake manifold? It wasn't very dirty at that time (after years of never being cleaned), but I'll check it again. Can anything else cause pressure inside? Do I need to meddle around further down the tube that goes down from the flame trap?
I will review written material and check videos for additional information. I suspect that will generate additional questions.
To 1908242DLa In response to your questions/comments:
1. At what mileage did you have those seals changed?
ANSWER: Guessing about 135,000 miles.
2. Have you noticed oil loss via changes in the dipstick level?
ANSWER: I first noticed when a Volvo mechanic looked underneath and said that my steering rack was leaking. I then started noticing more and more oil dripping onto the street when I park. I check the oil regularly through the dipstick and keep adding.
Look at the seal at the top of the water pump where it attaches to the cylinder head. If you see oil, you probably need to replace the water pump seal.
ANSWER:There is definitely oil on the top and front of the water pump. I was guessing it was blown back by the fan after leaking out from inside the timing belt cover. The entire area is covered in oil. When you say "water pump seal where it attaches to the cylinder head", how do I remedy that? Is there a gasket? I also on occasion see water near where the pipe attaches to the WP, as indicated by the green color. Just occasionally, but it varies from almost nothing, to a slight drip, to a heavy drip that leaves a small puddle on the ground.
I'll be back after looking into information available online.
|
|
-
|
|
|
Hi to ... fao2,
Speaking of blowing out seals, this is not the first time I have heard of this or I have seen it my self!
I have read the upper cam seal is the one that starts first and then the lower crank seal slowly does its leaky thing.
I have seen one cam seal spin in place while still the inside diameter was fitting the camshaft fairly normally.
That told me the outside diameter was either too small for hole originally the seal itself, shrunk in size altogether? The aluminum head runs quite a bit hotter, more often, than the massive engine block below.
That is WEAR (:) the differences of life get separated a little bit but the crankshaft spins more turns than all of them. It has more surface area to seal so your other drips maybe from there, front or rear?
Sounds like you need a total revamp!
I question just pushing back in that rear plug on the valve cover that's it's really sealing.
Is your transmission bell housing looking kinda black under the firewall?
The EPDM rubber type of a seal has a limit of about 350 degrees, of which, is above the heads temperature or they wouldn't get away with using them. The better quality seal with have more silicone that raises the limit to about 450 degrees.
On all these situations, I have noticed they have been always been Elring seals. There something about them that is not quite right?
Size or material or both?
If you buy one of their rear crankshaft seals, I know for a fact, they with a 93mm on the inside diameter for the crankshaft that measures 92mm.
You always fit the diameter with a seal for that diameter shaft, period!
You can sleeve a diameter up in size a few thousandths, but you never oversize the seal.
In fact, they make a stainless steel ring sleeves to cover over wear grooves or scratches that happen under a seal running area, in extreme cases. They press on very carefully.
They're not cheap, but its better than any other alternatives.
I use a National/Timkem seal for the flywheel engine end. Number 355660H.
The 92mm I.D. on it, of which, converts to a standard American dimension, if you count fractions, as a standard? (:) go figure?
I have never measured the crank dimension for the front seal. I Might, be able to get a National seal for it too, when that comes around.
I don't have that much trouble with a dirty flame trap getting ahead of me!
I imagine it is hard to measure back in there and why I haven't done it.
This all has made me wonder who makes Volvo's crankshafts, but 92mm is in the same tolerance zone of either continent! Which is good for world wide sales!
Ford or its vendors made the crankshafts for the Six cylinder Honda racing bike back in the sixties for them.
They needed a forged crankshaft would not flex or twist and break.
It was really long for any motorcycle of that time and the days of Mike Hailwood.
He was Nic Named "Mike the bike" as he was so fluid in riding the track. Man and machine!
Check his interesting but tragically short life, told by a fortune teller that he must have believed!
https://en.m.wikipedia.org/wiki/Mike_Hailwood
Maybe he rode or felt like the Mortor, in the trick out, Geico commercials?
I have decided to try to not buy Elring brand anymore, if I can get away from them.
I'm going to try FCP's Corteco brand since they are willing to give them a lifetime replacement vote of "confidence" warranty. You got to like something very well yourself, with that one!
National or SKF is a more common brand in the states today. SKF bought out Chicago National Rawhide moons ago!
Corteco's are made by Italian makers and that gives me some pause, but of things that can go wrong with Italian vehicles, it not so much is it with oil leaks!
Fiat is not high on the list of reliable cars! Their electrical systems are only slightly worse the than English made Lucas brand. Fiat and Chrysler together is like K Mart and Sears!
Fiat is wanting out just like Mercedes and Range Rover.
Range or Land Rover uses alternator's by Martinelli. Real special and over costly, buggers even rebuilt, as they are not that rebuildable friendly.
Edit:
Thanks Dave Stevens, for the almost thumbs up and kind words earlier.
Just getting around to doing the catch up on reading and posting entertainment thing we do!
Tried to write about as much as I could on “The nothing” I know about Corteco seals on another thread earlier today. I mean earlier!
I kinda bad mouth Elring seals, especially the camshaft seal and the rear main seals, on another later thread.
This thread is the prelude to that later thread.
Phil
|
|
-
|
|
|
Replace your flame trap. Two of my 240 blew the main seals out due to clogged flame trap. New seals were probably done with the timing belt. Flame trap failure.
|
|
-
|
|
|
At what mileage did you have those seals changed?
Have you noticed oil loss via changes in the dipstick level?
Look at the seal at the top of the water pump where it attaches to the cylinder head. If you see oil, you probably need to replace the water pump seal.
The front has three seals: camshaft; intermediate shaft; and crankshaft. Can you remove the upper timing belt cover to take a look to see which seal is leaking? I suspect that it's the crankshaft seal.
In class, I learned about UV dyes for leak detection. I recommend you get the dye, flashlight, and UV glasses. It's worth the meager cost.
FAQs here and this bulletin board has helped a lot with doing this myself. This section will get you up and running:
https://www.brickboard.com/FAQ/700-900/EngineSealsBeltsVent.htm
Also, if you're a visual person like me, YouTube has videos where others have replaced timing belts and seals.
Oh, and if you replace the water pump, be sure to use the correct gasket material. Ask me how I know that one :(
I've done three timing belt/seals on three Volvos over the years. Time varies, but I would allocate a weekend.
|
|
-
|
|
|
Hi,
If it’s lots of oil, like in running around the upper lip on the oil pan?
Make sure your flame trap hose screen is clear!
You might have excessive crankcase pressure.
You want to make sure it stays clean or you could blow out the rear valve cover seal.
It’s a large diameter cam hole seal that lots of people mount a thin metal plate over it to stop it from becoming a event! IPD sells them, but their really made too nice, for their purpose.
If the timing belt is contaminated you don’t want risk to two catastrophic events!
Check everything out!
Phil
|
|
-
|
|
|
Phil, I wanted to Thumbs Up your post, but that feature is unavailable while Jarrod is tweaking the site. That caution about the rear cam half-moon plug is very well taken and should be noted by others as it can make for a mildly rude awakening when they let go -not that I have personal experience, just seen it happen to others and heard about it many times here. People who religiously check and clean their flame trap and things like the throttle body at each and every oil oil change probably don't need to worry about using a retainer strap, but for everyone else it's cheap insurance.
To Jerry, sorry, the FCPEuro lifetime warranty likely won't help you unless you somehow find a seal that actually ruptured. There's a slim chance it was an installation issue by your shop with one of the seals not being fully seated or seated at an off angle, but after two years without a problem the odds are extremely high a seal was blown out due to excessive crankcase pressure. Keep following places like the Brickboard here and other Volvophile websites and you'll constantly be learning more about such idiosynchrasies as the flame trap. Art Benstein had more than good reason to name his very informative website cleanflametrap.com -do check it out.
--
Dave -still with 940's, prev 740/240/140/120 You'd think I'd have learned by now
|
|
-
|
|
|
fcp always gives me credit for whatever i send back,,I think I have solved all my oil leaks,,Bobbit is a great mechanic in Phillipsburg,Nj,,he told e to use either a pint of kerocene or oil change fluid in the crankcase,drive for 0mles slow,,30mph return & change the oil & filter right aaway...its been 5 mos so far 7 not a drip of oil lost..on a 275,000 miles engine.
|
|
-
|
|
|
Thanks to all of you for your suggestions. Some of it is confusing to me. I'll comment/question one at a time. Here is the submission by "Blindboy".
fcp always gives me credit for whatever i send back,,I think I have solved all my oil leaks,,Bobbit is a great mechanic in Phillipsburg,Nj,,he told e to use either a pint of kerocene or oil change fluid in the crankcase,drive for 0mles slow,,30mph return & change the oil & filter right aaway...its been 5 mos so far 7 not a drip of oil lost..on a 275,000 miles engine.
Is the message here that a mechanic suggested running a pint of kerosene in with the oil, then draining/refilling to seal oil leaks? Any other validation for this?
|
|
-
|
|
|
Hi,
I wouldn’t touch that remedy with a ten foot pole!
Wasn’t that the guys last name, “Bobbit,” that woke up one night missing something!
This paragraph of writing is a little fragmented, let along confusing and has a few other mentees in there?
Phil
|
|
|
|
|