|
|
|
I just checked FAQs, but didn't see an answer.
1988 Volvo 240DL N/A with about 300k miles. It does not have ABS and the entire brake system appears to be stock. My brakes were fine until this morning.
In October 2018, I replaced the brake master cylinder and installed speed bleeders withou any problems until today. Two weeks ago, I bled the rear brakes to make the pedal higher, which happened (surprisingly they were the highest ever on this car). I then refilled the brake fluid to full. No problems with brakes at all until this morning. I have not checked the brake fluid since refilling the reservoir two weeks ago, but never had a brake fluid leak.
I was driving and noticed the brake pedal seemed a bit lower than normal. However, it was not spongy and I had good braking ability.
A bit later this morning, the "brake failure light went on." The brake fluid reservoir was only half full. I added brake fluid. The "brake failure" light went out and the brakes felt fine, i.e. I drove home without any problems (although I can't recall if the pedal went down).
I got home and checked all brake lines, the booster/master cylinder, and bleeder valves (I put a clear hose) with the ignition key in position two. Everything in those areas is as dry as a bone.
However, during the testing process, the reservoir went down a little and the brake pedal sank lower than earlier in my testing the brakes. There's still not sponginess in the brake pedal. On starting the engine, the brake failure light went out.
|
|
-
|
|
|
I got under the car again and had an assistant step on the brake pedal. Only upon applying consistent pressure did I see a small leak from brake junction box which apparently has many other names (brake proportioning valve, brake hydraulic line junction, and manifold splitter). There were no other leaks at any of the brake line connections to the brake junction box.
I'm hoping that Occam's Razor applies and that this is the only source of my brake leak and explains all of the symptoms I've been having.
I really don't want to replace the whole brake junction box, because there are 8 brake lines to disconnect and reconnect.
Is it possible just to replace the brake failure light whatchamacallit?
Thanks
|
|
-

|
|
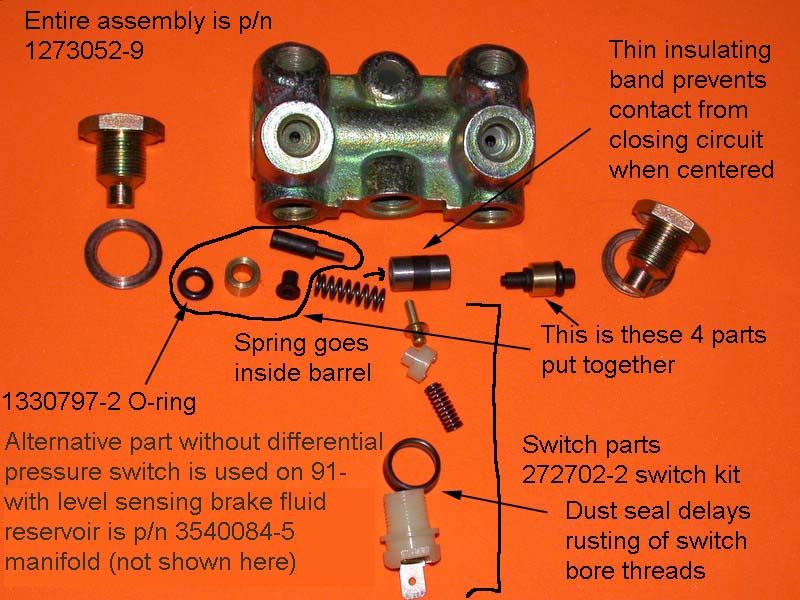
"...brake junction box which apparently has many other names (brake proportioning valve, brake hydraulic line junction, and manifold splitter). "
Yup, this unique little box gets called all sorts of names. One that some of the parts vendors use "proportioning valve" is completely wrong. Its function is to split the hydraulic circuits manifold directions, which creates a junction of lines, and close an electrical switch when a difference in pressure exists between the two distinct hydraulic circuits.
If you do a search, it is also called (by Volvo) "pressure differential warning valve" and by many of us, "the octopus."
--
Art Benstein near Baltimore
I was going to wear my camouflage shirt today, but I couldn't find it.
|
|
-
posted by
someone claiming to be 1908242DLa
on
Thu Jan 24 13:29 CST 2019 [ RELATED]
|
|
Per Michael Yount's recommendation, I just picked up the brake junction unit from a junkyard and will install it, hopefully, today.
With the old brake junction unit that leaks at the brake warning light connection, would you recommend my rebuilding that with a replacement washer, or do you think there are other problems impending with the whole unit?
Thanks
|
|
-
|
|
|
My thoughts on the octopus are that all of those that are 30 years old have some leakage past the o-rings into the switch cavity. The question is how much.
The fluid loss you talk about in this thread is huge. I can tolerate a little dampness behind the switch but only you can choose a remedy based on your own skill level. Based on what I've read so far, I'd take the safe route and suggest you get a new unit from Volvo.
--
Art Benstein near Baltimore
If at first you don't succeed, skydiving is not for you.
|
|
-
|
|
|
Echo Art’s wise counsel - junkyard part for this not worth the trouble. New.
--
82 242-6.2L; '17 Mazda3; '16 Crosstrek
|
|
-
|
|
|
It’s all one “thing” - leaks/failure require rebuilding it or replacing it; either way it has to come out. When you pull it, top up reservoir and place a small piece of tape over the reservoir cap vent hole. You’ll lose only the fluid in the junction which will make bleeding easy, especially if you buy a MOTIVE!
--
82 242-6.2L; '17 Mazda3; '16 Crosstrek
|
|
-
|
|
|
Thanks.
What is the reservoir cap vent hole? Do you mean the two brake lines that leave the master cylinder?
|
|
-
|
|
|
Think I mentioned this much earlier in this epic thread. In order for the brake fluid level to drop in the reservoir, air has to be able to enter the reservoir. If you examine your reservoir cap carefully, you'll see there is a tiny vent hole -- mine is right in the center of the cap. If you top of the reservoir, screw on the cap and seal that hole with a piece of tape, you can disconnect a line(s) below and virtually no fluid at all will come out. It can't leave the system if air (atmospheric pressure) can't get in the top of the reservoir. Covering the vent hole prevents the air from getting in the top. Exactly like putting a straw into your iced tea, putting your thumb over the top and pulling out a straw-full of tea. When you remove your thumb, out comes the tea.
So taking this approach means you WILL NOT have to re-bleed your MC all over again when you replace/rebuild your brake failure switch.
--
82 242-6.2L; '17 Mazda3; '16 Crosstrek
|
|
-
|
|
|
Thanks.
I think I understand.
On the underside, I a dimple and circular-shaped white diaphragm in the center of my main and spare brake reseroir fluid caps. On the top side, I don't see any holes.
Nevertheless, I wrapped the center of a thin, old plastic bag around the entire brake reseroir cap, then tightened it. In other words, that gives me two sides of the plastic bag to cover the entire brake reservoir cap. Is that adequate to accomplish what you recommend?
Thanks
|
|
-
|
|
|
Mech pencil pointing to vent hole in mine. You'll have to try your plastic bag approach and see if it works. I've left mine for a week or two with a little piece of masking tape over the vent hole you see. Not a drop of fluid loss. Fill reservoir as close to the top as you can before taking this approach. My concern about your approach is I don't know what impact the brake fluid will have (chemically) on whatever type of plastic you used.


--
82 242-6.2L; '17 Mazda3; '16 Crosstrek
|
|
-
|
|
|
After about a 60 mile drive, the brake fluid reservoir is noticeably lower, but the brakes are great and no "brake failure" light. I had to replace a wheel hub today (see other post), so I reinstalled the OEM bleeder valves in the right front wheel.
|
|
-
posted by
someone claiming to be CB
on
Mon Jan 21 21:19 CST 2019 [ RELATED]
|
|
Dangerous Mind
Having tagged onto your Hub/Stud TorqueMada thread, and the worry you presented there. Fearing that one wheel stud that wudn't torque to "specs" made you change out a Hub for some "safety reason".
Yet you will drive about - 60 miles!- with a brake system that inexplicably and with an uncertain schedule --- Loses Brake Fluid---in Minutes.
So you put yourself and all those other drivers that you pass on the road during your 60 Mile "test drive" in mortal danger.
The thing about driving a Volvo 240 Tank--U begin to feel invincible---you will survive...the other maybe not so much.
I mean who knows, just as a small child runs out into the road and the driver on the otherside of the road swerves and comes at you head-on.
Not a good time to have a pedal-to-the-floor-NO-STOP incident.
Oh but that wheel stud was 4ftlbs off specs...
Perhaps the Automotive Class you are taking will teach you about TestDriving your amatuer brake job on real people on real roads in real-time with real people.
It's one thing to be a danger to yourself. To be a danger to others. That's another issue.
|
|
-
|
|
|
If it were my car I would sumulate a panic stop. I would have the car engine running at idle, push the brake pedal as hard as if I were on a panic stop and hold it for a couple of minutes. I think there is nothing wrong with that because these components must be able to resist in any car doing panic stop.
Two things will happen.
If the pedal will sink slowly it is for two reasons:
- there is a fluid leak somewhere and it should be visible after holding pressure so long
- or the master cylinder piston seals are not holding their pressure, but fluid stays in reservoir
If fluid still disappear the only place I can see is between master cylinder and booster.
|
|
-
|
|
|
Bleeding the brakes should have no effect whatsoever on pedal height if everything is working as it should. Suspect something has been amiss regarrding air in the system - likely related to MC replacement a few months ago. IF there’s no external leak the only way you can have a significant fluid drop in the MC reservoir is if air in the system finally gets displaced with fluid.
--
82 242-6.2L; '17 Mazda3; '16 Crosstrek
|
|
-
|
|
|
Thanks.
Just to be clear, I replaced the master cylinder in October 2018 and had no problems until the other day.
I also flushed the brakes for two rounds the other day.
|
|
-
|
|
|
I understood that. My point was/is - if bleeding the brakes/rears results in a “higher pedal” then I believe you DID have problems prior to the other day. A brake bleed should not result in a higher pedal unless there was air in the system - that’s a problem that most likely occurred when the MC was replaced - based on what you’ve shared. A sudden fluid drop in the reservoir with no external leak is also evidence of air in the system being displaced.
Did you bench bleed the new MC?
--
82 242-6.2L; '17 Mazda3; '16 Crosstrek
|
|
-
|
|
|
Thanks.
I didn't know to bench-bleed the master cylinder. I could check YouTube; does anyone have a quick link?
I understand the rest of what you wrote. I'm thinking that the master cylinder leaked, causing air in the brake lines. However, I'm open to other explanations that explain the intermittent nature of my problem.
Thanks.
|
|
-
|
|
|
If you didn't bench bleed the MC, then you had air in the MC from the time you replaced it. If this were mine, and given how important certainty in braking is, I would start by bleeding the MC in the car and then completely re-bleed the rest of the system using a Motive bleeder or similar tool that pressurizes the MC reservoir.
|
|
-
|
|
|
As per MY's suggestion to bleed the master in car. Have an assistant to pump the pedal. Place rags under the master and have water available to rinse the fender well. Fill the reservoir. Disconnect the lines to the master. Place a finger tip over each open port. Have the assistant slowly (but steady) depress the pedal to the floor. It will probably take one or two pumps before there's pressure at the ports -- you'll feel it at each port with your finger tips. For each stroke - with the pedal held to the floor reseal the ports with your finger tips and let the pedal up. Repeat the process (may take 5-7 strokes) until you feel the pressure is even at each port and there are no air bubbles. Before having the pedal pushed down one last time have the assistant get comfortable so he/she can hold the pedal fully down for a few minutes. Have the pedal pushed down and held while you let the pressurized fluid pass. As quickly as you can reattach the brake lines and when they're tight the assistant can release the pedal. At that point the pedal should be right up top. -- Dave
|
|
-
|
|
|
Thanks, Dave and Michael.
In my October 2018 master cylinder, I installed the master cylinder and reservoir empty, attached the brake lines, then filled the reservoir with fluid and bled it. The brakes were pretty high.
Last week, I first installed the old brake fluid reservoir on the new master cylinder, covered the brake line holes/ports, filled the reservoir with brake fluid, inverted the new master cylinder/reservoir, carried it over to the car, then installed the brake lines.
Would that suffice as bench bleeding, or should I try what Dave recommended?
|
|
-
|
|
|
I have always done the bench bleeding of the master cylinder with it on the car.
Install the MC with a full reservoir and the brake lines detached. Attach the bench bleed kit fittings to the master cylinder and insure that the hoses are below the level of the fluid in the reservoir.
Slowly pump the brake pedal. This will expel the air and produce bubbles in the reservoir. No need to get aggressive on the pedal travel and it does not take long. Remove the kit fittings and reinstall the brake lines.
If you happen to have some old brake lines available you can bend those to give a hard line right into the reservoir- the rubber hoses supplied with the kits can be difficult to keep in place (below the brake fluid in the reservoir).
Good luck,
Randy
|
|
-
|
|
|
As Starkie says - leave MC on car; detach lines; attach kit; bleed MC; reattach lines WITHOUT letting reservoir run dry (or you have to do it again); then you must completely rebleed the system from the calipers.
--
82 242-6.2L; '17 Mazda3; '16 Crosstrek
|
|
-
|
|
|
The problem was not bench bleeding the brake master cylinder. Doing that solved all my problems, but I have a lingering question (see below).
I bench bled the master cylinder off-car (before I saw your messages). I saw air bubbles come out of the reservoir, smaller and less frequent with continued pushing, and kept pushing until 3 cycles of no air. I got a "brake failure light," despite my not believing any air is in the brakes.
I then bled the brakes. They were horrible. I bled them again. Brakes are back to normal; I couldn't be happier with the brake feel and performance.
There are no leaks at the brake booster interface with the master cylinder. No leaks upon reassembly of brake lines to master cylinder. No fluid loss, except when bleeding the brakes.
At first, the "brake failure" light came on every time I applied the brakes. It took about 20 minutes of stop and go driving for the "brake failure" light to stay off. Any idea why?
|
|
-
|
|
|
https://ozvolvo.org/discussion/8404/brake-warning-switch
BTW --- I'm having a hard time reconciling these two statements from your previous post -- "The problem was not bench bleeding the brake master cylinder. Doing that solved all my problems"
--
82 242-6.2L; '17 Mazda3; '16 Crosstrek
|
|
-
|
|
|
Thanks.
I meant: I solved the problems, so no more "brake failure" light, spongy pedal, or pedal height low. I did what you recommended and bench bled the brake master cylinder. My problems resolved after doing that and bleeding the brakes. Therefore, I believe that NOT bleeding the master cylinder caused all of these problems.
Just to be clear, does the "brake failure" switch ONLY measure differences between the two brake cylinders?
As to your link, do you mean I always need to remove and reinstall the switch after bleeding as a cautionary measure?
Thanks again for all your (all of you) help!!!!!!!
|
|
-
|
|
|
"As to your link, do you mean I always need to remove and reinstall the switch after bleeding as a cautionary measure?"
It's a pretty picture, but it is a drawing based on an earlier design, used in the 140. Disregard the switch "reset" part -- your device, if working properly, resets itself.
--
Art Benstein near Baltimore
Growing old: It's frustrating when you know all the answers but nobody bothers to ask you the questions.
|
|
-
|
|
|
I drove about 50 miles today without a "brake failure" light or brake problems.
When I got home, the brake fluid reservoir was half filled. The master cylinder and bleeder valves are dry. While bleeding, the brake failure light came on, but after bleeding only comes on when I apply the brakes, which work fine, but are down to half-way.
Aaargh!
|
|
-
|
|
|
The brake failure light should come on when you're bleeding the brakes if you use the pedal to bleed. Very few of us do that, I'm thinking, as it is only safe to do with a new master cylinder, so perhaps no one else bothered to mention to you that releasing pressure in one half of the dual-diagonal two-circuit system would be expected to light the warning lamp.
That the lamp lights when you are NOT bleeding brakes tells you the same thing -- that one half of the system lacks pressure. Simply put, if you don't have an air bubble, you have a leak.
Remind us what you have done to the brakes in this car. Did you check behind the new master for a leak into the booster? Have you replaced any calipers?
--
Art Benstein near Baltimore
Laughing is good exercise. It's like jogging on the inside..
|
|
-
|
|
|
"Remind us what you have done to the brakes in this car. Did you check behind the new master for a leak into the booster? Have you replaced any calipers?"
I never changed the brake calipers. The only thing that I did to the brake system, other than replace the master cylinder in 10/2018 and last week was to add speed bleeders in 10/2018 and bleed the system several times starting and since 10/2018.
Yesterday, when I bench bled the new master cylinder, I looked at the brake booster. It was dry in the center and there were no fluid trails emanating from it, as was the master cylinder side that faces it.
|
|
-
|
|
|
"Yesterday, when I bench bled the new master cylinder, I looked at the brake booster. It was dry in the center and there were no fluid trails emanating from it, as was the master cylinder side that faces it."
I'm getting the picture you looked at the outside of the booster. The secret reason for mysterious brake fluid disappearance is said to be an internal leak to the rear, actuator end of the master which is sucked into the engine by the vacuum path to the booster. To see evidence of this, you need to disconnect the master from the booster.
Just because I've never encountered this doesn't mean it couldn't happen to you,.
Another story propagated on this and other forums is "you can't trust the rebuilds" when it comes to a brake master. Combine the unknown quality of a rebuild with your inability to see the large quantity of brake fluid that's gone missing, and the likelihood of this "internal" leak rises in my mind.
I see you're beginning to suspect a defective speed bleeder. The reason I suggest ditching them is not the quality of the product, but the concept of bleeding your brake system with the pedal. Our brake hydraulics are open to the atmosphere -- you may have noticed when examining the reservoir cap.
It doesn't take long for moisture to cause the unused part of the master cylinder to rust. If you bleed from the pedal, you can't help pushing the master past its normal travel and tearing the edges of the seals on the rough rusty unused part. So, if we were to pedal bleed, we'd expect to be replacing the master with a new part every time. Could be why you did.
So, here's what you need to do. Put the original bleeders back on your calipers one at a time. While doing that make sure each one flows fluid as soon as you open it and check the reservoir, keeping it topped up. If any don't flow immediately, leave them open until they do, by gravity. Don't touch the pedal. There's no reason to have the ignition key anywhere but in your pocket. Clean the calipers thoroughly so you can spot any subsequent leaking after snugging the bleeders.
Pitch the speed bleeder valves or save them for a Buick or other closed hydraulics, and never again bleed your Volvo's brakes using the pedal. Gravity, or if you're impatient, pressure (Motive). Some will recommend vacuum (MityVac) but you may find that troublesome as the threads on the bleeders need to seal for that to work.
--
Art Benstein near Baltimore
Never ask your 3-year old brother to hold a tomato.
|
|
-
|
|
|
Thanks again, Art and Michael.
Before I read your most recent comment, I did the following:
I replaced the suspected top left front bleeder valve with the original valve. I drove for about 10 miles today. The pedal was a little spongy in that I had to press kinda hard at stop lights. However, there's no visible decrease in reservoir fluid and no fluid on the top of the left lower control arm.
I also bled the brakes using the brake pedal twice all the way around. Have I damaged the master cylinder?
|
|
-
|
|
|
"I also bled the brakes using the brake pedal twice all the way around. Have I damaged the master cylinder? "
The risk is rust. Because you have a new (?) master cylinder, it hasn't had a chance yet to develop rust in the unused part. You'll know when you've damaged one in one of two ways; (1) the pedal will drop halfway, the failure light (if working) will light, and you'll lose braking to one of the rear wheels, and you won't be missing any fluid, or (2) the pedal will sink slowly while you keep pressure on it steadily at a stop light.
--
Art Benstein near Baltimore
You spend the first two years of their life teaching them to walk and talk. Then you spend the next sixteen telling them to sit down and shut up.
|
|
-
|
|
|
Thanks.
It's a remanufactured master cylinder.
It sounds like I'm okay for now, as I won't brake pedal bleed any more? The only symptom is at a stop light I have to keep my foot harder than normal to keep the car from creeping forward (it's an automatic transmission).
|
|
-
|
|
|
Have been using a hand-held vacuum pump (like Mity Vac) for 40 years. Never understood what folks are talking about leaking past the threads. Never took any special precautions in that area -- likely because I still don't understand the issue....LOL!
--
82 242-6.2L; '17 Mazda3; '16 Crosstrek
|
|
-
|
|
|
When you loosen a bleeder screw, the conical metal-on-metal seal opens and allows brake fluid (and any vapor) past, but reducing the pressure on the nipple below atmospheric to hasten the gravity flow will draw air in past the screw's threads which are not gas-tight, unless you can successfully seal them with heavy grease. The problem is you see this air as bubbles in the fluid stream, not knowing if it came from the caliper or from around the threads.
True, you can bleed the brakes that way, but you have to learn to ignore the bubbles, or make a habit of pulling the bleeder screw and loading its threads with grease. Might be a fine point for the less-fussy. And of course YMMV depending on how many times the caliper has been rebuilt. Some of those bleeder screws fit better than others.
Another method which has the advantage of moving the smaller bubbles in their natural direction uses pressure pumping fresh fluid from the wheels up toward the master. It would also require a good seal at the bleeder screws, but only liquid-tight.
--
Art Benstein near Baltimore
"When I grew up, it was duck and cover! Now it's ... Tuck in them elbows, boys and girls!" - Phil
|
|
-
|
|
|
Kinda figured that was the issue. As it turns out - I've been rarely looking for bubbles; I'm just pulling fluid through until I'm sure I've replaced everything the MC and the lines/caliper hold. So mine has been more of a volume issue. Been blessed with never having a failure or a replacement that introduced a bunch of air into the system that had to be pushed all the way out to the caliper.
You guys inspired me. Made this on this rainy day. I can Motive/pressure push brake fluid into one of the fittings, the other open to atmosphere. Or I can connect one to vacuum and the other to the caliper fittings to pull through. Made with mostly stuff I had laying around - had to buy 2 9/16" jam nuts ($.49 ea) to turn my -6AN male x 3/8" barbed into "bulk head" fitting.

--
82 242-6.2L; '17 Mazda3; '16 Crosstrek
|
|
-
|
|
|
I checked the caps for the coolant and brake fluid reservoirs and they are interchangeable. I have a cooling system pressure tester with a threaded adapter for the coolant reservoir so I thought that I can bleed the brakes by using it.
I don't want to overpressurize the brake fluid reservoir and damage the master cylinder. How many psi should I use?
Thanks
|
|
-
|
|
|
Hey 1908,
I realize you were not asking me, but I can give you at least two caveats about using your cooling system pressure tester to supply the extra oomph you want to get those bleeders squirting. You may think they are insignificant worries compared to foot pedal bleeding, but I think maybe worth mentioning because I get to tell a story from experience.
Before I acquired the Motive product, I used a garden sprayer to supply air pressure to both cooling system and brake reservoir. The number one issue was how quickly you could empty the front or rear section of the reservoir and force air into the system! So easy to be watching the bubbles progress through the bleeding hose and forget how little the reservoir holds.
Yes, this is just a goof, but a hard lesson, because now I had to bleed all over again. With the Motive product, you don't put air into the reservoir, just brake fluid. You don't need to jump up every few minutes and check the rez.
Second issue you anticipated. Too much pressure could ruin your paint job. This one never happened to me, but even with 10psi you can see that plastic reservoir straining at the seams. I wrapped a ziptie around for safety. An explosion of brake fluid would not be fun.
Get a Motive. You can put the fluid in it.

--
Art Benstein near Baltimore
Mistakes are the portals of discovery. -James Joyce
|
|
-
|
|
|
Thanks.
In fact, I actually was asking you and appreciate your feedback.
With the Motive or garden sprayer tool, do you open each bleeder, one at a time, then pump, then close the bleeder, then repeat, or can you bleed several bleeders at the same time?
I see that the Motive is about $50 on Amazon, but garden sprayers are about $6-11. This one is $6 and I have spare clear hose to add and brake fluid reservoir cap:
https://www.lowes.com/pd/Project-Source-0-396-Gallon-Plastic-Tank-Sprayer/3711310
Can I avoid the problem of introducing air into the system by filling the garden sprayer with brake fluid? If not, which Motive model do you recommend?
|
|
-
|
|
|
I use a brake reservoir cap that has a schrader valve installed in the center. I used a step drill to make the opening.
I fill the reservoir and install the cap. I open the bleeder valve and then use a bicycle frame pump (not a floor pump) to apply pressure. When the fluid level needs raised I remove the pump and cap leaving the bleeder open before reinstalling the cap and pump after refreshing the fluid.
The advantage to my method is "cheap".
I like the suggestion to secure the reservoir to the master cylinder with a zip tie although I think the possibility of excess pressure using a frame pump is not as great as using an air compressor.
Randy
|
|
-
|
|
|
Thanks, rstarkie. Are you using a tire valve stem to attach to the cap? If so, do you recall what size drill bit you used to make the hole in the cap?
|
|
-
|
|
|
Yes, a replacement valve stem used on wheels. I believe they fit a 9/16" hole.
I used a step drill.
Randy
|
|
-
|
|
|
With the Scraeder valve in place, how do you "vent" the reservoir to atmosphere under normal operation? There is a tiny hole for that right in the middle of the stock cap, but that appears to have gone away with your mod. Or do you just install an additional valved cap when you're bleeding?
I much prefer the Motive - put the fluid in the container, then go to town. Never take pressure off, never worry about running the reservoir dry.
--
82 242-6.2L; '17 Mazda3; '16 Crosstrek
|
|
-
|
|
|
I only use the altered cap for flushing/bleeding the system. Once that operation is complete I install the original reservoir cap.
|
|
-
|
|
|
Thanks again, Art and Michael Yount.
Michael, which model of the Motive do you have? Do you have a link to it?
|
|
-
|
|
|
I believe Art posted a picture up above somewhere, but this thread length has become, uh, cumbersome.
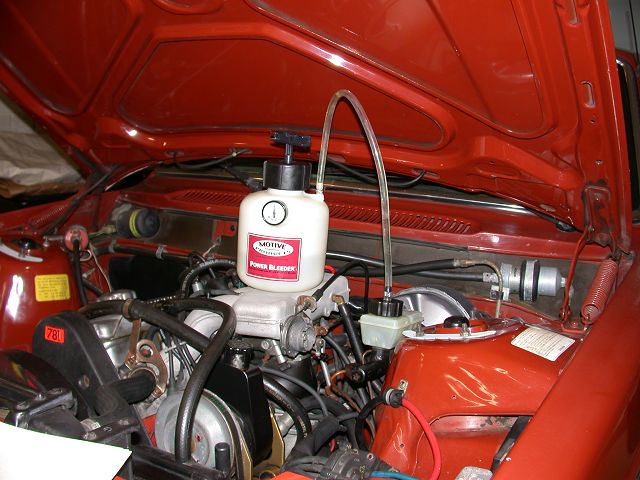
https://www.amazon.com/Motive-Products-0090-Power-Bleeder/dp/B00O6FZJFG/ref=asc_df_B00O6FZJFG/?tag=hyprod-20&linkCode=df0&hvadid=312280085431&hvpos=1o1&hvnetw=g&hvrand=1420927987726355596&hvpone=&hvptwo=&hvqmt=&hvdev=c&hvdvcmdl=&hvlocint=&hvlocphy=9009993&hvtargid=pla-571251780138&psc=1
Here's a pic with it full of engine oil as I used it to prime the new LS3 I put into mine a couple of years ago. Same approach with brake fluid except - 1) brake fluid in the bottle, 2) connected to the cap of the reservoir instead of a -6AN fitting into the engine block, and 3) about 25 psig to prime the oil system; I rarely go above 10 psig when pushing new fluid into the braking system.

--
82 242-6.2L; '17 Mazda3; '16 Crosstrek
|
|
-
|
|
|
Hi,
Everything Art says is true!
It's like when a bird got friendly on a fellow cross country runner, when next to Forrest Gump and he said, "S*** Happens."
I like using my modified reservoir cap and my air compressor with the regulator turned way down under ten PSI. It only shows a zero to ten. So about five PSI will suffice.
A Mighty Vac pump doesn't pump itself, so it requires a helper who regulates! Like my wife! I don't care for that out in my shop! We have an understanding between worlds and if I had kids, they would probably have cleared to the woods! I'll never know?
Art's idea of adding a zip tie around the reservoir, I never thought of. I hate to waste a cheap wire tie but a bungee cord that can hold calipers up will work fine, don't you think?
That reservoir is only stuffed into place and held by rubber "o"rings.
I also didn't realize about the hassle of getting up to check it. I have a car lift so it's a walk around to a ladder and three steps up for a peek.
When it needs more I disconnect the coupler from the cap and the pressure is gone. Refill and reconnect. I get a couple or three bleeds between sets. Almost all the time, I'm just flushing looking for clearer fluid.
I have found out not to open the bleeders very far, as the threads on the bleeder can let air suck in as the fluid goes by and give you the idea that there is air in the system. The threaded body can get loose fast. A half turn is usually enough.
I didn't invest in a bleeder like those because they are too big, IMHO.
I think they were designed for brake shops with many customers, you hope!
It holds a lot of fluid if filled completely and that will get exposed to a lot of air! If not completely full or kept full between uses, You, will have to empty it completely after each use from what I have seen. That means back into a narrow neck fluid bottle.
The setup I have uses a minimum quantity and is as needed dispensing.
That's more important to me.
Also, My modified brake cap fits in a drawer, so easily, I can misplace it! (:)
Nothing like a good hunt to start your day out!
I have gotten better though, now I treat it as a peanut butter jar!
A certain place for it like the crackers or the piece of clear bleeding hose.
Being organized in two places is a modern day challenge!
(:)
Phil
|
|
-
|
|
|
The air above the fluid in the purpose-made pressure bleeder is exactly my concern. That's why Motive made it small, I think.
To the OP: Yes, you pump once and bleed consecutively, and normally there's no need to pump again. If the flow reduces past your patience threshold, check the pressure gauge and give it another pump or two.
The cost of the Motive is about one oil change or set of brake pads, and definitely not a reason to buy a garden sprayer, hope it is glycol compatible, add a pressure gauge and hose-to-cap accessory. Even for a cheap DIYer like me. And the garden sprayer, even the little 1-gal models are way too big; too much air.
Back to Phil: You should consider a nitrogen bottle to power yours. You probably already have one for your HVAC adventures, complete with regulator. One for each residence, right? Just teasing. But at least you could know you did everything to keep moisture from getting near the surface of your new brake fluid!
--
Art Benstein near Baltimore
Crusin' and playin' the radio... With no particular place to go.
|
|
-
|
|
|
Is this model adequate for the Volvo? I'd like to have one for my other car, a Toyota, but it uses a snap-on cap for clutch and brake fluid rather than threads.
https://www.amazon.com/Motive-Products-European-Bleeder-Pressure/dp/B0002KM5L0/ref=sr_1_4?s=automotive&ie=UTF8&qid=1548171341&sr=1-4&keywords=motive+brake+bleeder
|
|
-
|
|
|
Looks like the new Motive is better than mine. Has a swivel joint in the hose!
Also, I see in your Amazon link they have some competition now. Have to quit calling my tissues Kleenex, and my cellophane tape Scotch.
Can't help you with the Toyota, except to suggest you sell it. :-)
--
Art Benstein near Baltimore
RIP
Doug Williams aka Mr. Doug 4/15/2009
George Downs III aka walrus3 7/5/2013
Pete Fluitman aka fivehundred 7/14/2013
Mick Starkey aka TrickMick 1/10/2014
Bruce Young aka lucid 1/22/2017
|
|
-
|
|
|
LOL, thanks.
Which of the brands/models would you recommend just for the Volvo?
|
|
-
|
|
|
Which would I recommend for you?
Hard to say. I like the one I've got. Looks like the one you linked, but yours is newer and perhaps improved. I won't tell you what oil to use or how often to flush your coolant.
Thing is, every tool and method we use is slightly biased by the investment we make. Notice, no one (except lucid himself) will admit to making a mistake by buying the crank holding tool. You've got mama to answer to for the price of that new impact wrench. Of course it was worth getting! We want to justify our decisions.
You need to focus on learning how the hydraulic brakes work in your Volvo if you're going to maintain them yourself. Take pride in learning the theory for yourself, not in following unexplained instructions given by others. What CB said about brakes being important underlines our concerns.
--
Art Benstein near Baltimore
A man will pay $20 for a $10 item he needs. A woman will pay $10 for a $20 item that she doesn't need.
|
|
-
|
|
|
Hi,
Yes I have Argon for welding. It's only at one house! (:). I rotate the cars that go south back up for services.
I used my air compressor because it comes with ready made fittings. Besides my welder is a big Mig, Stick and scratch start Tig machine from the 70's. It rolls on a cart I made for it that holds large bottles. A wee bit much to roll to the lift when I have an air hose right there!
I figured that the reservoir is already small or smaller than a large bottle of half empty brake fluid.
You are right the factory cap is vented and very small, so that's the way of the world, that you learn not to sweat!
As far as compability, I'm sure or pretty sure that all the bottles we are talking about using are made out of polyethylene and not expensive nylon. The fluid comes in HDPE I believe?
Polyethylene comes in at least two densities. Milk bottles are LDPE.
I keep rods and flat slabs of both in my shop to tinker with.
I have a whole thick drawer of various non-metallic materials hoarded away.
I love to machine easy cutting things, like aluminum too!
Have a nice day!
Phil
|
|
-
|
|
|
Thanks.
Machine Man, would you post a photo of your brake bleeding set up?
Art and Machine Man, do you mean wrap a zip tie around the bottom of the master master cylinder and the reservoir, only around the reservoir, or both?
|
|
-
|
|
|
Hi,
I have not made many pictures of things I have done to put on the Brickboard.
Those few that I have done, I had help with camera to the file thing.
I don’t understand the whole url, jpeg thing or having a host and so forth. I don’t understand where to get what information, how it’s works with all the variations of browsers or formats and so forth!
I struggled with that old DOS system years ago and that frustrated me to no end!
I have seen Art’s yellow banner note but it’s a Greek language of symbols and I’m totally gun shy with jitters from those blue screens of death!
I still have 35 mm film slides that I would like to convert onto a disc to take to Navy reunions but everytime I look into it, I find out that the equipment is questionable, at best!
No truth on how well it works!
I’m afraid it’s another nasty rat’s nest to throw money and effort into!
It’s like going back and living with and fixing Microsoft’s bungling and bundling software scams, for Free!
Microsoft own their soles to the “freelancers” that helped fixed their stuff! IMO!
APPLE survived only because Microsoft needed competition to look legitimate in not monopolizing.
It help to beat down the many other ways to build computer operating systems in the process!
That’s the only godsend!
I have wasted thousands of dollars on Microsoft’s & IBM’s education through three, now defunct, makers of computers. Plus throwing away good working CRT monitors for the newest upgrades, each time, that makes keeping Volvo’s, a well worth it, endeavor!
The cap modification is very simple.
I used a right angle brass fitting that has a 1/8” Male National Pipe Thread on one end to go into the cap and a Female 1/4 NPT on the inlet end that fits a standard male air coupler fitting used on air tools.
I drill a small hole, the size of the small end of the tap or about 13/64” of an inch or a “R” drill, if I remember correctly. The caps center then will accept a 1/8” pipe tap.
I thread it into the cap until it reaches about eleven (11) full threads up on the tap.
That’s approximately the full depth on any size new pipe tap. That will make the length correct in the hole for a mating thread in most all materials.
The material, in the case of the cap, is thinner than the normal depth of a pipe thread.
So if you work your way down slowly with the tap and test fit it, you can arrive at the widest supporting diameter for the fitting.
You can then still later swivel it around, some, + & - if necessary
The plastic cap screws onto the reservoir to lock down on it first. If needed you can swivel the fitting to point that allows you direct access to the air coupler!
The angled fitting sticks out parallel to the top of the cap so the air hose will come onto the cap and lay out over the engine without straining the cap or reservoir.
Plug it on for pressure and off its off as air will come out the fitting. There is hardly any volume in the reservoir to notice upon release.
Once you use it a little, you will get the hang of it and never think again about pumping the brake pedal!
Even if you are not a “Mikey,” you will like it! (:)
Phil
|
|
-
|
|
|
Thanks, Phil.
I've taken photography and photojournalism classes and had my work published in the school newspaper. One of my interests is automotive photography.
Maybe we can meet sometime and, if interested, I can photograph digitally your work and cars and give you copies, and show you how to do the computer tasks.
|
|
-
|
|
|
Hi M,
Thanks for the offer!
Many have told me ... you could use some professional help! I didn’t think of it your way, at that time? (:-)
Your profile doesn’t give up your state.
I live in two places along the California Coast and the commutes are long enough!
I have a digital camera from HP but that turn out to be a bust.
I don’t think they made them for all that long.
The HP camera is now a paper weight like my 35 mm Minolta film camera that it was suppose to replace.
Now I only use it to check and see if an infrared “emitter” within remote controls are flashing!
Heck, the Apple cameras can probably do that too!
Thanks again
Phil
|
|
-
|
|
|
That's a really snazzy looking jar! Puts my pickle jar to shame, for sure, but honestly what really impresses me is seeing a clean workbench behind it. That's almost nostalgic for me. Maybe I can take some inspiration.
I haven't used the jar in a long while, but it sorta smells of brake fluid. The cap is pierced by brass tubing soldered in. Maybe I sucked a reservoir dry, but I can't remember. Yes, I think that was it. Had a cracked rez come with a new master, and had to change it after finding the leak.
Master bench-bleeding adapters made from one junkyard front caliper-to-hose cupro-nickel line sitting in the foreground.

--
Art Benstein near Baltimore
Be nice to your kids. They will choose your nursing home one day.
|
|
-
|
|
|
Mine was a pickle jar too Art!
--
82 242-6.2L; '17 Mazda3; '16 Crosstrek
|
|
-
|
|
|
Argh indeed. Sorry for 140 link - I saw the shape, and thought “that’s it”. Thx Art for clarity.
--
82 242-6.2L; '17 Mazda3; '16 Crosstrek
|
|
-
|
|
|
I think this is the post I thought the most of.
"If you didn't bench bleed the MC, then you had air in the MC from the time you replaced it. If this were mine, and given how important certainty in braking is, I would start by bleeding the MC in the car and then completely re-bleed the rest of the system using a Motive bleeder or similar tool that pressurizes the MC reservoir."
OP needs to ditch the speedbleeders.
--
Art Benstein near Baltimore
Forget the health food. I need all the preservatives I can get.
|
|
-
|
|
|
EVERYONE should ditch speed bleeders. chuckle
Even when I can't use my Motive because of a cap mismatch (lots of Japanese cars it seems) I use a small manual vacuum pump at each corner -- pull on the bleeder with the wrench in my hand to open/close. Takes longer, but works well other than the time it takes.
--
82 242-6.2L; '17 Mazda3; '16 Crosstrek
|
|
-
|
|
|
I believe that one of the speed bleeders, front top, is slowly leaking.
After re-bleeeding the brakes, in my garage, there's a puddle under the left lower control arm and only there. The passenger side is completely dry. On the upper surface of the lower control arm are two areas: black grimy; bare metal with rust. Looking at the top speed bleeder, it points that way. I put a clear vinyl hose over it, then pumped the brakes, but did not see brake fluid.
I put the original bleeder back there and will drive the car for a while, checking the brake fluid level. I also removed the rust, primed and painted the lower control arm.
I wonder if an intermittent failure of the speed bleeder valve explains everything?
|
|
-
|
|
|
I hope it's that simple for you! Fingers crossed....
--
82 242-6.2L; '17 Mazda3; '16 Crosstrek
|
|
-
|
|
|
Thanks!
I looked at the brake junction and didn't see any leaks. That part looks like a nightmare to replace given the eight brake lines that go there.
The paint on the top of the lower control arm will dry by morning and I"m not driving the car until then.
Does spraying undercoating onto that painted surface protect it at all?
I've used speed bleeders in my cars for more than five years and this is the first time I've had a problem with it. You and Art are pretty adamently against them. Are leaking speed bleeders common, or are there other problems with them?
|
|
-
|
|
|
In all my decades I’ve NEVER removed/fiddled with the failure switch as part of bleeding any or all of the system. I linked to that as it had a good diagram of the switch so you could see how it worked. Suspect when you had air in the system it allowed/caused the plunger to move providing ground and lighting the light. As you worked all the air out, it finally settled down.
I did have to replace my failure switch a couple of years ago. That’s fun. Top up reservoir and put a little piece of tape over the cap vent hole = virtually no fluid loss at all. When done, crack bottom most brake line at the switch and let gravity push fluid into switch and push air out. Then bleed system as per normal at calipers. Flawless.
--
82 242-6.2L; '17 Mazda3; '16 Crosstrek
|
|
-
|
|
|
Pull up some youtube vids on bench bleeding. There's no alternative that I'd trust.
--
82 242-6.2L; '17 Mazda3; '16 Crosstrek
|
|
-
|
|
|
Thanks.
I'm going to try the bench bleed tonight or tomorrow after I pick up the master cylinder brake bleeder kit.
When I remove the master cylinder, I should look at the brake booster for brake fluid leaks, right?
Just to be clear, because the YouTube videos aren't, if I bench bleed the master cylinder and ensure that the reservoir remains full during installation of the brake lines, can I avoid bleeding the brakes again?
|
|
-
|
|
|
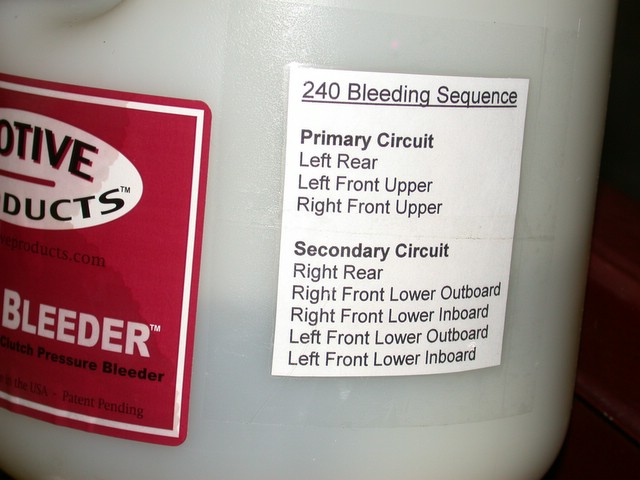
I bought one of the cheap kits that allow you to run hoses from the ports back into the reservoir. No way I’d try it without those hoses - too much nice paint to preserve.
--
82 242-6.2L; '17 Mazda3; '16 Crosstrek
|
|
-
|
|
|
Did you check the manifold where 8 of the brake lines meet?
This manifold is located on the left frame rail below the brake master. To locate this manifold, follow the 2 brake lines from the master cylinder as they go directly to the manifold.
The switch for the brake failure warning light is located inside this manifold and they can leak.
--
Eric
Hi Performance Automotive Service (formerly OVO or Old Volvos Only)
Torrance, CA 90502
|
|
-
|
|
|
I see the manifold from the engine bay and just cleaned the area from the top to better look for leaks tomorrow.
I also looked at my Haynes and Bentley manuals, but they don't describe this part in any of the brake sections. Is there another name or part number for the manifold?
Also, besides just disconnecting all 8 brake lines, how do I disconnect and replace the manifold?
How often do they go bad? This Volvo was horribly neglected with many of the fluids. I forgot to mention that upon buying it, there was no visible fluid in the brake reservoir. When I added fluid, the brakes got spongy, so I bled the brakes. The brakes were still spongy and intermittently the "brake failure" light came on. After I changed the master cylinder and re-bled the brakes, everything was fine until today's issues.
|
|
-
|
|
|
Thanks.
I just got this message. I'll look at that in a few. I looked there and didn't see fluid leak when helper stepped on brakes. I'll look again more closely.
Before Is saw your message, I installed a brake master cylinder - easy/peasy, torqued tightly, no leaks from the master cylinder or brake lines feeding it. I bled the brakes twice all the way around. When the key is on, engine off, the brake pedal is very high. When idling and driving, the pedal is halfway, but it's frim, i.e. no spongy feeling. Brake failure light was off (came on when starting car, but went off immeidately like all other dash lights).
Is it possible that I misaligned new brake master cylinder?
|
|
-
|
|
|
Hi,
You could have a couple things going on.
A new one or a relapse of an old one?
Since you changed out the master cylinder it could be now be leaking into the brake booster.
This is in an area behind the push rod.
The rebuild could have failed now or an adjustment was needing to be done to the brake booster back when you had the old MC on there.
Having the low height on the brake pedal could be from several reasons with the pedal mechanism?The space under the steering column is not where I like to do any Squinting either! May need to be greased?
That symptom is hard to diagnose from an armchair to what could be causing it.
A bad adjustment on either side of a booster, a bad booster or the MC was truly failing like you thought!
This may seem to be a "number two" moment within nature (:-) but actually it is a case of bad luck, with rebuilts, that happens!
When ever you change a master cylinder, you have to check the push rod adjustment of the booster out to the cup in the new rebuilt cylinder. The rod on the brake booster is adjustable by loosening a nut on the rod.
The rod needs "to stick out" from the brake booster and go towards and inside the cup in the Master Cylinder.
There needs to be about .050 maximum gap between the rod end to the depth of the MC's cup.
You have to measure from the rods tip to the boosters face, to see how much excess, or not of length is going towards the disc's inside bottom area, from the bolting face of the MC.
This space is to allowed for play to the inside cylinder of the MC.
The Piston needs to move all the way back against its stop, all on its own, when the brake pedal is not being depressed.
The booster does not retract the MC's piston. The spring in the booster only helps pushes the pedal back along with atmospheric pressure.
The lack of atmospheric pressure or vacuum from the engine helps you to push the brakes on!
If that piston, inside the MC, cannot move back to the rear, there are ports built in the MC that will be open. They need to get blocked off between seals on the piston from both front and rear chambers of the reservoir.
This separates the front from the rear brakes systems to an individual fluid supply and in affect keeps fluid from seeping or blowing out to the rear of the MC in case of a bad cup seal up ahead failure. This helps keep fluid ready and air out!
Depending on seal locations the fluid can circulate between the two chambers in the reservoir though if those ports don't close.
This can give a up to false pedal feel when first applied or "possibly(?) one can think it's a sticking booster spring that is not pushing the pedal all the way back up slightly enough?
You did not say, whether it was both or only one, of the two reservoirs, that were going lower faster.
If the outside seal at the rear of the MC is leaking towards the booster, it gets there "it sometimes," sucks it in by the diaphragm.
You might need to check right below the MC attachment point for wetness that can accumulate during off times.
I don't know what you mean by speed bleeders?
Are you applying a vacuum on that clear tube or is there some sort of a spring loaded push to "pop open" type bleeder gadget that fits calipers now? (:-)
Never had much luck pulling a vacuum on a threaded bleeder nut and getting fluid with no air bubbles.
I apply about 7-8 (?) psi of air pressure to the top of my MC reservoir, through a spare reservoir cap, with an air fitting that I couple to it.
Less brake fluid to expose to a larger bug sprayer gadget and having to keep on a shelf, waiting.
My attaching cap goes into a nice thin drawer!
Phil
|
|
-
|
|
|
Thanks.
It's a new leak that started either today or within the past two weeks.
Just to be clear, I installed a remanufacted master cylinder in 10/2018, then another one today. Here's a link to it:
https://www.oreillyauto.com/detail/b/brakebest-brakes-4474/brake-systems-16456/brake-hydraulics-16513/brake-master-cylinder-11289/3bff094046ed/brakebest-master-cylinder-remanufactured/111921/4559909/1980/volvo/242?q=11-1921&pos=0
This morning, both brake reservoir cylinders lost fluid, but the rear was lower than the front.
When I bled the brakes this afternoon, both brake reservoir cylinders were noticeably low, and I think the rear was a little more lower.
speed bleeders are one-person check valves; loosen, then step on the brakes, then tighten when done.
https://www.amazon.com/Russell-639570-Speed-Bleeder/dp/B000CPCOB6/ref=sr_1_2?s=automotive&ie=UTF8&qid=1547532761&sr=1-2&keywords=speed+bleeders
This evening, I pumped the brakes, then idled the car. No fluid loss from the reservoir. In fact, after I changed the master cylinder and bled the brakes today, I don't see any fluid loss in the reservoir.
Does a master cylinder/brake booster push rod problem explain the intermittent problem that I'm having with brake fluid loss and poor brake pedal height, and also great pedal height with ignition key in position two but lower pedal when engine o?
|
|
-
|
|
|
I wonder if whoever rebuilds MC's for O'Reilly is installing the wrong seal or installing it backwards, allowing the booster to pull fluid out of it. When you separated the MC from the booster did you witness any fluid laying in the "cupped" area on the front of the booster or on the backside of the MC?
I bought a rebuilt MC from Advance Auto for my '73 1800. It didn't seem to work right so I tore it apart, only to find it was missing half of the internal pieces.
--
Current rides: 2005 Volvo S80 2.5T, 2003 Volvo V70 2.4NA, 1973 Volvo 1800ES (getting ever closer to road worthiness)
|
|
-
|
|
|
Thanks.
When I buy aftermarket, I only buy major brand name or lifetime warranty on non-major brand name. About 15 years ago, I went through several Autolite alternators on my 240.
Yesterday, I didn't think to look at the master cylinder and brake booster inner surfaces for leaks.
I just looked at the car's new master cylinder and brake booster. After driving it briefly and pushing the brakes several times at differen times over the past 15 hours, I see no leaks.
I also just looked at the old master cylinder I just replaced. The inside surface, which is chrome and has some sort of snap ring, is perfectly dry. Although half of the black flat part that surrounds and is in front of and outside the inner/chrome surface is wet, but that could be from fluid in the bag that I'm using to return it to the store.
On a related note, how often do brake boosters go bad and what causes them to go bad? Would a junkyard brake booster suffice?
|
|
|
|
|