|
|
|
Greetings,
I've got an leaky camshaft front seal. The sprocket has circular rings for spokes and the back is flat, so I can't wedge anything through the sprocket for levering. The FAQs and a couple of posts suggest ways to get the bolt holding the sprocket loose. These didn't work for me:
3 foot cheater bar with breaker bar
oil filter rubber strap wrench
holding the old timing belt really hard against the timing belt tensioner stud
using wire and rope
impact wrench
Evertough Timing Gear Holder Kit #67013
Second, I can't find replacement water pump pulley studs. The new water pump doesn't have the studs and the old ones are seized on. Are you supposed to use Loctite on those studs? I tried making one by cutting the head off an M6 x 1.0 bolt, but could not hacksaw the head off smoothly enough to permit the nuts to thread.
|
|
-
|
|
|
To try to loosen the camshaft bolt, I used 2 Vise-Grip locking pliers wrapped in rags around the camshaft. I attached them in between the cam lobes. However, after two failed attempts, I saw these new scratches:
a curvilinear scratch on cam lobe #4 (intake?)
https://www.brickboard.com/IMAGELIB/volvopic.htm?js_link=1&id=13339
and a V-shaped scratch on cam lobe on #5 (exhaust?):
https://www.brickboard.com/IMAGELIB/volvopic.htm?js_link=1&id=13340
Both are smooth to touch, ie no ridges upon moving my fingernail on them.
There are other blemishes, like pitting on the camshaft.
Is my camshaft still usable?
If so, is there anything I need to do for those scratches.
|
|
-
posted by
someone claiming to be CB
on
Mon Dec 31 11:57 CST 2018 [ RELATED]
|
|
I really don't understand why you haven't bought a Chain Wrench yet.
You wrote that you can't "find one locally"????
Yet you are on the Internet.
Why are you making this much much harder than it needs to be.
Good Grief Charlie Brown
|
|
-
|
|
|
Hi,
Don’t know how you managed to get marks there but that looks like you only scratched off some varnish or coked oil stain. Those surfaces are almost as hard as glass but only “skin deep” as the saying goes! (:-)
Like Aramin said, nothing rides on the backsides or opposite the lifting lobes.
Also like he said, back the nuts off carefully as there will be valve spring tension in various places along the length of the camshaft.
The heaviest amount will be where yo see the cam lobe rolled and pointing downward!
Come up evenly by watching the caps rise off their seats.
Same going back on too! The last thing you want is break a cap by being crooked.
If you decide to pull that cam be sure to keep the bearing caps in the same “exact” order and direction as they come off.
They may or not be numbered, so keep your act together on those.
It is crucial that they fit back correctly as they have “run-in” with their own wear pattern or location of oil clearances.
These things are in-line bored straight but as the head has heated up and down they are worn into where they have to be, to run smoothly.
Next thing don’t you dare drop it or twist it out of the vise.
I’m sure you understand he wants you grip the thickness of the sprocket.
The rest of the camshaft will be hanging out there! Keep it close over to something in case the bolt snaps or some other, unforeseen happenstance, could occur with this miserable bolt!
Two vise grips huh? Wow! Did you try use some aluminum soda can shim under the bite or jaws of those vise grips?
You are placing harden steel against harden steel as those teeth are hard. No metal to pile up around those teeth!
So consequently, they have no “bite-in” capability but only friction.
Shame to have use that method to begin with!
I personally think leather strips would help increase the surface area of tightness farther around the whole diameter. It will help match up to the jaws in width and length.
Are you using “curved jaw” vise grips? At least a number 10 size! No needle-nose models are allowed here!
Good luck!
Phil
|
|
-
|
|
|
From those 2 photos, looks like the scratch marks are on the non-contact surfaces of the cam. Cam still good to use.
Maybe I could suggest on how to take out the camshaft bolt by alternative way. Dismantle slowly all the cam bearing caps - all those 13mm nuts along the camshaft. Take the whole camshaft out of the engine - along with the rear plastic timing cover. Put the cam pulley in vise grip - sandwiched by thin woods to protect the pulley. Tackle the stuck camshaft bolt at the vise.
Amarin.
|
|
-
|
|
|
You might want to try a 1/2 inch electric impact wrench, Harbor Freight $48
--
Bruce S. near D.C.
|
|
-
-
|
|
|
I saw these in junkyard Volvos, so I practiced trying to remove them. They all were stuck. Any idea how to get them out?
|
|
-
-
|
|
|
I meant to remove the dowel pins from the camshaft.
|
|
-
|
|
|
I meant to remove the dowel pins from the camshaft
-> Leave it there. You need the dowel pin to align the cam pulley. IPD sells solid steel pins but practically its not needed if the camshaft bolt is torqued properly. Besides its a bear to take the rolled sheet pin out.
Amarin.
|
|
-
|
|
|
I believe you're referring to Volvo Tool 5199 counterhold tool. Despite a Google search, I can't find it anywhere.
I see a similar generic tool, OTC Universal Pulley Holder 4754:
https://www.ebay.com/itm/Pulley-Holder-Universal-OTC-4754/222963151376?ssPageName=STRK%3AMEBIDX%3AIT&_trksid=p2057872.m2749.l2649
|
|
-
|
|
|
It is normal to have to transfer the pulley studs from the old pump to the new one. Did you try to remove them by locking up two nuts against one another? I've never used locktite on these--but maybe the pump had been replaced and locktite was used then?
Trying to use a modified bolt as a stud means it can't be tightened into the pump flange. You may be better off using short enough bolts to hold the pulley on along with thread locker. When you shorten a bolt it would be wise to run a nut up the bolt near the bolt head before cutting off the head -- smooth the cut end with a file or grinding wheel -- lock two nuts together behind the first nut and set the first nut into a vice and then use the locked nuts to unscrew the "stud" from the first nut which will "cut" the threads cleanly. -- Dave
|
|
-

|
|
"It is normal to have to transfer the pulley studs from the old pump to the new one."
Just did this day before yesterday. Before I did, I looked for new studs I thought I had on hand (p/n 1266775). Didn't even have any used ones.
I put the old water pump flange in the bench vise face-up after squirting some penetrant on the back side of the studs. Threaded two nuts onto each in turn, using the inner one to back the stud out of the flange. Used two small 10mm wrenches, one to back out the stud, and the other to keep the two nuts locked to each other.
This works great, but takes some time that could be saved by stocking a handful of the 30-cent studs.
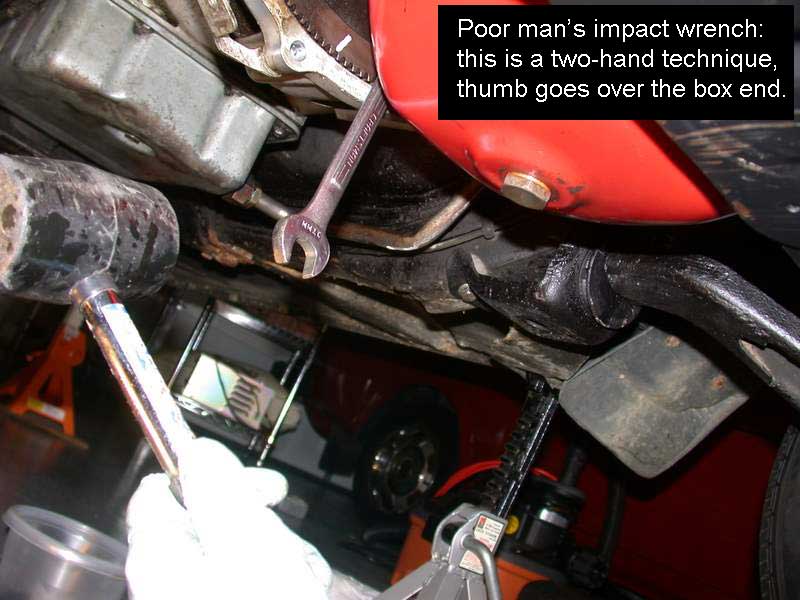
I fully understand the OP's difficulty using various methods of counter-holding the camshaft to loosen the sprocket bolt against brute force. What I don't understand is his having "impact" on his list of things that didn't work. Impact is the ideal tool for this. As a photographer, you probably can feel some sympathy for my inability to present this method in a picture with both hands put to the task, but still, you'd think the idea isn't that difficult to grasp.

As often as this seal-changing challenge seems to come up on this forum, I suppose I'd have to concede videography would better suit the times. People just want to see you-tubes.
--
Art Benstein near Baltimore
If you lend someone $20 and never see that person again, it was probably worth it.
|
|
-
|
|
|
Where can I find the water pump pulley studs, especially for $.30?
About the impact, just to be clear, I put a cordless impact drill on the bolt, but it wouldn't budge. I don't understand your photo; please help me get it. Do you mean to hit a 24 mm wrench, the closed end attached to the bolt and toward you? I'm starting to strip the cam bolt (but my 6 pointed socket still holds it securely) so I'm reluctant to use a 12 point wrench on it.
|
|
-
|
|
|
You cleared up my misunderstanding about the use of impact. I also use an impact screwdriver working on the car, in fact, more often than I use it elsewhere. It is compact, and easy to chuck in 1/4" or 3/8" drive socket adapters, or quickly switch to Phillips or Torx bits.
However, the screwdriver is just not enough to tackle M8 and larger hardware in many cases. For that, I will use an automotive tool. Air impact is the traditional way, but within the last year I acquired a lithium-ion powered brushless wrench I'm still giddy over. To do, for instance, the seasonal snow tire swap on a 240, would require 2 or even 3 fills of my 11-gallon air tank using the air wrench, but with this battery wrench, I can do 2 cars with one charge. Easily. And it has excellent control.
Back to the sprocket bolts. To knock them use takes just one swing of the rubber mallet, so it isn't even needed to fetch the air tank, though I might grab the new battery wrench next time. The photo in my previous post shows the important part, holding the box wrench firmly on the bolt head with a thumb (otherwise you'll chew it up). What that photo didn't show is the swift swing of the hammer to knock the wrench in the correct direction. I needed my other hand to hold the camera, and left the rubber mallet there to your imagination as to how it was used. Here's it being done in another spot -- one where you won't get an air wrench.
About the studs; the internet search engine has to be one of the miracles of the technical revolution. I know it wouldn't be of much use post apocalypse, but for now it has made visits to the local library much shorter and less frequent. Amazingly enough, I can type just the 7-digit part number I mentioned and have multiple ads returned, one of which lists the stud for 29 cents. Genuine Volvo is a bit higher, of course. It just amazes me I don't even need to include the word "volvo" in the search, just the part number! Surely that doesn't work for everything, say, if I type in Jenny's number, 8675309, why, I just mostly get Jenny. But search "1266775" using Google and it tells you where to find a stud! :)
--
Art Benstein near Baltimore
Experience is something you don't get until just after you need it.
Merry Christmas!
|
|
-
|
|
|
I used a dead-blow sledge hammer and a two foot breaker bar several times; the bolt didn't loosen.
PB Blaster won't work, because the threads are too deep inside the camshaft shaft and are blocked by the washer and the sprocket.
How about using a torch to heat up the cam bolt? But I'm concerned that it might not work and would melt the cam seal, making any leaks worse.
In the FAQs,
https://www.brickboard.com/FAQ/700-900/Cooling.htm
one person suggested using "Permatex High temperature silicone rtv gasket maker around the seal (the gray silicone shown in the photo at right)"
to protect the rubber/synethetic o-ring seal at the top of the water pump (that connects to the cylinder head) from camshaft oil leaks, such as I'm having now. I found VersaChem Mega Grey OEM Import Gasket Maker #99939 which says it's high-temp to 650'F and resists oil and water. It contains polydimethylsiloxane and petroleum distillates. I'd like to install it to protect the water pump (even if I can change the cam seal). However, I can't find whether it's rubber/synethetic o-ring safe.
|
|
-
|
|
|
I'm not surprised a socket and two-foot breaker bar didn't help you hitting the end of it with a dead-blow hammer. That isn't what I suggested, either. Try a box end wrench, and use a rubber mallet. Swing swiftly. The breaker bar and sloppy connection to the socket can't transfer the impact and together have more inertia on the wrong side of the problem.
If doing it as I suggest doesn't work for you, maybe it is time for you to invest in automotive tools, or borrow some. It could be a previous owner/mechanic did something to that bolt, like imbue its threads with threadlocker, or use his impact wrench overly much to install it. Or maybe it was tightened an extra amount because the roll pin key was damaged. If it did get Loctite, maybe a torch would help, but there's where my experience stops, and certainly my ability to convey it.

--
Art Benstein near Baltimore
Give a man a fish and he will eat for a day. Teach him how to fish, and he will sit in a boat and drink beer all day.
|
|
-
posted by
someone claiming to be CB
on
Mon Dec 24 17:48 CST 2018 [ RELATED]
|
|
Merry Christmas Art:)
|
|
-
|
|
|
How about this -- install the new timing belt and whatever seals you decide to replace. Install the V belts so the car can be run. Leave the top cover off -- drive to a repair shop and have them spin the bolt out with an air impact and then reinstall it at the proper torque. Drive home - remove the bolt - loosen the tensioner through the access hole - remove the camshaft gear -- replace the seal and reinstall the gear -- retention the timing belt. -- Dave
|
|
-
|
|
|
Thanks.
That would have to be a mechanic, because the machine shops in my area are all out of business, as I was hoping to take just the camshaft and sprocket off of the car and bring them to a machine shop.
How about adding ice to the camshaft bolt to shrink it, or would that damage the camshaft temper?
I'm taking an auto class in a month and should have access to air tools. How much damage would the camshaft oil leakage cause, given no measurable oil loss, but visible oil in front of the seal and on top of the top of the water pump? By the way, the dashboard oil light stays on only for 1-2 seconds on every start up.
|
|
-
posted by
someone claiming to be CB
on
Mon Dec 24 17:34 CST 2018 [ RELATED]
|
|
ViceGrip Chain Wrench --- or other brand.
https://duckduckgo.com/?q=Vice+Grip+chain+wrench&t=ffsb&iax=images&ia=images
use the old timing belt around the gear to cushion the chain.
Brace the tool, idealy against the ground, figuring out the needed wood blocks/cement blocks --- or braced against the frame.
1 foot breaker bar with a long pipe extension.
This is the method I use to Lose the Crank Shaft bolt. When I change the front seals, the Intermediate and the Cam gears require 1/4 the force needed to loosen the bolts.
If you can't crack that bolt free with that, then ???? - something else is wrong or been done by previous "mechanics". Like using that Green LockTight (must use Heat and Extreme mechanical torque to break bolts/nuts free)
|
|
-
|
|
|
"This is the method I use to Lose the Crank Shaft bolt."
On a Volvo? Your '80, I suppose. Careful trying this on a B230 with harmonic balancer; you'll "test" the rubber isolator. :)
https://www.youtube.com/watch?v=oi8TACw1RR0
--
Art Benstein near Baltimore
Merry Christmas!
|
|
-
|
|
|
I can't find any Vise-chains locally. I'll keep looking.
Would a US 1985 240T camshaft work on a 1987 B230F NA?
How about a US 1994 940T B230FT (8 valve) camshaft work?
|
|
-
|
|
|
My Ridgid 18 Volt impact drill, like the one shown on the left in your photo, didn't loosen the bolt despite several attempts.
I'll have to look for a 17 mm wrench with a 6-point closed end.
|
|
-
|
|
|
I don't understand wire and rope?
I've done the rope trick just to learn it and had no problem. Have you put the belt back on and tried then?
You might need the intermediate shaft holder tool to hold everything tight.
As for the water pump bolts why are you wanting to remove the studs? About 1/2 are nuts and 1/2 are bolts.
|
|
-
|
|
|
Tying wire or rope between a spoke hole in the camshaft and the engine hoist that is on top of the thermostat housing; both broke.
What is intermediate shaft holder tool?
I now can't find the link but someone wrote something about jamming a wrench between a camshaft lobe and the passenger side of the cylinder head. But wouldn't that damage the camshaft lobe?
|
|
-
|
|
|
Hi,
I definitely would forget you ever read about trying to jam the cam lobes with anything!
That is just totally scary of what might happen to the cam surface or about the side loading onto the cams journals and bearing caps!
That is truly trying to leverage something from by holding on to the smallest diameter of which is backwards of course.
The camshaft bolt shouldn't be on there that tight to begin with.
It doesn't need a bunch of torque to hold that sprocket on the end. It has a nice fit and is keyed.
The engine and the cam turns to the right, the same direction as does the tightening of the bolt. The camshaft is the driven member, not the driver like the crankshaft at the bottom. The crankshaft bolt get up over 100 foot pounds of torque and turns the accessories!
You should look up the torque value on that bolt as it should be in the neighborhood of the belt tensioning idler unit. I think it's like 35 foot pounds which is like twice more than a spark plug gets tightened.
Its best to leave the older timing belt on their engine and loosen all the bolts first that way you have the drag of the whole motor plus more ways to lock up all those bolts.
If you mangle the old timing belt who cares! Clamp it or jam it with wood as long as you don't mangle the sprockets teeth any place.
As far as the water pump fan flange studs go, I think you do not have to keep using them studs and nuts!
I believe some water pumps come with replacement bolts for the threaded flange so it can be done two ways! I think the new bolts are about 12 mm long from under the head.
Some Regular short bolts will work and the thinner the head the better because you will put them into the clutch flange holes first.
They only need to stick out past clutch flange the thickness of the water pump flange.
Then you move the clutch fan onto the water pump flange nub and work the bolts into their respective holes.
Turn the bolts in as you go around evenly with your fingers or an open end wrench until you get the flanges touching together evenly. You then tighten them up with your 10 mm wrench box end just like you would with the stud nuts.
A good decent Hand tightness is sufficient. It not going anywhere as there is no vibration or any other forces capable of counter rotating the bolts.
It's just like the studs and nuts! In fact you only have one thread fit dimension instead off two that might be too loose of a fit.
No need for any thread locker garbage. The factory doesn't use it on either of the ways.
I hope this helps gets you through this minor dilemma.
Phil
|
|
-
|
|
|
The manual and FAQs here say 37 ft-lbs of torque for the camshaft bolt; that's not beyond my physical ability to deliver. I don't know why it's so hard to get off. A junkyard 940 camshaft came right off with the old belt being held by hand and a breaker bar with 2 foot cheater bar; plus, there was no damage to the camshaft bolt head.
I wonder if I really need to change the camshaft oil seal? Here's what's going on. The crankshaft and intermediate shaft bases have oil on top and below them, so there are leaks there. There is new oil on the front of the camshaft sprocket seal and behind the timing belt cover. There is also new oil on the top of the water pump, where the upward facing rubber o-ring sits. That area had oil and the rubber o-ring leaked a couple months back so I replaced the water pump. I now check that area for oil ever few weeks. However, I don't see any measurable amount of oil loss from the dipstick.
I measured the water pump pulley studs: 30 mm. M6 x 1 x 30 mm bolts won't fit either way because of the body of the clutch fan on one end and the water pump shaft on the other preventing 30 mm from fitting on. Otherwise, I would have cut the bolt head and inserted the uncut end through the front of the water pump metal.
|
|
-
|
|
|
Hi,
I cannot understand why that bolt would be so tight either unless another impact joe got in there before you. I see those youngsters on you tube videos with those mighty but compact electric tools making everything they work on look so easy.
I don't want to say anything to you about lefty "loosy" and righty "tightly" because I'm sure with the amount of frustration, you have had, that thought has occurred to you.
I know about left hand threads and those have screwed up a few very young mechanics.
Don't worry about that, as to where you are working, this does not apply.
I did notice you mentioned in a post about which way you were pulling that big ole' cheater bar and it should have moved that bolt before the pores in your skin broke into a sweat! (:)
As far as machine bolts fitting in between the clutch hub and the flange they will.
You just have to think about how you can work your way through getting out of from between a rock and a hard place!
It take a ingenuity and some perseverance.
I read a story about a guy went hiking and some rocks fell on him. He was trapped under a large stone by his hand being caught under it. He waited and yelled all he could until realized he was not going to get saved.
He ended up deciding that he had to cut it off. I don't remember if he used a knife or whether he chewed through it!
I know you're not that desperate!
You can take a bolt, that is actually slightly longer than a space available in length, because the clearance hole, that it is going into, is larger than the body diameter of the bolt. Wiggle room!
You mentioned 30 mm studs and I said about 12 mm from under the head. 25.4 mm is an inch. You made me go measure that space and you have at least 13 mm. So like I said a thin headed bolt. Those bolts on this car are thin. Maybe some from the "belly pan" below might work, but I don't know the diameter!
This allows a slight angle and if to grind a longer angle on the tip it will make more clearance for the longer side but still leave you a partial first thread.
Have you ever seen threads with one side having a flat along its whole length. They are still strong and You don't have to get that drastic.
Think of it as large chamfer that should be on the end of all threads anyways. This is so it will enter the hole and allow that first thread to engage farther down in the hole first! Far less chance of getting in there and stripping.
If you ever have to cut a thread shorter, it is wise to put a nut on the thread first, before cutting it to a length. This way after cutting the thread you back off the nut and it rolls the last threads burr forward.
Then you take a file or grinder and add a chamfer to get that head start getting it into the tapped hole.
If you don't have any of those tools, those desperations I spoke about can kick in and you find a slab of concrete or a rock and rub the burr away!
By the way, a "chamfer" is always a 45 degree angle but a "bevel" is any other angle but 45 degrees!
If you see on a blueprint that all edges of the part are to be "broken"....that means, dulled enough to not be sharp to the touch and any angle or even rounded off corners is permissible.
When it small parts they get thrown into vibratory machines than have abrasive stones!
Now that I have defended my idea of bolts can be used.... I have to ask .... are you near any hardware stores or auto parts house?
They have got to have some sort of selection because, we have been evaded by metric goods, so long ago, that either studs or bolts are not "hens teeth" anymore!
If a oil seal is weeping it will get worse in time. If it was totally dry around the seal, you leave them alone! The timing belts last a long time but oil film will shorten its life.
Haven't you checked the the crankcase ventilation system hoses out for restrictions. Over pressurization can cause weeping.
On this car it's called a flame trap screen!
You will to clear it out to make it easier on any new seals!
Phil
|
|
-
|
|
|
I have only done lefty-loosy on the camshaft bolt, ensuring before applying the impact drill that it rotated in that direction.
Since I last wrote, I hit the bolt straight on with a hammer to try to jar it loose. It didn't work. I also tried the impact drill a little longer, again without loosening the camshaft bolt
At this point, I'm open to all possibilities. The bolt looks like an OEM right-threaded camshaft bolt. I can't fathom why they put on a left-threaded.
I suspect that the prior owner's over-torquing is the cause. It's the simplest reason and there's more evidence of thread damage on the car.
The proper torque for the crankshaft bolt is 44 ft-lbs + an extra 60' rotation. I don't know what torque that translates to and I prefer and am better at quantitative ft-lbs on the torque wrench to measuring degrees. I loosened that bolt with 71-72 ft-lbs of torque. Does anyone know what the total ft-lbs of torque is supposed to be?
The harmonic balancer was seized onto the crankshaft. After about two hours and leverage from different angles with a crowbar, I removed it - and without damage to the crankshaft.
Of note, the OEM oil drain plug was stripped by the prior owner; when I got the car, there was a brass, 15 mm plug surrounded by a gray/chrome metal protrusion that connected to the red block. This makes me think that the prior owner over-torqued a lot. It needs a replacement washer and has a little stripping on the bolt. Without removing it to take it to a hardware store, is there a way I can determine the washer size and bolt's thread count to do a quick swap during my next oil change?
About excessive pressure, a few months back, I cleaned the flame trap and oil separator, so that's not the cause of the camshaft seal's continued leak.
|
|
-
|
|
|
Wow! What a holiday treat!
I hope it's not snowing where ever you are because you are in the thick of it now!
That's bad news to find out a "strong dim wit" had a hold of a wrench or worse that another "heavy fingered dim wit" used an impact driver as a torque wrench.
It is hard for me to imagine the camshaft bolt ever getting that tight without snapping the bolt.
An air ratchet driver can reach 35 foot pounds pretty easily!
I surely hope it didn't get stripped in by the impact driver dude!
Have you tried loosening the intermediate sprocket bolt that drives the distributor around!
I think it has the same size diameter bolt in it.
It has been a long time since I have had to change seals or a water pump on any of my six Volvos so the sizes are vague.
How are you locking up the camshaft, so it cannot wiggle. If you are trying to hit that "sweet spot" to knock the bolt loose, everything has to be ridgid.
The wrench and hammer usage requires nothing to bounce or flex about.
I personally like a lead hammer and mine is has solid lead head.
There was a lead hammer service where I worked in the seventies that provided them to us. Today, I just melt lead more into a mold around the old handle that I kept up with for years.
Nowadays, because OHSA banned the use of lead in so many ways, they sell lead shot inside a container, inside a molded plastic or rubber head.
They call them "dead blow" hammers and work fairly well when you want to set a part in a vise without marring it. Otherwise, they are a bit light on hitting dead solid and passing on mass force!
A heavy solid weight can really move things but, you better use it carefully.
To explain the bit about rotating the flats, I can give you an example of where that come from.
Back in 1982, I was hired temporarily for three months, due to a layoff period from my previous company, to overhaul a steam turbine that drove a dynamo for the Edison power company in Long Beach, Ca.
There we removed three inch diameter, through studs, that were about four to five feet long from the steam turbine casings.
That required "slugging wrenches" to turn five inch-plus diameter nuts.
On those, it was all about using 20 pound steel sledgehammers and swinging between the feet to hit a super thick handle.
We moved the nuts loose a flat or so and then use big impact drivers to move them rest of the way loose.
When we put them back in after the rebuild we use that same 1 &1/2" square drive air driven impact wrenches to set the studs. Nicknamed, "Big Bertha!"
These studs had a long blind hole down in the middle, that we measured to the bottom of with depth micrometers, before the first tightening routine.
After using the impacts as much as they would turn them, we took new measurements.
This was to tell us how much we stretched them.
Those measurements were sent up to engineers someplace so they could tell us how much more of a turn of the nut was needed to get the stretch or torque needed on the stud. It would come back to us as degrees of more rotation.
It was then that we inserted some heating rods down inside those holes.
They were like a long heating element that you have in your home oven but made straight.
Once the studs heated up, we took our wrenches and beat the nuts farther around and let them cool. Then one more measurement, to confirm the stretch!
Usually it came out, right on or within a tolerance. The pitch of the thread in the nuts or stud threads are a finite distance of a helix.
This was Very important stuff considering the use of super heated or high pressure steam will heat those heavy cases up!
This also was the second time in my career that I got to use what is called the "tight wire" method of aligning end bores of a machined housing. Or in this case, placing several plain bearings true to each other over a long length.
It's There, I learned about "oil stacking." I was not a machinist mate in the Navy but a Machinery Repairman that made shaft bearing for ships but never set one!
It's where oil stacks up on one side of a rotating shaft while inside the bearing!
This is due to friction and gravity!
We also used an offset dimension to shim the bearings around in the housing, in relation to the turbine fins place to run in.
The turbine actually lifts up and stays up on a "pumped in" bath or film of oil.
The oil tanks nearby are the size of a small house.
The first part of my new job was wiping them down inside until spotless.
Almost like cleaning bilges of an engine room in the Navy!
Oh, what a young man I used to be!
But being a Navy veteran has had its pay backs over the years with decent paying jobs that companies are truly in demand for skills and work ethics.
On start up, The turbine is "jacked" around slowly from the outside until all is hot from some steam throttling before going up to speed. The mechanism is called a jacking gear, of course!
When up to speed, the bearings oil is not the same thickness all the way around but the turbine shaft comes up running it is true to the thing called a "pickle."
This is the "slang term" used on the turbine deck by a crew call "steam division animals."
The reason I learned that they earn that name traveling from one work site to another.
Anyway, It's the rotor inside of the generator.
It just so happens, I was a thin enough person back then, that I got the pleasure to lay inside of of that Dynamo.
They needed to install steel belly bands in between the outer housing and around the outside of the windings inside! You were first asked, "Are you claustrophobic?"
It was a GE modification to reduce humming of the windings or coils. If they move around more than they should the wires can wear against each other.
Doesn't sound good when they used hydrogen as a cooling medium. It removes about as much heat as water does per pound I found out later.
That same year the Redondo Beach unit blew its end bell off or cracked it. I overheard that anyways. Then there is badges, for those who get to work overtime, to glow in the dark at nuclear places? Steam division!
In your case with the crankshaft, the 44 foot pounds is preliminary set, that's within most everyone's tool box torque wrench.
The 60 degrees is really only one flat of the hex head as they are 60 degrees each. 360 degrees divided by 6 flats is 60 each!
You mark one to the pulley face and move the bolt one whole flat from that line. I believe and it's a guess, that it probably works out around 120 foot pounds OR about all that an electric or 100 lb. air power impact wrench can hit!
For me that's plenty tight.
I don't know what forces they are trying to overcome that they think will ever loosen that bolt but an impact one .... From where on a rotating shaft!
Harmonics has more to do with the flexing of the whole crankshaft with stroke pluses at certain speeds and loads. This is a four banger with five mains ... I don't get the worry, but then I'm not an engine maker!
The early red blocks never had a damper so the cranks might be thinner or lighter over time?
All I can advise it get everything setup without hardly any play on that bolt in your wrench setup.
A six point socket is the first way to go and you have the whereabouts to know that already.
So it comes down to mass rules!
The oil drain plug is normally a 3/4 inch by 10 pitch thread. The same as the thread inside the spin-on oil filter thread. I think I screwed a drain plug into one once to check that out.
That 15 mm must be a down sized oil plug arrangement because 3/4" is more like 19 mm.
Good luck to you during the holidays!
Phil
|
|
-
|
|
|
The old timing belt frequently slips on the camshaft sprocket, except when I use an impact drill. The impact drill does not move the camshaft, but it doesn't move the bolt, either. Like Art wrote in another post, I went bam, bam, bam, and bam several different times without getting the bolt loose.
Just to be clear about the oil drain plug, there's a 15 mm socket size brass colored bolt fitted on a raised grey metal surface that's firmly connected to the red oil pan. I would like to know what the most likely diameter, pitch, and length so that I can do a quick change of bolts and add a washer, instead of having to take the part to Home Depot to measure it, which would leave the oil drain hole open and exposed for a couple of hours.
|
|
-
|
|
|
Hi,
You know, maybe it just hit me, that you keep calling your impact tool a "drill!"
There is a difference in the two tools.
The drill one is used to drill holes into concrete if you select the hammering portion! Otherwise is and ordinary drill motor.
A impacting wrench uses a much larger hammering mechanism and doesn't have a drill chuck.
I also realized that it's possible to put a square socket driver into a drill chuck.
Is this possible that we are hung between, what is what and there is a misunderstanding here?
This doesn't explain you using long leverage bars either.
To the life of me, something is getting missed!
On the bolt size for the oil pan, the 15 mm hex size, it is not going to directly tell you the thread diameter or the pitch of thread on it.
There are at least three different standards plus the other one's are called, "its anybody guess" or "whatever a designer wants special!" In your case the PO or designer might be called a "bozo!"
You are going to have to take it out and measure it accurately and get a properly design oil plug that has a flange or shoulder surface for a seal.
Besides there is no worry if you let the oil pan drain longer. It's not like something is going to get sucked up in there or leap from the ground to get oily. Fly bye's are also unlikely in December.
If you are going to save the oil to put back in use a very clean pan and cover it immediately to keep out dust. Throw away any smaller drips while you are gone and take all the keys with you so the car doesn't get used! Or disarm the ignition system by taking the coil wire off!
I have rule with my wife and that is, "if I leave the hood up that means the car is out of service." Something is wrong somewhere on the car that I might be working on. You know like missing a wheel!
You might have to send us a picture of that camshaft project. Maybe we can spot a weld bead? (:)
Phil
Phil
|
|
-
|
|
|
Phil, it is an impact screwdriver, in my parlance, not a hammer drill. It won't loosen a cam sprocket. I can get the tough 5mm hex screws out of the door latch hardware with it, but I only use it for small stuff because it is fast. Ridgid and other brands like it sell it for driving deck screws mostly, not for concrete. Works great on lag bolts in wood.
I also took issue with OP calling it a drill, but didn't think it rose to the level of argument. Maybe you can explain why the manufacturer's claim of "2250 in/lbs" delivered to a 1/4" hex socket for a few milliseconds through adapters and sockets might not mean it will loosen a 1/2" bolt torqued to 187 lb/ft. Put another way, try putting the 1/4" adapter in a vise and see how much torque you can apply with a torque wrench before it snaps. (smile)
"Maybe we can spot a weld bead? (:) "
No kidding!
--
Art Benstein near Baltimore
The Art Collector's Wife:
A New York attorney representing a wealthy art collector called and asked to speak to his client. "Saul, I have some good news and, I have some bad news."
The art collector replied, "I've had an awful day; let's hear the good news first."
The lawyer said, "Well, I met with your wife today, and she informed me that she invested $5,000 in two pictures that she thinks will bring a minimum of $15-20million. I think she could be right."
Saul replied enthusiastically, "Well done! My wife is a brilliant businesswoman! You've just made my day. Now I know I can handle the bad news. What is it?"
The lawyer replied, "The pictures are of you with your secretary.”
|
|
-
|
|
|
I learned something new. The tool Art and I have is actually called an "impact driver:"
https://www.homedepot.com/p/RIDGID-18-Volt-Gen5X-Lithium-Ion-Brushless-Cordless-1-4-in-Impact-Driver-Tool-Only-with-Belt-Clip-R86037N/206947575
Assuming that it really can deliver 187 ft-lbs of torque, is there any benefit in my using an air tool? How about a hammer drill?
I have not damaged the bolt by using the impact "driver," but I wonder if using a higher torque tool might, as someone suggested shear the bolt's head off?
|
|
-
|
|
|
You said the bolt didn't deserve a photo, because there's nothing out of the ordinary about it. I'd be interested in just how "chewed up" the head is, and why you resist putting a 12-pt box end wrench on it.
Forget the hammer drill idea.
A typical air tool will buzz that bolt out in 1 second.
Put your box wrench on it, hold it in place with your thumb, and take a swing like Mike Trout with a rubber mallet. You'll loosen the bolt.
--
Art Benstein near Baltimore
"Any intelligent fool can make things bigger and more complex. It takes a touch of genius - and a lot of courage - to move in the opposite direction."
-Albert Einstein
|
|
-
|
|
|
Rubber mallet and sledge hammer with 5 foot total length of cheater/breaker bar did not work.
Here are links to photos of the camshaft bolt:
https://www.brickboard.com/IMAGELIB/volvopic.htm?js_link=1&id=13333
https://www.brickboard.com/IMAGELIB/volvopic.htm?js_link=1&id=13334
By the way, how do I include a photo in the message instead of a link?
The photos make the bolt edges look better than they feel; I can feel smoothing out of the edges, but a six-point socket holds the bolt firmly and still moves it.
I can try a 12-point socket, but what's the risk of stripping the bolt head?

|
|
-
|
|
|
There's nothing wrong with that bolt head. Have at it. I already explained why your breaker bar/socket attempt failed.
|
|
-
|
|
|
I did exactly what you suggested; despite several attempts, the bolt won't budge. Yikes!
|
|
-
|
|
|
Hi,
Try a heavier mass hammer but most importantly get all the slack out of the wrench in the direction of loosening!
Don't use anything like a cheater that does not fit up good and tight to remove any flexing upon impact.
Point you thumb down over the box end or the socket with the breaker bar in it.
Now, with the palm of your hand above and placed on the mass of the longest wrench you have. Apply twisting pressure to the left as steady as you can.
If you are left handed this is going to be slightly crossed up but get your body, either way, to the right behind the mass. It all helps, trust me, on big stuff!
As a Portuguese guy told me once, "It's like my Maria, she's gotta go!
I saw you said wire and rope around the tensioner stud!
That stuff has to stiffen up and get their slack out. That is not solid!
The sprocket has to be locked up solid from rotating.
I don't care if you have to use a big Ole "C" clamp over the belt but get whatever you use stopped up against something solid around the engine.
Lay a wood two by four across the engine and out to the front of the car to bridge under anything you use.
Get creative and intentional!
When swinging that hammer get it going like Art suggested and just as it is going to hit the wrench, relax the wrist of its tension but keep your grip.
Just a little bit free flow allows the mass to speed up ever more!
It allows the hammer head to carry through like a car going through a wall!
If this doesn't work, go walk your neighborhood and find a big guy or woman, that looks like a lumberjack! (:)
Phil
|
|
-
|
|
|
The Bentley Bible on p. 214-5 says to use Channel Lock Pliers around the shaft of the camshaft (with rag in between to prevent scratching the cam) to loosen the bolt. Assuming I use a rag, is there any chance of the pliers damaging the camshaft?
Home Depot has a 650 ft-lb air impact drill. I could get that and rent an air compressor. Might that work, or possibly damage the camshaft?
|
|
-
|
|
|
The only red marks I have in my Bentley in the Cylinder Head and Valvetrain chapter are at the cautions implying our cars have interference engines. Understanding there are several European market motors which are said to have these, it is just an "x" over the word "caution."
I had a look at Fig. 8 on 214-5 in Bentley. The locking pliers being used as a counter hold on the camshaft is definitely not gripped around the cam lobes, but between them. My interpretation of that procedure is you'd better protect the polished aluminum sealing surface where the cam cover gasket mates with the head. Protect it against a slip.
Tell us what, exactly, "worked in a junkyard twice."
--
Art Benstein near Baltimore
My brother is a dyslexic, agnostic insomniac. He lays awake in bed each night and wonders if there really is a dog.
|
|
-
|
|
|
Hi,
Ok you made me go get my Bentley Bible. Like most bibles the people reading them prefer to interpret what was said, in their own words and the facts get changed.
First of all, those are not Channel Locks being used.
Those are call grooved joint pliers and nicknamed “water pump” pliers dating back in the Model A and T years. Back then they p greased up leather packing to be used around the pump shaft.
Ever so often you turned the bonnet nut in and or greased it. This is long before lip seals.
What’s there is a pair of Vise Grips shown in a photograph.
They are called “locking pliers” and patented that way. Not a wrench, but people will burr those names and thoughts together!
I knew you were blowing smoke up my skirt, when you said they were using the brand name, Channel Locks and they actually said it in print. Didn’t quite see that either?
A service manual will not use a brand name without some sort of endorsement acknowledgment. There are many “thin lined rules” outlined about using trademarks!
You will also notice that you looking at that picture of the valve cover being off. That type of access is not normal for routine belt or seal work. The next pictures below that one, proves it!
As far as whether this procedure will hurt the cam lobes is always possible just because of the fit. It’s not a fitted wrench but a handle is sort of created?
You cannot see that the locking pliers are fitting in between the cam lobes space.
I suspect it was intended to show that, but we know what happens when “assumed” sneaks in!
Clamping hardened steel jaws down onto a cam lobe, that has only a “surface” hardened to a depth of .020-.030 deep will never be advised.
Likewise, in the photograph you are left to “infer,” what you wanted to believe, to see!
Being Not on cam lobes, makes more sense.
I also see a ratchet and socket being used. Did you see that? Ah, a normal method with a belt on and a breaker bar works as well. I mentioned that before, someplace I think?
What protection does a rag give?
Might as well use a dust mask or go bare back! It Depends on thickness and the resilience of that material. I personally only wipe my hands with them!
If it was me doing this method, I would prefer to use leather.
Do you have a old LEATHER belt laying around. Not a paper fake one!
Make up some pads or a short strip under the pliers.
You can Cut up some aluminum for protective shims too!
Get creative with the data up in your head!
The Locking pliers will be needed as groove joint Channel Lock pliers will require your concentration to be divided let alone your strength.
Look backward on those Bentley pages and see several caution notations. So protect where or what the pliers will stop up against. Protect any machined surfaces.
Then again with bibles or manuals it’s all about, If you don’t know better, then that’s on you!
This is how the Holy Bible gets to be so misunderstood and why there are so many variations of religions. Most all humans or animals look for what suits their needs to get through life as easy as possible.
These are also the reasons why there are better mechanics than others!
Like, when it comes to doctors, not all of them are the number ones in the class and a second opinion should be considered?
That’s why you are here and will become better for it provided the “environment on here” presents that opportunity to you!
We “are” what our environments taught us to be, as we grow up and go through life!
Call it fate or luck but the absorption of information available is up to you!
Now, as another part of your “on going” education, that everyone needs, you need to stop using the word “drill” so loosely!
A drill is what you put in a chuck of a drill(ing) motor!
Some people will call them a bit? No, the are called a Twist Drill ... period!
A bit is another generic name for a blank piece of cutting steel. It later get angles put on it to shear metal in several directions of machining motion for different purposes. The term bit keeps it simple and I will say the term is abused because it’s so loose!
It’s like the terms to “drill” a hole to “bore” a hole? One is to make a hole and the other is to “enlarge” a hole, that’s are ready there!
A “reamer” can only be used to enlarge a hole to a finite finished size.
I went out to Home Depot and used that 650 ft. lb. specification to find what you are looking for.
Are you sure you don’t want a 454 cu. inch. engine in your Volvo?
Even those engines don’t have bolts that get tighten to that much torque.
Do you think you need that much and IF it delivered it, how how would you hold on to it?
I don’t know who shops “Home” Depot and has the sockets to work with that either? I have used 1&1/2” shank air impact drivers and two people move them about with long handles. I think we reached around 1250 ft. lbs.
Today, they make hydraulically driven torque motors to go higher on ambient temperature bolts.
A professional master mechanic working on monster sized “earth moving” equipment might need that power and probably pays industrial outlet prices for company deductions or write offs!
I have a 300 ft. lb. torque wrench that hangs on a wall because it’s over three feet long! Look at the handle of their driver or impact Driver! Something doesn’t compute to me physically?
I could go on about the lying going on with consumer products when it comes to horsepower numbers, especially, on electric shop Vacuum motors!
I see 4.5 peak HP touted when one HP equals 748 watts in work with electrical power.
This on a 115 volt 20 ampere circuit! 748 divided by 115 volts equals amperage. Go figure? Clue, it’s not happening!
They are lying because they are comparing it to a gasoline engine equivalent and we know how inefficient they are!
Marketing on these here items are on steroids playing with those that are “uninformed” or lack of some “common sense” reasoning. IMHO!
Please stop over thinking this 35 ft. lb. bolt or it’s going to be one expensive project for you!
Just, Get out there and turn that bolt!
When you do get it loose, you will have to go stand with your back to a full length mirror and use another mirror in your hand to look at your backside!
This way, when you find out how easy it was to come out, you can aim your foot to miss the crack in your behind, when you kick it!
This way the foot won’t get stuck up in there too! (-:)
(-:) I bet, if that happens, the tools are even harder to find, as I can only imagine that scenario?
Yep! I’ll never tell anyone I have experience about long mirrors! I just have the imagination!
(:-)
Edit: I read another post after posting and would like to clarify the different jointed types of pliers.
A slip joint set of pliers will only have one vertical slot with two selections of opening adjustment.
A grooved joint has many more adjustments and grips to one side.
Phil
|
|
-
|
|
|
Phil, do we need yet another entry to the Bentley Errata list?
Have you figured out a way to describe the difference between peak force and sustained force? Explain inertia? Why a marketing tool might take advantage of ignorance? I haven't. As an aside, I recall how the makers of sound systems and speakers would do battle over "peak power" using whatever time constant they deemed most advantageous.
Folks, please, when citing written resources, quoting "internet" advice, please give chapter and verse, whether Bentley, Haynes, Volvo, 700 FAQ list, someone's You-Tube, or forum post. Then anyone can look for themselves.
--
Art Benstein near Baltimore
“Sometimes you put walls up not to keep people out, but to see who cares enough to break them down.” -Socrates
|
|
-
|
|
|
I've used my extra large size slip joint waterpump pliers with a rag over the gear itself many times with no damage done. Instead of renting a compressor you could probably buy a small air tank and coupler to loosen the bolt with the impact gun -- and have tools you can keep for the money. -- Dave
|
|
-
|
|
|
Do you mean over the non-lobe area of the camshaft body?
|
|
-
|
|
|
My impact drill is a Ridgid, the same as Art's:
https://www.homedepot.com/p/RIDGID-18-Volt-Gen5X-Lithium-Ion-Brushless-Cordless-1-4-in-Impact-Driver-Tool-Only-with-Belt-Clip-R86037N/206947575
It's rated at 187 ft-lbs of torque, but the camshaft bolt doesn't move.
My lug nuts are torqued to 85 ft-lbs. I loosened them easily with my breaker bar, the same one that I tried on the camshaft bolt.
I'd post a photo, but there's nothing special or unusual about the bolt.
|
|
-
|
|
|
Phil, that was a holiday treat for sure, reading about your exciting 3 month stint working on the dynamo. Yeah, I had to change the title; just the thought of jamming something against a cam lobe makes me cringe. But your story? I could almost see Charles P. Steinmetz there alongside consulting. Thank you!
--
Art Benstein near Baltimore
"Did you hear that they were going to rename the Hertz after Charles P. Steinmetz? The abbreviation will be CPS."
|
|
-
|
|
|
Thanks Art glad you enjoyed it.
I think I saw a segment of Innovation Nation on CBS that showed his cabin in the woods where he did a lot of his thinking.
New York was quite the buzz about using and making electricity.
I wouldn't have been able to tell you his name. I got the idea after reading up on him, you know about his work a lot more than I do. The whole world has him to thank!
My guy, that I had to learn about and has also been featured on Innovation Nation, was Henry Maudslay.
You can say, he was more of a "hands on" make it better man that I have tried to be. I went far enough to find out "perfect" doesn't exist but very good has its rewards!
Phil
|
|
-
|
|
|
I didn't know about Maudslay! Interesting, his bust, even more than his portrait, reminds me of an engineer I worked for in the early 70's. And I recognized the names of two of those who worked for Maudslay. Whitworth of course, and David Napier, whom I confused with John Napier from an even earlier era - the name associated with natural logarithms. Reading about Maudslay brought me back to my childhood when my best buddy was given a metal lathe he was just getting the hang of. No erector sets for us!
--
Art Benstein near Baltimore
"When something can be read without effort, great effort has gone into its writing."
-Enricque Jardiel Poncela
|
|
|
|
|