I and my mechanic are unable to reinstall the rear parking brake shoes. FAQs didn't help. I can't find a YouTube video that shows how to replace them on the 240. Any tips for videos or descriptions with pics?
In 1972, I had to do brakes on my 66 Dodge - I purchased a Craftsman brake spoon, brake spring pliers, and a brake cylinder hone.
When I had to replace the shoes in our '88 GLE, the springs were dead easy despite the flange in the way - the pliers, undoubtedly just like mine, are seen in a couple of posts from the bottom.
I Install the lower long spring first. But unlike Bulletproof's photo, I'm pretty sure I place it on the outside (like the upper small spring).
I then install the upper small spring and with a bit of effort spread the shoes apart to drop in the spreader bar. I think I use a screwdriver through the access hole, butted against a shoe, and turn the rotor to push the shoe apart enough to drop in the spreader bar.
Note: I have given up on occasion and taken an angle grinder to the spreader bar to shorten it (and deepen it's "V"'s), in order to allow it to drop in under less spreading of the shoes.
--
1980 245 Canadian B21A with SU carb, M46 trans, 3:31 dif, in Brampton, Ont.
"But unlike Bulletproof's photo, I'm pretty sure I place it on the outside (like the upper small spring)."
I agree. I don't know the context of MasterBlaster's photo on TB, but I wouldn't use that image for a reference. But maybe it doesn't make any difference.
--
Art Benstein near Baltimore
The voices in my head may not be real, but they have some good ideas!
A man and his ever-nagging wife went on vacation in Jerusalem . While they were there, the wife passed away. The undertaker told the husband, "You can have her buried here in the Holy Land for $150 or we can have her shipped back home for $5000. The husband thought about it and told the undertaker he would have her shipped back home. The undertaker asked him, "why would you spend $5000 to have her shipped home when you could have a beautiful burial here, and it would only cost $150????" The husband replied, "Long ago, a man died here, was buried here, and three days later, rose from the dead. I Just can't take that chance".
190... asked how do you keep the pin in place? With the expander set to the position it will "rest" at, the pin is captured. Your mission is to keep it that way during installation. A bit of heavy grease will help. -- Dave
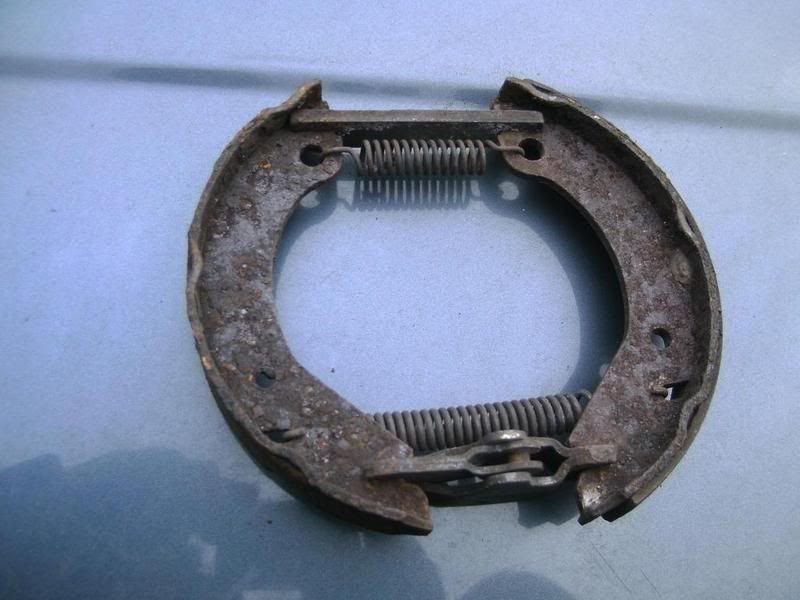
Photo is from a thread at turbobricks. Just happened to run across it (thanks to MasterBlaster and I hope he doesn't mind if I borrow this although he will probably never see it here anyway).
You will notice your brake shoe assembly does not have the adjuster seen in the exploded diagram. Just the flat link seen at the top of the pic.
The expander seen at the bottom of the pic needs to be oriented correctly. You and the mechanic should be able to dope it out.
I would lightly grease the pin in the expander and also the points where the shoes contact the link and expander.
posted by
someone claiming to be CB
on
Thu Oct 25 21:00 CST 2018 [RELATED]
my bet is that they are having a problem getting the springs in place.
I did this job Once and as I recall getting the springs hooked in was...well I never replaced another set again.
I'm sure there is a secret hand maneuver, that I probably inadvertanly made... but can never repeat...WITH the correct TOOL in thatmoving hand ??? Tool??
That sets it all in place...nice and proper.
I agree. I was unable to stretch the spring that connects the top of each brake shoe together. In addition, I have trouble fitting the bottom spring into the wedge/notch where the parking brake fits.
I have yet to find a YouTube video that clearly shows how to do this.
Along with Art's pictures, especially where you stick the screw driver into to pull the spring over, I use a quick clamp over the shoes to hold the whole thing together while I pull the spring into place.
Its taken me years of doing this to finally come up with a fail safe method that lets me do this job in short order, and no longer is it a hateful event.
I re-read this post, looked at the pics, and worked on the right parking brake today. I made progress, but had two major complications.
First, the brake shoes did not simultaneously touch the front metal protrusion on the disc brake housing. They're off by about 5 mm. I disconnected the parking brake cable and tried various configurations, all to no avail. I also confirmed that the large spring went into the proper holes (and found out why those were the proper holes, LOL). I tripled checked the brake lever to ensure it said "up." I don't know if left and right parking brake parts are the same, but I kept them in separate bags and labeled them "left" and "right" twice on each bag.
Despite this, I assembled the parking brake. When I put the metal rod in the rear on, it pushed both brake shoes partially out from their upper and lower clips. In addition, the brake shoes went out so far that the rotor would not fit.
I reinserted the rod several times and rotated it, all to no avail. As a result, with the rod, the brake disc won't fit on (it fits just fine without it).
"As a result, with the rod, the brake disc won't fit on (it fits just fine without it). I spent about 5 hours on this today."
Did you read my note IE.
"Note: I have given up on occasion and taken an angle grinder to the spreader bar to shorten it (and deepen it's "V"'s), in order to allow it to drop in under less spreading of the shoes."
Basically, if the parking brake cable has been completely slackened at the back of the parking brake lever (in the cabin) and the rotor still won't go on, then I used "drastic" measures.
--
1980 245 Canadian B21A with SU carb, M46 trans, 3:31 dif, in Brampton, Ont.
The 740/940 video below is very similar to the 240. This presentation is in Swedish but there are some titles in English. Even so, it's easy to see what's going on. Go to about 5:15 for the brake shoe install.
Put some slack in the cable and adjust it after installation. Three clicks when you pull the handle up is about right.
Wow, starting from part one, I was exhausted of empathy and patience by the time that you-tuber stretched the spring in part 2. I could feel the pain in his palm being tried as an impact tool. Wanted to offer advice and help every few minutes, imagining just how cold his hands were in snows&studs weather. What a persevering spirit he had in front of the video camera! Watching that was more jarring than an episode of Criminal Minds.
His method of hooking the spring is what I've settled on after trying many ways. The flat blade screwdriver. Mine is ground down into a "spoon" shape, as I've posted before often. To remind me which method works, with long periods of time passing between p-brake work, I made this image:
Not sure where the old posts are, but here are some other notes-to-self:
(spoon grind -- also useful to separate rotor from hub)
(use the big hole to get a socket on the hub bolts or access to the springs)
(a reminder to check the orientation of the spreader -- I hear this has caused others some grief)
I am just a rookie, but I installed new Raybestos shoes from rockauto and the IPD hardware kit a couple of months ago. It sucks a lot. You just have to keep at it until it works. Don't lose the little metal dowels that hold the cables in. They're probably loose with age and will want to run away. Also the dealiebobber the dowel goes in has to be oriented the right way, but it's pretty evident once you stare at it and some pictures like the one in this thread and the Bentley diagrams. I think the Haynes pictures might have actually been more helpful.
The one tool from this kit that looks like a pair of pliers helped with the springs: https://www.harborfreight.com/drum-brake-spring-pliers-kit-3-pc-63640.html. The only part I could figure out how to use was the hooky end that grabs and stretches the springs. I don't think I could have gotten it done without it.
One more thing: when I got it all together I kept getting this awful twang when I pulled up the parking brake handle. When I finally tightened the 17mm adjustment bolt to spec that went away and it all works great now.
Oh, I think you can get the hardware kit with the later adjustment screw setup from rockauto as well, but it's about three times as expensive. That might make it easier since you should be able to put everything together with a little less tension and then tighten it up in place.
Again, this job totally sucks, but eventually you will figure it out and it will work fine. Keep the faith. Don't forget your working on the car vocabulary. Alcohol may help as well, but wait a bit for the test drive.
Brickboard.com is not affiliated with nor sponsored by AB Volvo, Volvo Car Corporation, Volvo Cars of North America, Inc. or Ford Motor Company. Brickboard.com is a Volvo owner/enthusiast site, similar to a club, and does not intend to pose as an official Volvo site. The official Volvo site can be found here.