Volvo RWD Forum

INDEX FOR 10/2025(CURRENT) INDEX FOR 5/2008

[<<]  [>>]


THREADED THREADED EXPANDED FLAT PRINT ALL
MESSAGES IN THIS THREAD


  REPLY TO THIS MESSAGE    PRINT   SAVE 

The frustration of my 3 hour tail bulb replacement...

So this is the harrowing tale of my 3 hour tail bulb replacement... not for the meek at heart.

I have replaced all the bulbs on the front and rear lights of my 1995 940 station wagon turbo for years. I've changed that bulb in cold and dark and rainy conditions. It has always been a slightly troublesome job. So it seemed a unreal that it was NOT working today, a beautiful sunny day.

I once replaced the heater core unit on my 1980 Volvo 240 (a major project) - so I'm not a total beginner mechanic. I've done plugs, distributors, radiator hoses, j-pipes, batteries, etc. So a light bulb is gonna give me trouble??? Are you nuts???

I had recently changed the left brake bulb, so today's bulb on the right seemed it'd take 3 minutes. I carefully took note of the alignment of the bottom bulb and unscrewed it. Then without even changing my grip I took out the old bulb and put in the new bulb- at least I tried to put in the new unit.

Still holding the bulb unit, I put in the holder and turned... but it did NOT go in to connect. It felt around as the unit did NOT seem to fit in anywhere. It just jiggled and scratched like crazy. I tried turning, and nothing held fast.

I tried again... still it only wobbled and refused to slip into place naturally... just a lot of hand-cutting hellish frustration. I tried a different angle - no luck. I got on the Brickboard and tried reading to see if there is some secret to how to do it. I tried taping my knuckles to keep from cutting up my skin... to little avail.

Did I have the one notch with the angled side facing up? I watched a youtube video to see if I could tell what was going wrong.

Anyhow - 3 frickin hours of trying to get that damn bulb holder in. I was almost ready to unbolt the whole tail light assembly (which I've replaced before) when I thought I might try a little electric bulb lube.

So I squeezed on dabs of lube onto the aluminum brackets that previously were the source of most of the scratchy feeling of trying to put in the bulb. And this time... with the lube on... it actually WENT IN and held firm!

So that's my tale. Make sure the notch with the angled side attachment of the three tabs is facing towards up (slightly to left before insertion so it will be up when in) and then smoothly slide it into place. Try some lube on those aluminum blades - so it goes in without scratchy resistance. I'd never have guessed that would make any difference, but apparently it really did finally work... just in case anyone has the same problem.

lol!


  REPLY TO THIS MESSAGE    PRINT   SAVE 

The frustration of my 3 hour tail bulb replacement...

I normally add some dielectric grease to the contact points on the holder.

It helps eliminate corrosion and the printed circuit board eventually rubbing away.
--
Paul NW Indiana '90 745 turbo 145 K


  REPLY TO THIS MESSAGE    PRINT   SAVE 

The frustration of my 3 hour tail bulb replacement...

I figured by now, someone experienced would have made the age-related lubrication remark, but still, I'm trying to envision this, not having entirely zero experience with a 940: Is it the bulb into the bulb holder, or the bulb holder into the taillight assembly?
--
Art Benstein near Baltimore

Those who get too big for their britches will be exposed in the end.


  REPLY TO THIS MESSAGE    PRINT   SAVE 

The frustration of my 3 hour tail bulb replacement...

There is a bulb holder that holds the bulb, and the holder is removed by reaching into the narrow sharp edged body of the back of the car on a station wagon model.

The bulb holder is a remarkably confusing device, with 3 tabs for electric connection and 3 tabs for fitting into the main assembly. Since there are no clear instructions, I figured out that it's the tab with a triangular connection that marks the top spot.

But the thing is, it was only after adding a dollop of lube that it worked to screw in - on the first try. This was after trying for hours - which I could hardly believe, since I'd already done this same task a dozen times before.

Go figure!


  REPLY TO THIS MESSAGE    PRINT   SAVE 

245 symptoms

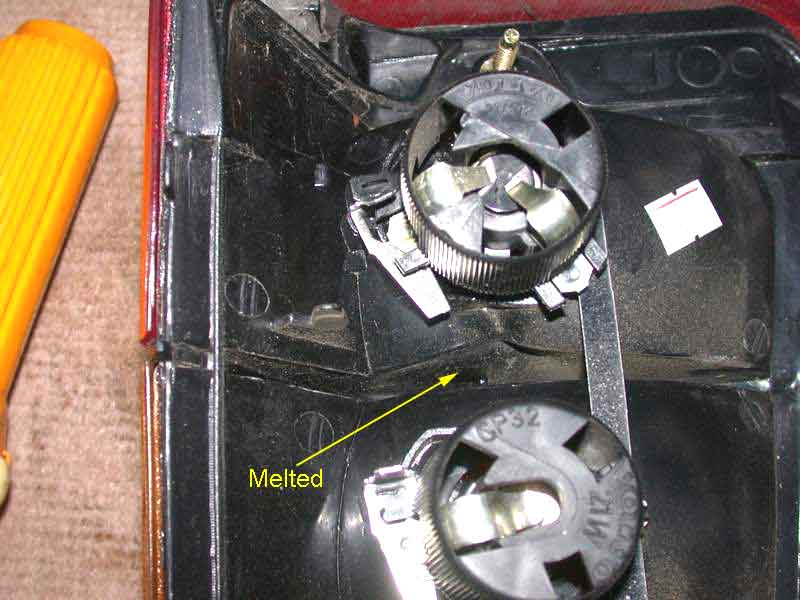
This might be totally irrelevant, but on the later 240 wagons, the tail lamp and brake lamp are shared by the same bulb. It has three electrical contacts; ground, tail, and brake, and the holder has three tabs to lock it in the housing, one larger than the other two, to prevent it from being clocked wrong.

When the lamp assembly ages, cracks develop letting moisture in which eventually cause oxidation of the spring contacts on the holder where they take the current from the plated metal fixed to the body of the lamp housing.

As the oxidation increases the contact resistance, heat develops, especially while you are waiting for a long light to change with your foot on the brake pedal. With more heat, more resistance. More resistance, more heat. The plastic lamp housing softens, the spring tension of the contacts relaxes, and now the resistance increases further.

Then the bulb failure lamp lights, so you go around back to investigate what needs fixing and find the lamp housing so distorted you can't even get the bulb out of the hole, much less get the holder to make good contact again cleaning the metal. You blame the whole mess on obsolete incandescent lamps invented in the 19th century so you can justify converting it to LED, completely missing the oxidation/corrosion/leaky lens issue, and now you find the bulb failure feature is useless.

Could it be the fit is tighter because it is on the way to this 245 symptom?


--
Art Benstein near Baltimore

We're going on a class trip to the Coca-Cola factory. I hope there's no pop quiz.


  REPLY TO THIS MESSAGE    PRINT   SAVE 

245 symptoms

iT TOOK ME QUITE a while to figure out that I was a NITWIT!! & should just take the 3 `10mm nuts off & pull the entire assembly off & easily change the bulb


  REPLY TO THIS MESSAGE    PRINT   SAVE 

245 symptoms

Lol! Yes, I was trying to do that... but I couldn't find the extension #10 bolt holder in my workshop. So part of my 3 hours was spent looking for that along with emailing the Brickboard and watching Youtube videos on the subject.

So if anyone is having the same problem, just try a little grease before anything more drastic.


  REPLY TO THIS MESSAGE    PRINT   SAVE 

245 symptoms

Thanks for that insight. But my assembly seems to be in fine shape. I mostly suspect it is the stubborn friction of the aluminum spring contacts - but still I remain baffled as to why I tried dozens of times to rotate the bulb holder in - but it refused to grab hold every time... UNTIL I added a dab of dielectric grease.

I also think the Volvo instructions are mostly non-existent - and once you take the bulb holder out, you soon forget which spring is supposed to go onto which contact. So it takes what ought to be a simple task and made it a frustrating PITA for me...

I kept wondering if I had it in wrong - but no matter which direction I held it, it refused to sink down into place. I went to my computer and searched Google and the brickboard - didn't find anyone else with the same problem. I noted on the 940 manual it says 'turn the assembly 1/4 turn clockwise' and sure enough tried that about 15 times. To no avail.

But now I know better - and I'll never put in another springed bulb holder without a squeeze of dielectric grease!


<< < > >>


©Jarrod Stenberg 1997-2022. All material except where indicated.


All participants agree to these terms.

Brickboard.com is not affiliated with nor sponsored by AB Volvo, Volvo Car Corporation, Volvo Cars of North America, Inc. or Ford Motor Company. Brickboard.com is a Volvo owner/enthusiast site, similar to a club, and does not intend to pose as an official Volvo site. The official Volvo site can be found here.