|
|
|
hi sages- interesting problem just came in from left field. havent had this on any of my tanks american or swedish. 92 245 volvo has been sitting for about 2 mos. started it a few days ago and drove it all around on errands. ran fine. brakes work properly . one problem. abs brake light is on . brakes themselves operate and act normally . hand brake is full off. what possibles should i look at. any likelihoods? thanks tons oldduke
|
|
-
|
|
|
If the ABS light goes on when car reach a speed of 3 to 5 mile/hr then it could be a sensor that is dirty, rust on the front dented crown. I dont know if lack of rear signal from differential would cause the problem.
Years ago the ABS light would show after the car first move a little and stay on until key is turned off. I ruined a front sensor trying to remove it. Dealer would charge me over $150 for a new one. I ended up replacing the whole strut on my 1991 with one from a 1993. It works well since.
Very fragile those front sensors. Clean them with care and remove some rust on the dented wheels.
Tell us what you find.
|
|
-

|
|
"If the ABS light goes on when car reach a speed of 3 to 5 mile/hr..."
This is a key first step in diagnosis instead of the guessfest. If the lamp doesn't show itself until you drive, don't bother digging out fuses from under the seat.
--
Art Benstein near Baltimore
A three-legged dog walks into a saloon in the Old West. He slides up to the bar and announces: "I'm looking for the man who shot my paw."
|
|
-
|
|
|
True, the ABS system runs a self-test after the car has started moving. Any problems with the sensors will turn on the ABS dash light at that stage.
|
|
-
|
|
|
hello jw and arty b- thanks for the heads up test to do first. the abs light comes on right away when the ignition is turned on and stays on when the car is driven. so does this confirm the likelihood that is the fuse under the passenger seat carpet? it does not go out and then come back on(stays on). thanks tons oldduke
|
|
-
|
|
|
I have ABS light on too. Took up carpet, replaced fuse
Fuses at drivers left cleaned
But I cant seem to get the sensors loose to clean them. Unbolted, and wiggle a little but can’t get them away from knuckle. In spite of liberal applications of PB blaster
|
|
-
|
|
|
most likely yes its the fuse
|
|
-
|
|
|
look under passengers front carpet and verify abs fuse attached to the relay is not blown
|
|
-
|
|
|
hi trich- will check that abs fuse under carpet front. didnt think of that. thanks tons oldduke
|
|
-
-
|
|
|
hi kit g- thank you for your suggestions. heres the latest: looked closely at the 16 fuses on panel in the left door column. #1 is radio and the side terminals were loaded with white powder corrosion, cleaned them off and polished with some emory paper and the radio magically worked. in process of cleaning all the fuse terminals with rag, emory paper and a brass brush. this fuse is 8A . cleaned and replaced the #6 fuse which is 16A and controls the main fuel pump relay and the car started. the fuse here itself was broken. this corrosion is a mfuga. big question- is a little bit of de oxit grease on these terminals advisable? have used that on battery terminals and house current wire nutted connections. so tanker is starting and radio working. abs light is still a problem . seat removal, console removal and carpet pullup will be needed for that checkout of the connector. btw these fuses are not easy to find in the parts stores. most dont have them. suspect that the abs problem will be dirty sensors at each wheel. did check the grey connector by the abs box next to the coil. will keep you posted if more sagery is needed. thanks tons oldduke
|
|
-

|
|
Hiya Uncle Old Duke!
I dunno if sagery. Though thank you for the praise.
Maybe more garlic-y or shallot-y or maybe best like yellow onion-y?
You have our Uncle Art's Sagery here:
Main Fuse for Engine Management Systems
http://cleanflametrap.com/emfuse.html
Art goes into the fuse panel foibles also.
Yep, the corrosion is like tarter or calculus on teeth waiting for removal at the dentist.
I used a small brass brush to clean all 32 of the fuse panel holder blades with the battery disconnected, of course!
I then used silicon grease, or some kind of grease, on all the terminals before restoreing the fuses to the fuse panel.
Art in one reply to my 1990 Volvo 240 (li'l red) Wagon power window failure indicates using the ceramic fuse body with the copper or copper alloy fuse material.
I'll guess the ceramic fuses in our 240 fuse panel box with the silver or grey fuse material may be coated in tin / lead (in the era of RoHS?) to prevent corrosion. Though if RoHS silver / tin solder coated, that can corroded in contact with the copper alloy fuse panel fuse holder blades.
Yes, the DeoxIT-D grease would be best for the fused contacts. Best with any contact / connector / ground wire stack on 240 EXCEPT the air bag power circuit wiring with the gold plated electrodes and the oxygen sensor green wire inside the boot connector (so I've read).
Though as Art shows in his article link, he gets behind the fuse panel where the wire harness power feeds (left side as you look at the fuse side of the fuse panel) and loads (right side) connect to the backside of the fuse panel.
What stopped the power window working on my 1990 240 DL (li'l red) Wagon was the load side wire that power the high current side of the power window relay has corrosion where it connected at the back side of the fuse panel.
I discovered this all after I'd futzed with the power window systems fuses (two lo-side relay and high current side relay) connector (the connector to the door switch inside the doors can corrode / quick disconnect / connect works), switches on all door panels (Some DeoxIT-D 5% [?] spray works in the switches, lest you have years of coffee soda spilled into these), the relay connector, the relay and I guess that is it.
So, I had to pull out the fuse panel, and with a 1993 fuse panel cover legend confusing me all the way (the thing was wrecked, and they put in interior parts like a new fuse panel door and the wiring is not 1990 factory), I had to connect and reconnect the wire harness or give it a wiggle. Some of the terminals at the wire ends broke and I had to crimp new one one. I had no DeoxIT-D spray or grease. And that would have made it all simpler without pull off wire harness terminals at the fuse panel back side. Just wiggle and spray and wiggle again. Wait a few or five minutes for the DoxIT-D to work.
Though I used dielectric silicon SuperLube brand grease in a 14 ounce tube.
DeoxIT-D products I guess are alright with AC power stuff. DeOXIT-D is dielectric, so it won't cause shorts. Though I'm insure the voltage max the DeoxIT spec says. You would have to ask.
For three phase 240 VAC stuff, and 600VDC 400AMP stuff, I'd used No-OX and the like corrosion inhibiting, electrically conductive grease. These are battery chains and large connections for batter power back for use with telecom systems and the like. Though if DeoxIT (Caig) makes something for that that is dielectric, yet you have a secure bonded contact, may be no problem.
Have to ask an electrician. Or electrical engineer?
Here is a page with the images of my effort reported in reply to someone else with power window issues:
https://www.brickboard.com/RWD/volvo/1625057/220/240/260/280/power_windows_stopped_working_fixed_corrsion_fusebox_doh.html
Questions?
Hope that helps.
Though I'm now in corrupt St. Louis, what with the MK Ultra Organized Stalking as with Spokane, WA.
Duffed.
--
Give your brickboard.com a big thumbs up! Way up! - Roger Ebert. 
|
|
-
|
|
|
hi kit- your message was an interesting read. cleaned and emory paper rubbed all the fuses and the terminals. got rid of that white corrosion powder on them then put de oxit black grease on them and the terminals. had to replace one broken fuse 16A on the main pump fuse holder , think it was number 6. all the electrics worked and the car started. also put in new cassette radio from crutchfield(had been on shelf for 2 years). worked fine and good big band swing tunes. only problem left is the abs light is always on. figure from sages here the problem is corrosion on the connector under the passenger seat carpet. will have to clean and deoxit that as soon as i can get around to ousting the seat and lifting the carpet. also suspect brake dust and rust on the sensors at each wheel may also be the problem. brakes themselves are normal and work fine. will keep you posted . still not sure whether deoxit or dielectric grease is best here. think deoxit is conductive and anti corrosive. isnt dielectric by definition non conductive? thanks tons oldduke
|
|
-
|
|
|
Hiya Uncle Old Duke,
The DeoxIT-D is a dielectric grease that both does away with and inhibits corrosion formation in the grease or salve form. The spray is also the dielectric.
The spray at the 5% (?) concentration, the rest some form of alcohol and propellant.
I'll also guess you rolled up your emery paper to do a three-angle grind (polish, really) on each hole in each fuse-holding tab. I used a file. My hands are clumsy.
You would want to read the product doc from Caig to know the spec for DeoxIT.
If you futz with them two front ABS sensors, of it last. As they are kind of fragile and the o-rings (in red and green or yellow like Christmas!) may be sort of swollen and not secure in the channels on the sensor barrel when they factory install them.
When you get the carpet up, hopes all is dry. I believe in one thread on this or the SRS box, water had gotten in and rusted all of it up. Though the foot rest area behind the seats are pressed lower than the under the seat sheet metal floor pan doo-hickey.
I used the brake parts cleaner and the remaining schmaltz as lube to press them back in ad both checked out okay when testing each sensor at the connector. for ohms resistance. Forgot the ohms value yet as both were about the same I guessed okay.
I need to get a new bentley manual. Volvo guy helps another volvo owner, and voila! manual is gone and other bits gone. I get absorbed into the task and get distracted and don't realize until days or weeks later. D'oh-nutz.
Questions?
Garlic, Shallot, or Yellow Onion Boy.
(Left sage country to return to an equally corrupt heap names St. Louis, AmeriKa.)
Say NO to Egg Nog! Er, uh, corn syrup diluted with whole milk and sold for 50x the bring it to the store shelf cost.
--
Give your brickboard.com a big thumbs up! Way up! - Roger Ebert.
|
|
-
|
|
|
mea culpa kit- made an info mistake in last message. actually do not have a product call de oxit , so no knowledge thereto . however what i thought was that was in fact a product called ox gard anti oxident compound. it is a black grease without dielectric terminology and states it improves conductivity while getting rid of corrosion on electrical connections/ wires. so thats is what i used on the volvo fuses and terminals. also have a small tube of dielectric grease made by crc, a well known automotive chemical producer in the us. also verified what i thought was dielectrics meaning. worked as an electricians helper back in 66 and remember a lot of the stuff. dielectric means non conducting so logically it would be insulating . would seem you wouldnt use it where you wanted current to flow through wires and terminals. am i missing something? ran 245 down tobacco road to stinking creek and back . ran fine. no change in lit abs light. will start soon on getting under the passenger seat and carpet to check that connection. will first try to look at the sensors for the abs at each wheel. what think you? thanks tons oldduke
|
|
-
-
|
|
|
hi kit g- wow that is the first time ive heard not to use conductive grease. i put it on the ends of the fuses after i had cleaned them and on the flat blade terminals to which the fuse snaps into . dont understand what you mean by it shorting. seems to me it would improve the conductive path of that part of the circuit. i also cleaned the flat blades. it is working fine. it definitely slows down corrosion accumulation. i used it on 110v wire nutted connections and it works fine too for the last 2 years on a post lamp switched on by a photoelectric cell. sounds like im missing something. please advise valued sage. that white corrosion appears to have been oxidation over the years which is what the ox gard is supposed to stop or slow down. have used the crc dielectric grease on the same applications with no difference in performance. electrician did tell me once either is acceptable the way i use it. thanks tons oldduke
|
|
-
|
|
|
Hiya Uncle Old Duke,
I wrote all that up far too fast, I guess. You are far too generous with your praise in my responses. My prior reply to you a case and point, as well as maybe two dozen prior replies using this bnrickboard user name. I had another a long time ago, and forgot it and the email address to which it was associated ... sorry to digress, cotangent, combobulate, ...
Not really a sage, more of a limburger cheese and red onions on pumpernickel bread as a treat to celebrate a large town with no NFL, yet the NFL cheats any way to the next Supperbowl teams make them money .... Beh ...
... we likes professional tennis ...
Go Roger Federer in the ATP Championship Finals!!!!
Though I know you know how to set and read that multimeter ... OMDog.
So, we have two types of bonded contacts:
- New bonded electrical contacts like wire up of AC power for some purpose. A wrapped contact under a machine screw for a wall outlet, wall light switch, or something.
- Old bonded contact like an engine control wire harness connector, the wire harness terms secured to the spades at the back of the 240 fuse panel, the fuse panels blades with the holes where the conical fuse ends secure, and so on. Yet may be an 120 single-phase AC outdoor post light where water weather intruded and corroded the light bulb socket receptacle.
We have electrical service:
- Low volt, some or high current DC, as in the Volvo 240
- High volt, low or high current, usually AC power as in the home, or a 600 VDC bus at 400 AMPs, where all is shielded (you hope well enough - scary, that was a bit).
Then we have the connector or mechanical interface comprising the bonded contact. The Form Factor - The separation between polarities
- Low volt, low to medium current DC power, like wireline signaling, where electrical bonded interfaces are very close together or are open like the connector on your AMM, the control unit connectors, the connectors for the 02 sensor heater wires under the hood. Even when connectors are seated, there may be a gap exposes at the bottom of the plug side even if recessed or walled. Yet we do not worry of air conductivity. The usually silicon or rubber seal at the base of the connector usually seals out moisture.
- High volt (like 50-100 volts and higher, any AMP current) where the form factor well separates the polarities like at the light switch.
So, with DeoxIT D, you have carrier, be it some manner of (dielectric) grease or solvent and propellant, and the DE-oxidizer, that melts corrosion well enough to not have to wiggle a thing. Though you may apply it to known or suspect corroded contacts like at the 240 fuse panel fuse holder blades and holes. Though mechanically scraping away the corrosion using emery cloth, a fine file, or a steel or brass brush, so you better guarantee a fresh metal to metal (conductor to conductor) bond for the fuse end and the fuse holder blade (and the little hole the conical fuse ends secures in).
So, you may see an AMM / MAF in the 240 / 740 / 940. With engine off you disconnect the wire harness connector to it. Ever see any remaining, if old and stiff grease on it? You'll note the grease is pressed into the bottom of the the AMM receptacle, so, all five pins are coated as well as the bottom of the five pin well, you would not want electrically conductive grease there. (Though engine vibration may keep the metal to metal bonded contact between the wire harness connector receiving pins and the bladed term pin on the AMM.)
The same for your two front ABS sensor connector at the ABS sensor connector and the wire harness side of the ABS sensor connector.
You would not want to use a conductive grease displacing as you connect the two connectors together. Electrically conductive grease, whether corrosion inhibiting with a deoxidizer or the grease soap complex or not. You may use a teeny bit and place inside using a fine tipped or bladed tool into the receiving pins, and than connect. May cause a short, though not a powered short. The ABS sensor generate a low-volt electrical impulse as the ABS sensor magnet load varies gauss as ABS hub "tone ring" fins (?) pass by it.
(740 ABS Hub, could not useful 240 ABS hub image)

When you make an electrical bond, like what I did at the back of my fuse panel after I went through, like some silly person, the mechanical interface displaces the dielectric grease to make contact with each other.
Dielectric grease - about two years ago to the day

Dielectric grease

Slathered in dielectric grease, yet current flows just fine ...

No DeoxIT here in this image. Wiggle or disconnect / swab some SuperLube NLGI II silicon dielectric grease / reconnect. New metal to metal and the grease discourges new corrosion. Yet not like DeoxIT D as there is a deoxidizer in the DeoxIT D ....
The SuperLube I have is just like your CRC Dielectric Grease, yet cheaper. Both do not have a deoxidizer. These are great to use an any mechanically bonded interface.
Though I'd be a little wary with very small and frail connectors using a grease. There may be special stuff for that to prevent corrosion without inhibiting the mechanical bond of the electrical connection.
For new A/C power connections, like wire nuts and conductor connections at machine screw terms, where the different polarities, or (as with AC) phases, you could use the stuff like DE-OX-ID and NoOX that is electrically conductive. The connectors are at a distance, where the bare conductor is recessed or some how at enough distance to overcome air as an insulator.
There exist several specification to state how minimally distant connections of different polarities or (AC) power phases may be. In those, you can use a DE-OX-ID and NO-OX. The conductive material in the grease can sort of increase the surface area for the current flow, yet one can only consider the mechanical interface of the electrical bond for the volts / amps flowing through electrical bond.
For a 24 / 48 DC power sending some 100-400 amps to a cellular transmitter, the power cables may bolt on, and a little NoOX may go under and on top of the lug before apply torque. Same for the cables that connect the DC power plant (supply) to the bank of batteries as back up should AC Mains fails.
So, again, the electrical connector in a car, whether slathered with SuperLube or CRC Dielectric Grease sees no barrier unless the connector has lost pretension or the spring to force metal to metal contact. The grease is displaced and make contact.
Though you would not ever want top use a conductive grease for your AMM / MAF or control unit connector. All the bits are too close together.
I guess you have room aplenty at the front of the fuse panel. I'd worry in summertime conditions the grease used to inhibit corrosion at electrical connection may flow, and short, cause funny electrical leaks or things happen. Yet if you apply it to the back side of the fuse panel.
I'd worry that the ABS sensor lead to ABS sensor wire harness connections may form a short with eclectically conductive grease. Once as you reconnect it and next as under hood heat may make the eclectically conductive grease flow.
Does that halp?
Also, I do not know where it says DeoxIT D grease is dielectric. Says it is for use for things like the 240 wire harness connectors. I've seen the magic of the DeoxIT stuff.
Instead of individually sanding a pin on an ECU, and trying to do the same to the wire harness connector, I'd apply DeoxIT D spray to either side, let dry, and reconnect. The Disconnect / Reconnect displaces the corrosion layer, and the DeoxIT continues the deoxidation of the bonded connection at each pin interface in the secure connector.
Of course, as recently stated, we may want to consider replacing the electrolytic capacitors inside our 25+ year owld ECUs. Just like with a power supply in your Pioneer SX-9000 with the reverb feature.
Sorry to go on so long.
Art B. and Phil Machine Man and other could reply with like three sentences or something.
Questions?
Hope that halps.
Welp, off to get the new Starla Turbo 240 rear muffler for this ridiculous normally aspried Volvo 240 iPd sport exhaust. Broke off on the muffler inlet side. Considering it was hanging from the manifold to header knuts (NUTZ!) and that rear muffler inlet side shackle, I was sort of expecting it. Though want to restore it to factory exhaust. I guess that will wait, like the job I can never get and the garage I need.
Hurray. No job interviews today!
Celery Boyeeeeee
--
Give your brickboard.com a big thumbs up! Way up! - Roger Ebert.
|
|
-
|
|
|
hi kit g- thank you for your clarification. so what it comes down to is to wit- do not use ox -gard anti oxidant compound where there is a risk of it melting and flowing into or on another nearby electrical connector which could cause an electrical short or anomaly. those multiple pin type connectors and maybe the fuse board in the 240 or at least the back of the board would be an example of where not to use. in those two examples crc dielectric grease would be better. key may be to use either grease very sparingly on cleaned connectors. think i may be ok since i used the no ox sparingly with no overflow on the cleaned and emory papered fuse tips. what do you think- am i home free or still in clusterf!@#k city? thanks tons oldduke
|
|
-
|
|
|
Hi there Oldduke,
I saw where you get drafted into one of Kitty's long posts.
He is the champion, IMHO, of long post and he expects me to keep my shortened mine down to only few lines of information. Ha!
I do slip at times and do a short blip. It has more to do with I'm busy or tired.
I'm not as good as Art for those to the point posts.
I high jack threads! Art is always reminding me of that!
I do really appreciate Kitty efforts and I'm glad he around so I don't look so bad. (:-)
This is an entertainment site, for most part actually benefits even more people.
I don't think I have ever written as much before in my life as I had no reason too! It has helped improve my writing skills that truly needs exercise and improvement.
You can tell I'm a work in progress. (:-)
Art has a lot better vocabulary than I and keeps me looking up things!
I can say Kitty's and Arts pictures saved lots us, lots of questions!
Overall, we all do what we do, to be happy! Without a trip to Jamaica.
By the way Kitty,
I've been to the Saint Louis Arch back in the eighties.
It was the only place I visited so your remarks about Missouri are interesting. I never saw what you site that you live with but liked the Home of the Thrown Rolls in Springfield best!
I bought a couple video tapes showing of the building of that Arch back in the sixties.
My shop teacher showed lots of manufacturing Films from prominent automotive parts producers.
Perfect Circle piston rings, power steering pumps and Cooper tires.
He also showed us the Arch from a noisy film projector. Eventually a B/W TV got rolled around but no Betamax or VHS back then.
I showed my tapes to "a captive audience" of students in my Machine Shop class. They were also shown in an associated Welding class of the school. A motivation to become iron workers.
It demonstrated what a big and highly precision job it was to do!
They had problems and found solutions, as it went up, using good math and the new space age "laser" technology. Still it took fire hoses to get it in alignment.
In the seventies, I was still using optical surveying transits with Reticles calibrated in thousandths of an inch. We dial in the rear of a Dynamo housing, for a dam in Brazil, true to the post mill base for final opposite end machining.
Ok done with the high jacking!
Kitty goes to a lot more work than I would, packing all those connections by hand with grease or dielectric.
I use LPS ONE spray and dust the fuse panel or connectors with it.
It's is very light and greaseless so it doesn't get gummy. I use it on my precision instruments and machinery accessories. The mill table, lathe chucks and other stuff that sit out in the open but inside the shop. They go through periods of non use and I don't want to find my finger or palm prints showing rust of my laziness.
I also live in a high humidity area, like Saint Louis but it's only few miles from the pacific ocean.
LPS comes in three grades of rust inhibitors.
I was first introduced to LPS at a Metalworking trade show. They were running an active electric circuit to a light bulb with the cord connections dropped down into a water filled aquarium. The salesman was dabbling his hands in the water! I know the aquarium was made of glass and he wasn't grounded but it got one's attention. This was before I knew more about electricity. Now I think salt water would have been more entertaining.
Gimmick or not, He claimed the connections were sprayed with LPS 1and kept moisture or water away from the conductors. It worked to maintain electron conduction on the outer surfaces of a terminal. This was a new idea back in the seventies even this to a young, up and coming, Handle Cranker!
The elder to me, Journeymen Machinists of my day, of whom I learned a lot from, kept Camphor in their tool box drawers to provide a vapor barrier to drive away moisture. Smells like Eucalyptus!
This stuff was more Old school than WD-40 of which does the same thing but we all know you still end up with rust.
WD-40 is a sweet smelling solvent for cleaning. Almost like kerosene IMO.
LPS does not go away nearly as fast. No. 2 is slightly heavier and their No. 3 is like a wax or Cosmoline. Cosmoline is still sold and has undergone some revisions.
There are Zillions of snake oils, pastes and salves out there!
It's all about what works for you.
"Mechanics in a can" have their limited places to help?
Me... and I or we, (:-) just likes, them easy and effective ones!
Phil
|
|
-
|
|
|
Hi Uncle Old Duke and Phil Machine Man!
Happy Sat-your-day (all day long)! Hopes teh (LOL Cat) Turkey plans are forged and your days are replete with pies of pumpkin and pecan, and as you like.
Well, I sort of figure you and Art and folks would have a short easy reply as to best practice for Old Duke's questions as to electrical connection, corrosion at the electrical connection, and a best practice to treat the electrical connection corrosion.
I sort of write here extemporaneously in a single swoop without a (or a little) recast or proof and edit to neaten it up the text and images. Sort of thinking it up as I write along. I find the first text casting to be the best, no matter the message purpose or audience.
Phil Machine Man ... glad you enjoyed your visit to the Arches city. A visit is all it takes. Though such a civil sculpture work makes for what few symbols or signifier this city, region, the many publications and media outlets reply on as identifier for others. I guess CO-front range cities have mountains and pine trees, or great lakes states have water and nature as identifiers no matter how bad the water way pollution.
Uncle Old Duke ... I guess it is okay to use the corrosion inhibiting, conductive grease with zinc particles like the NoOxId and the like. Some grease is somewhat or conductive without zinc particles in it.
All of the ILSCO DeOX is like the Sanchem NO-OX-ID. Conductive. Like the NOOXID it comes as a soap complex grease that may also include particles in it for the metal type to be joined. The grease merely keeps the air out to prevent oxides forming. For new or reconnected bonded electrical contacts.
I'd not heard of the LPS ONE Phile Machine Man mentions.
http://www.lpslabs.com/product-details/560
Yet looking it up, you find the spec sheet on their website. And voila! Non-conductive, persists, and displaces moisture forming. Yet no deoxidation action like DeoxIT D.
They have other products, also.
For any of these products, if they do not indicate dielectric or non-conductive, I'd presume conductive.
I hope that halps yoooooooooo-hoooo (chocolate, strawberry, and chocolate-banana flavors)!
Welp, as it is a hundred acre wood blustery day today in one of teh (LOL Cat) seemingly many Queen of the Archy City Suburbs, replete with falling haycorns, yet no heffalumps nor woozles stealing muh hunny, I guess no rear muffler swap-in to replace the one installed with the iPd 240 cat-back exhaust. One heavy Starla muffler!
Starla made in Poland 240 Turbo muffler and Starla made in Germany rear muffler hangers (3 pairs of two for each 240 rear muffler) all from AutoZone. AutoZone seems to get better and better, including the web site service doc, with a real service notion ever more and more vacated by the remaining 'MeriKan endeavor.
No Eggnog MacDuffy's Tavern
(All grocery egg nawg as so much corn syrup may be sold as candy corn juice. Yuck. Rather have some early 1970s ayggg nawg before nasty diabetes making corn syrup became the primary ingredient. Makes a an eggnog as a not so thin boiled custard and honey and Irish Whisky with alcohol boiled away?)
--
Give your brickboard.com a big thumbs up! Way up! - Roger Ebert.
|
|
-
|
|
|
hi kit g- your essay was very helpful. turned me on to other stuff. listened to a rather long video about it from an electrician and a lighting specialist. both said the same thing. anything that will cut off the oxygen to the metal contacts is good but you need to avoid applying too much(ie slathering it on ) because if it runs due to warming from weather or flow of electrons or high current demand a short could occur which is very undesirable.that spike is where the trouble comes from- fire, popped lights, damages electronics. never saw it but permatex makes the dielectric grease too. it came down to two products- the crc dielectric grease and the ox gard. the two said both will do and last a long time which is what youre really after in this stuff.the key word is to use sparingly. one surprise is white lithium grease works just as well. so what do you think kg? pretty slick heh? sorry, me bad. thanks tons oldduke
|
|
-
|
|
|
Hiya Uncle Old Duke!!!!
Sure Happy it's Thanksgiving Day Eve!!!
Yeah, it's pretty slick!!! No bad!!!
Yep, I'd used white lithium on the fuse panel. Though I'd not ever looked up the properties of a white lithium grease as an electrical contact grease.
Apologies for the sloe (gin) follow up. That rear muffler replace was a real bother. Hardest exhaust work in years. Should have taken the whole Turbo 240 exhaust out and put in a Starla exhaust, use anti-size on the union, and ground the exhaust to the unibody. Well, I hope to replace the clamp / hanger between the cat and the rear silencer / muffler. The old muffler was heavy. Cut my hands up and did something weird to a right elbow nerve. My right hand fingers and thumb are still numb. Sorry to go on so. Promise no more craigslist Volvo picture advert posting!
Remember, it is the DeoxIT D that has the deoxidation compound that makes it work. Though I'll guess the grease is dielectric that they out the compound in.
Else, just give it a wiggle or twist so new metal bonded contact, and some greased to keep the oxygen out. Yet I believe heat and merely being a bonded contact may form some kind of resistance forming corrosion.
Welp, 14 years of Sheetz-giving all alone, again. I'm sure the same of X-mass also.
Happy Hollowdayze.
Duffed.
--
Give your brickboard.com a big thumbs up! Way up! - Roger Ebert. 
|
|
-
|
|
|
hi kit- i think ox gard and deoxit D greases have the same properties. so what do you think caused the 245 abs light to go out. all i did was drive it for a few days and fix the fuses. dont think the abs is in any way fused through the panel. one of uncle moes famous sayings was if it aint broke dont fix it. have to drive my tankers more frequently . no more long sittings. seems to encourage dampness and hastens corrosion. thanks tons fo yo insights oldduke
|
|
-
-
|
|
|
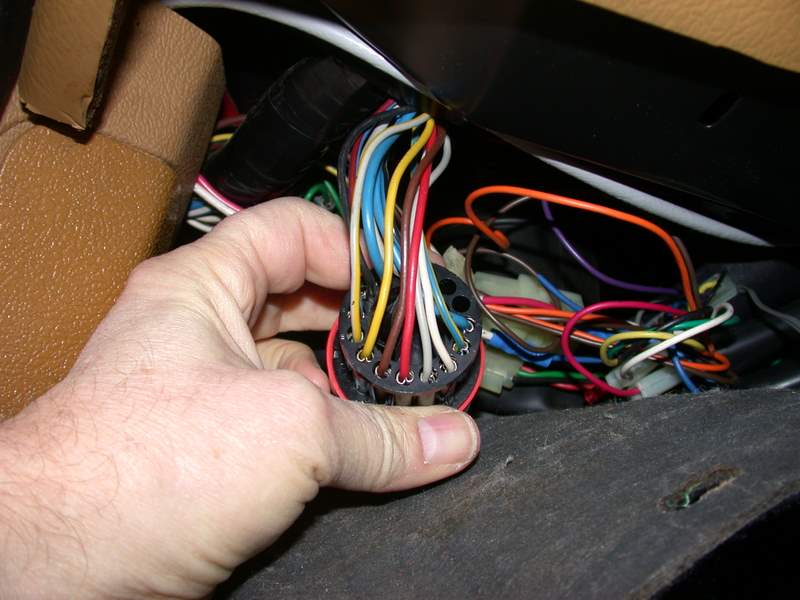
hi kit- thought this mystery was over even though without a clear answer. drove 245 today and abs light was back on . but it was very warm today and with a bright sun. guess i will have to take the seat out and try to get under the carpet. would love a picture of the connector for the abs under the carpet. keeping you posted. thanks tons oldduke
|
|
-
|
|
|
Hiya Uncle Old Duke,
Happy Sat-Your-Day all day long!!!
So, as you're in FL-state, you get the freshest Atlantic red snapper or about any kind and of fish and shrimp and like salty sea bugs for your at-home grill or out at your favorite eatery?
Yeah, the ABS dash indicator illuminates on mine a few times with outdoor temperature changes since the both wheel sensor de-bearding and reinstall. I did not unplug and plug the ABS sensor leads in the engine bay.
Usually I go nuts and work through the whole system, connectors, grounds, and all, before hand. I'd been off my anticipative mechanic-ing milk for some years now. I squarely blame the fascists.
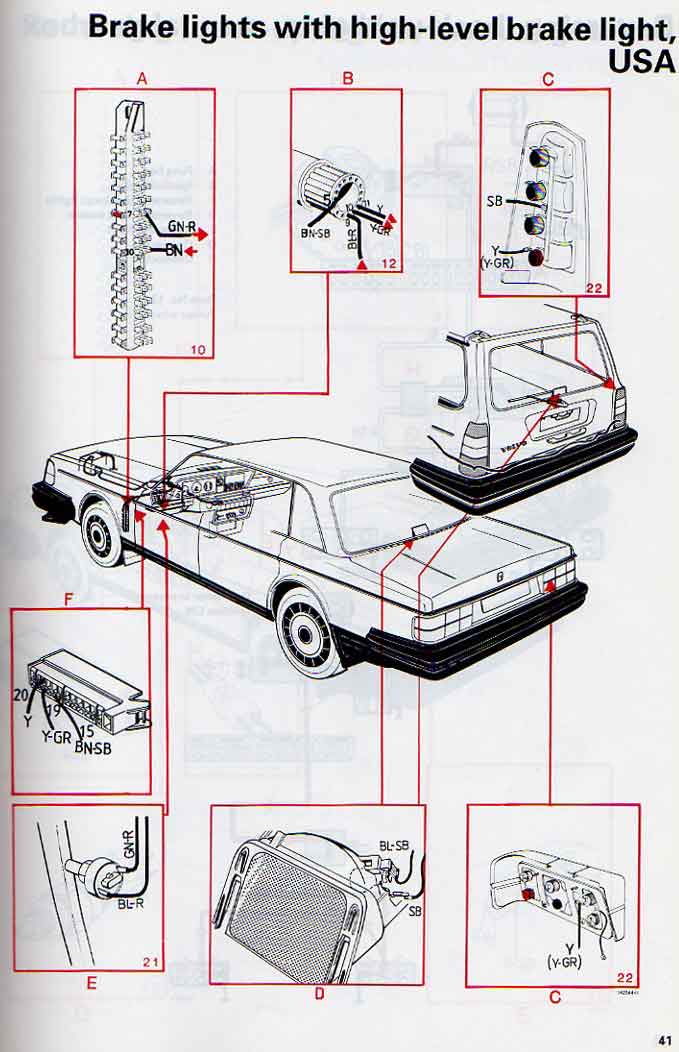
Here is a list of the 240 ABS system components:
VOLVO 240 BRAKE PARTS (ABS) 1975-1993
http://www.swedishautoparts.com/240/Volvo-240-brake-parts-(abs).html
Images of the ABS ECU computer control box that is under a seat. (Passenger side, yes? I forget right now.) Here goes, under the passenger seat for both:
"240 volvo: abs light stays does not go off...sensors..abs module"
https://www.justanswer.com/volvo/5had0-volvo-240-dl-93-240-volvo-240k-miles-abs.html
Though if the fuse on the transient surge suppressing relay had blown, the ABS light would be on all the time, yes? It could be some pesky corrosion at a connector or ground still as yet untreated? (Maybe corrosion at the backside of the fuse panel? Yet ABS does not draw current and rarely activates like the power window system, drawing current with each use.)
You can find some images here at (though I'll post them here using Art's image code reference instructions:
"1989-1993 Volvo 2140, 2640, 2660, 2680, 2840, 2860 ABS Anti-Lock Brake Control Module"
https://www.partrequest.com/auto-parts-detail/89-90-91-92-93-volvo-240-740-760-780-940-960-abs-anti-lock-brake-control-module-281815299412
The eBay Auction link:
https://www.ebay.com/itm/89-90-91-92-93-Volvo-240-740-760-780-940-960-ABS-Anti-Lock-Brake-Control-Module-/281815299412/
ABS Controller Images:


The connector would require use of dielectric grease with like your silicon CRC grease or the SuperLube I have.


Art's image link instructions ...

Ooops, I may have confused ABS and SRS bits with you in my prior posts in your post and thread here. I almost did it again. Sorry.
There is a wire harness connection to the ABS pump that travels through a black plastic shroud and connects to the pump(s) / actuators under the hood. Two connectors. Corrosion could be here. Or there may be faults with a pump assembly. You can dissemble it to pull of the shroud and unseat / reseat the two connectors.
How is your brake fluid? Reasonably clean and clear if a dark brown to black, time to Motive Power Bleeder your way to clean DOT 4 fluid. (I'm a bit overdue myself.)
Although the ABS pump assembly is probably the last thing you want to futz with if the issue is connector corrosion makin' the ABS dash light illuminate.
Unlike the SRS air bag equipped 240s, the 240 ABS system appears not to include some manner of diagnostic. Well, it diagnosis itself, yet does not report to other than the ABS dash light.
Does that help? Hope that helps. Questions?
Your Sat-Your-Day Armchair Diagnostic Boyeeeeeee
(Haz no armchair.)
--
Give your brickboard.com a big thumbs up! Way up! - Roger Ebert.
|
|
-
|
|
|
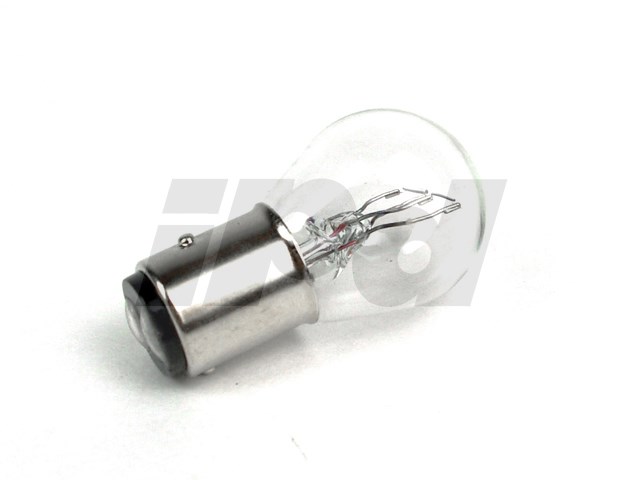
hi kit - not familiar with that part at all. the abs controller box is over by the coil on the left front fender. dont think i will fool with that. as sometimes happens will have to work on the brake lights. just found out both brake lights no go. this is the bottom light on the stack of 4 on the back of the 245. safety issue so have to clear that up right away. hope it is something as simple as bulb replacement. both usually do not go stinko at the same time but one might have burned out and the other later. calls for 1157 bulbs which i believe have been replaced by 2057s. these bulbs have been there since at least 2011 when i bought the car. so maybe time for them to go to hades. these are two contact/filaments bulbs with one the tail light and the other the brake light. replacing them, testing cleaning and checking their fuses . coppers dont like you driving without rear break lights. also could be tough on your keaster. sometimes a safety issue intervenes and takes priority. abs light went out again by itself. but is cool today . does seem to be heat related. hope it doesnt take 1/2 the day monday. thanks tons oldduke ps- you did describe some of the florida fish food reality.
|
|
-
|
|
|
Happy Mundae Uncle Old Duke!
With a late Monday morning edit. See Art's comment. Forgot to mention the stop light / brake light pedal switch..
Oh, and check the fuse #7.
I mention the ABS pump / relay controller assembly as I believe the ABS ECU checks for continuity to all connected system components at power up, engine start up and run, and the front ABS sensor and speedo / odo differential tone ring pulses when you engage gear and take up drive (start moving). So, yeah, may not want to bother with it, or save for last, if you other efforts do not extinguish the persistent ABS dash light.
Indeed a guess fest as our Uncle Art B. calls it.
Yep, time to check under the passenger seat. Sort of a bother to disconnect the bun warmer connection under the seat at the rear, and have to move the seat front and back to get at the four sets of hardware (12 & / or 13 mm socket), then roll the seat back out of the way or remove from the passenger cabin.
So, the left and right brake lights do not light when you press the brake pedal?
Does the high center third brake light, mounted to the bottom center of the rear hatch glass light?
Best as a question in a new thread? Though I'm glad to halps. And yours is a 1992 Volvo 240 Wagon.
On the dash instrument cluster with engine running (dash lights are off), does the Bulb Out indicator illuminate when you press the brake pedal?
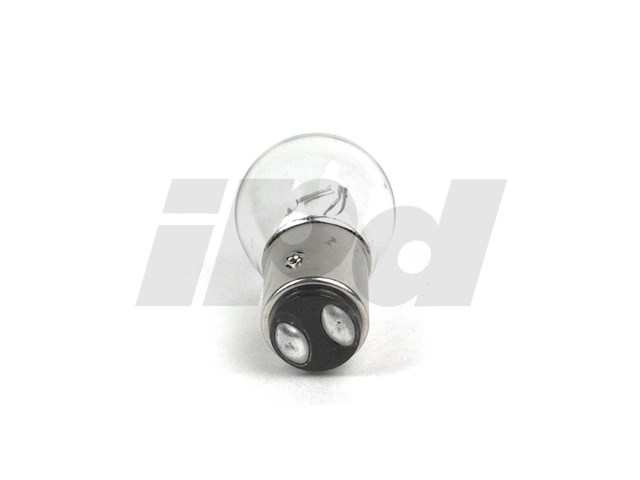
The 1992 rear tail light assembly bottom red lens serves as both a position light and a brake light using the dual-filament 1157 Bulb. That is the only position to use the black dual-filament bulb holder. (No white bulb holder in 240 Wagons with the third, high-center brake light at the bottom center of the rear hatch glass.)
Using a stick, tool box, or an assistant to press the brake pedal to illuminate the rear brake lights ...
... does the third high center brake light illuminate?
If not, and that means all three brake lights do not light up when pressing the brake pedal, the stop light / brake light switch may have failed.
You may recall I had to replace this four times in less than a year on my 1990 245. Get the OEM one or the one that appears OEM.
http://cleanflametrap.com/brakelights.htm
Volvo PN 3544691
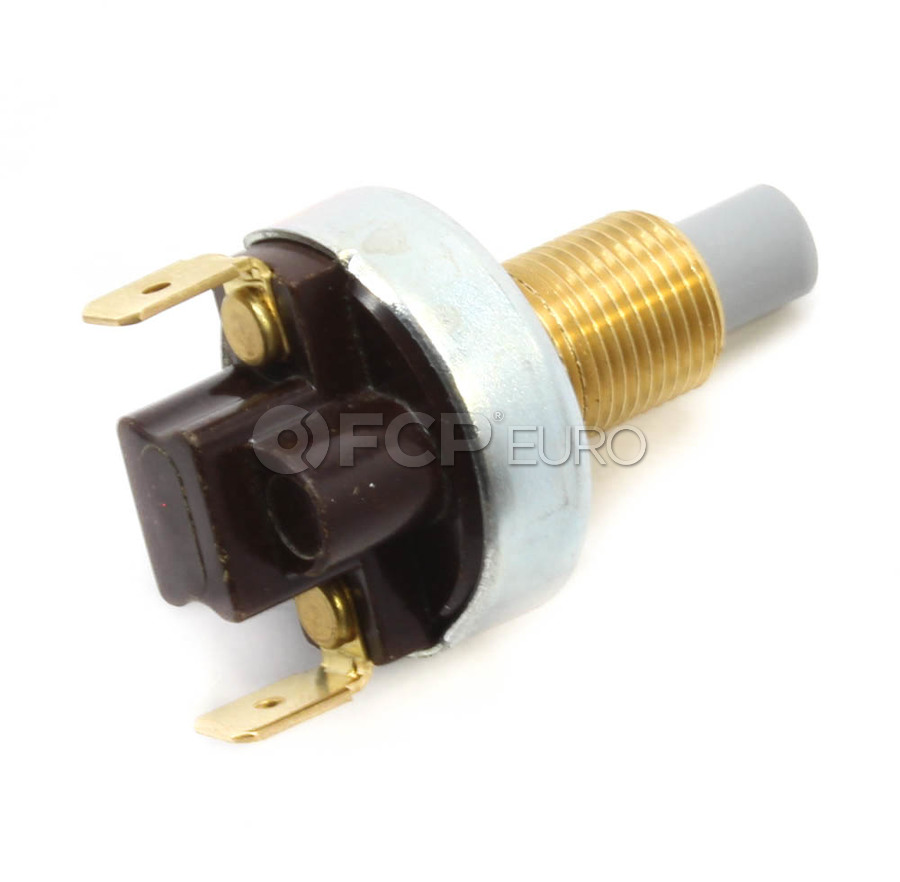
https://www.fcpeuro.com/products/volvo-brake-light-switch-3544691oe
Direct drop in. Merely swap the two nuts from old to new at the same position. Usually threaded to the end of the thread. The second nut is counter hold.
Do NOT get the FAE versions. It's awful and the same as MTC:

I'm unsure whether you replaced the rear hatch tail gate hinge harnesses at any time. By now, at 28 model years old, both these harnesses may have needed replacement one. (I replaced rear left and right hatch wire harnesses on my 1990 240 Wagon some months ago, yet routed them inside through the head liner and through gaps at the top lip of the rear hatch carpeted panel. I've yet to better dress the cable.)
If you turn the headlight switch to position 2 (not final position 3 for headlights), to turn on the parking / position / running lights only, do the position lights illuminate at all four corners? Certainly at the rear in both tail lights in the bottom red lens with the 1157 bulb in there.
I *guess* both left and right brake lights could both fail simultaneously, yet as you indicate, the chance is low.
You can access the interior side of the tail lights, remove the black dual-filament black plastic bulb holder, (use a clean paper towel or cloth) to remove and replace the 1157 bulb. Visually inspect the bulb for a burned out filament, use a known good 9-volt battery to check if each filament lights, or use a multimeter and check continuity between the end contacts of each filament and the bayonet socket barrel that serves as ground.
You can also inspect the dual-filament bulb holder for metal contact fatigue or corrosion (which may well come dislodged during the disconnect / reconnect act) at the:
- Three contacts on the bulb holder that make contact with the taillight metal contacts.
- Contact condition in the bulb holder that contacts the metal bulb barrel for found, and the two metal contacts that touch the two metal ends of the bulb, one for each filament.
- The metal contacts on the tail light. There is the single contact at the bottom retained what looks like a single rivet.
- Also, a wiggle of the wire harness wires where the secure to the taillight.
- May want to check the ground as a single ground connection, secured at a ring term under a self-tapping metal screw somewhere at the spare tire side or someplace at the left or rear hatch end of the floor cargo space. I forget. Though of this ground connection fails, non of the tail light lighting would work.
You can also test whether 12V power is delivered to each tail light. The wire harness comes up the car left side, into the spare tire area, and splits for left side and right side.
(Left and right as you sit in your 1992 Volvo 240.)
Sorry for the detail, I'm thinking this up as I go along.
So, to the earlier question whether the third, high-center brake light illuminates when pressing the brake pedal, yet no left and right taillight brake lights.
May suggest a failing bulb out sensor on that circuit.
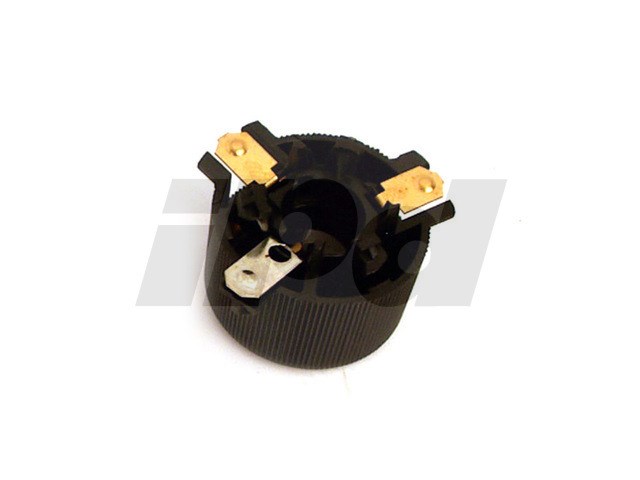
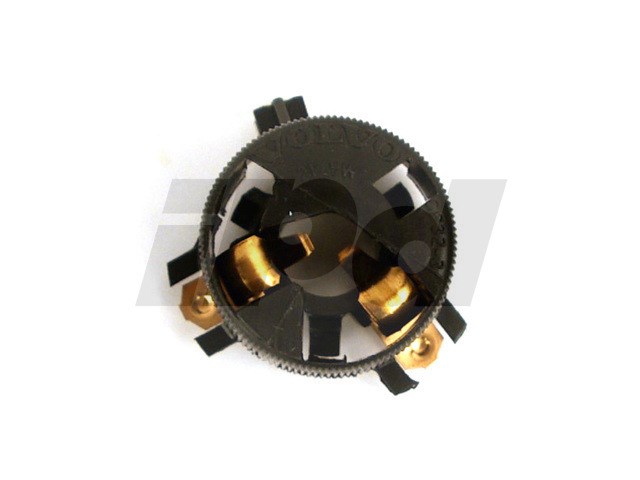
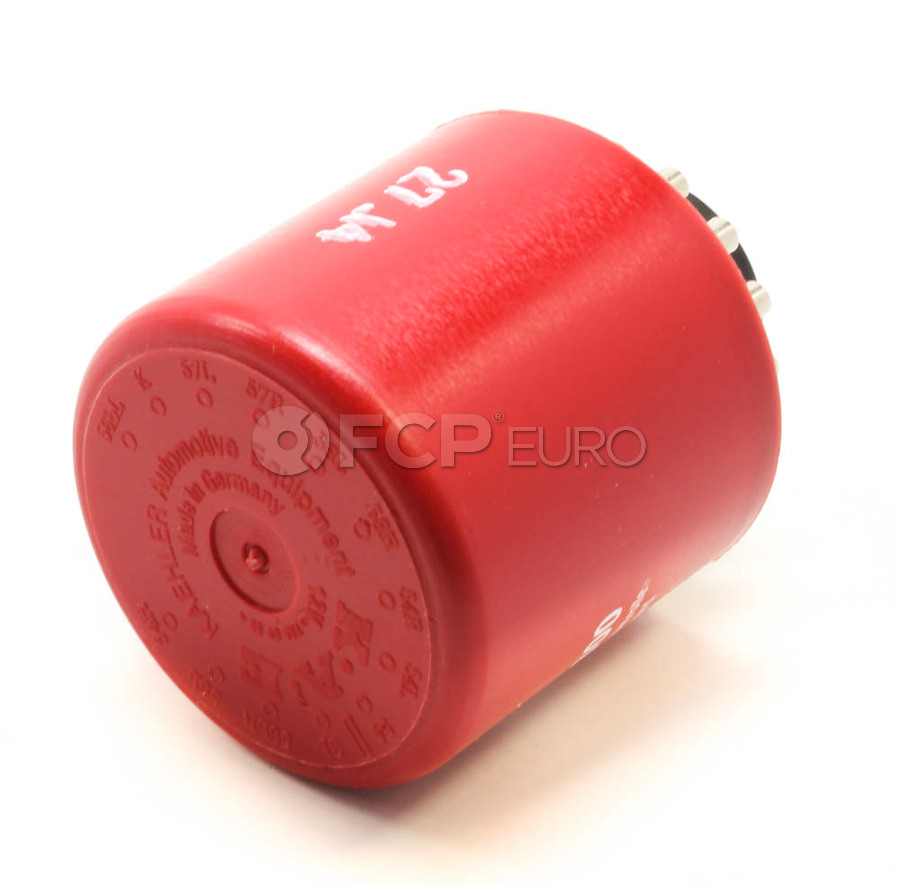
KAE Makes this sensor as OEM. It is orange-red in color for your model year 240.
Volvo PN 1362370
https://www.fcpeuro.com/products/volvo-bulb-failure-relay-red-1362370
46$
FCP Euro Images:
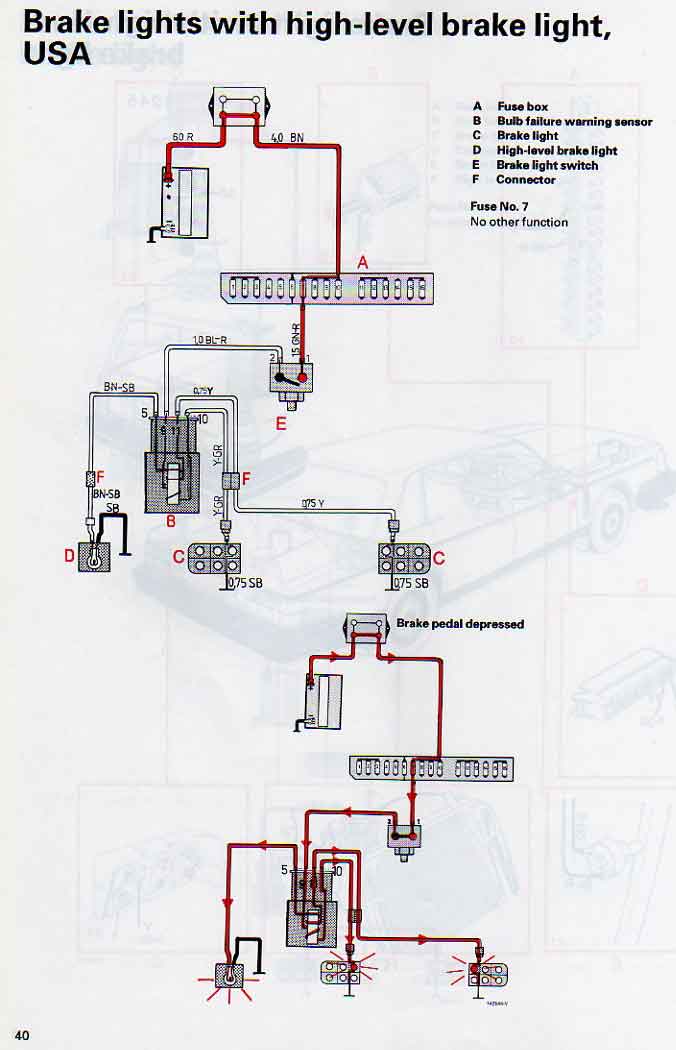
On PDF Page 18 of 23 in the PDF file ... :
http://volvowiringdiagrams.com/volvo/240%20Wiring%20Diagrams/Volvo%20240%201992.pdf
... You see the BULB FAIL SENS at E - 24.
So, on the BULB FAIL SENS pin and wire harness socket connection:
- Position 5, Brown / Black Wire: +12VDC for the high center brake light.
- Position 11, Yellow Wire: +12VDC to LEFT Wagon Tailight Stop / Brake light
- Position 10, Brown / White Wire: +12VDC to RIGHT Wagon Tailight Stop / Brake light
- Position 9, Blue / Red Wire: +12VDC FROM the stop light / brake light switch
So, with the bulb out sensor, under the dash, you have to remove the two (T-30?) Torx head screws to remove it, and then find the orange-red bulb out relay sensor. It could be at fault. I'll guess you have a known good spare, I hope?
The 1157 bulbs do interchange mechanically for the 2057 bulbs at the socket bayonet mount, so says the i-net.
The i-net also says the 2057 bulbs feature a lower wattage (dimmer) filament for the parking / position / running light. Yet lifecycle is no longer than the 1157 bulbs.
See here:
https://www.tacomaworld.com/threads/2057-vs-1157-bulbs.216241/
There exist a brighter bulb that will fit, yet service hours are drastically less. Find videos in you tube on the topic.
Also, replace in pairs. Keep the one that works as a spare.
You also have 1157 LED bulb option. Yet goodness knows if they are worth it.
I occasionally remove and wash out the tail light assembly as they collect dust (faster if they leak) that hangs onto the interior side of the lenses. Er, when I have a tail light failure.
Sorry to go on so.
Questions?
Hope that halps you.
Happy Mundane.
Buttermilk MacDuff.
--
Give your brickboard.com a big thumbs up! Way up! - Roger Ebert.
|
|
-
|
|
|
hi kit g- seems to be coming down to the brake pedal switch. hope a switch out is easy like in my american tanks- is it? replaced lower bulbs(brake and tail)as they were old but the tail filaments were working. high level bulb was burned out- put in new 1156. no go still on brake lights. fuse ok. dont like being up schitts creek without brake lights and no paddle. used to know jack schitts too. need your sagery kit. thanks tons oldduke
|
|
-
|
|
|
Hiya Uncle Old Duke!
Sure Happy it's Ruby Tuesday (all day long)!
Art's instructions to get to the brake light switch:
http://cleanflametrap.com/brakelights.htm
Yeah, I'd really love the seafood platter, more so in the grocery or a good fishmonger of some of the fresh seafood you have. I'll bet you grill out some fresh flounder and (I have no idea what kind of seafood you get where you live) the various giant shrimp and those thing that look like small lobster, yet forget the name. So, you have a propane and a charcoal grill? And grill some asparagus, portbella mushrooms (gills up with some olive oil, butter, garlic, and parsley / cilantro), broccoli, giant garlic, and such.
Though I also like the oily fish in the Pacific NW. Had hope to get a finishing pole and get some of that trout they have in WA, ID, MT and the like. There is fly fishing yet that takes a bigger equipment investment and patience as you cast and cast again.
Yeah, maybe be the stop light / brake light switch actuated by your foot through the brake pedal.
Replacement, for me, was a real cuss fest. At least with my ham-handed and sometimes arthritic hands. It is a much much worse stop light / brake light switch replacement if your 240 comes equipped with the cruise control for your 1992 240 model year.
I miss my 1975 Volvo 244 DL with M41 (or M45? I forget). All the roominess under the dash. I could +Turbo the metric B20F with K-Jet and use the cold start valve on boost. (No, I'd not ever do such a horrible thing.)
I did not at all imagine, and did not as on your 1992 Volvo 245 Wagon third brake light, until reading Art's reply as to the 1992 model year coming equipped with the high center, third brake light at the interior side of the rear hatch back glass. I made presumption. Uncle Art mentions you should see three brake lights at the aft end of your 1992 Volvo 245.
When you look at that 1992 Volvo 240 wiring diagram line art, you'll see that the:
- Third brake light is connected to a bulb out / failure sensor pin that is unique / separate from the from the left and right brake light pin on the bulb out / failure sensor.
When we say pin, we mean both the bulb out / failure sensor itself and the connector socket the bulb out / failure sensor wire harness socket that the bulb out / failure sensor connects.
So, as you see on PDF Page 18 of 23 in the PDF file ... (Copy and Paste the URL, should display in your browser of choice):
http://volvowiringdiagrams.com/volvo/240%20Wiring%20Diagrams/Volvo%20240%201992.pdf
Also, see the fuse panel for fuse #7 between C & D (horizontally) at C (vertically) on PDF page 22 of 23.
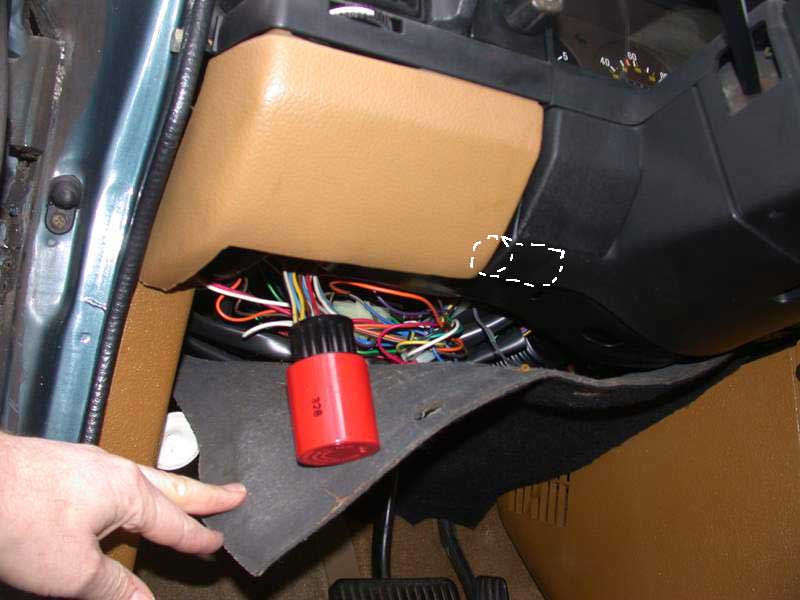
One of Arty B's images of the bulb out sensor and the white dashes indicate where you'll find it secure to a clip under the dash:
You can use your volt meter / multimeter set to continuity, with fuse #7 removed, to test the brake light / stop light switch for continuity when you press the brake pedal, and the switch plunger extends to close the contact.
A close up of the bulb out / failure sensor wire harness connector at left with the connected bulb out / failure sensor at right, though not fully seated. (Ignore the cut blue green wire.)
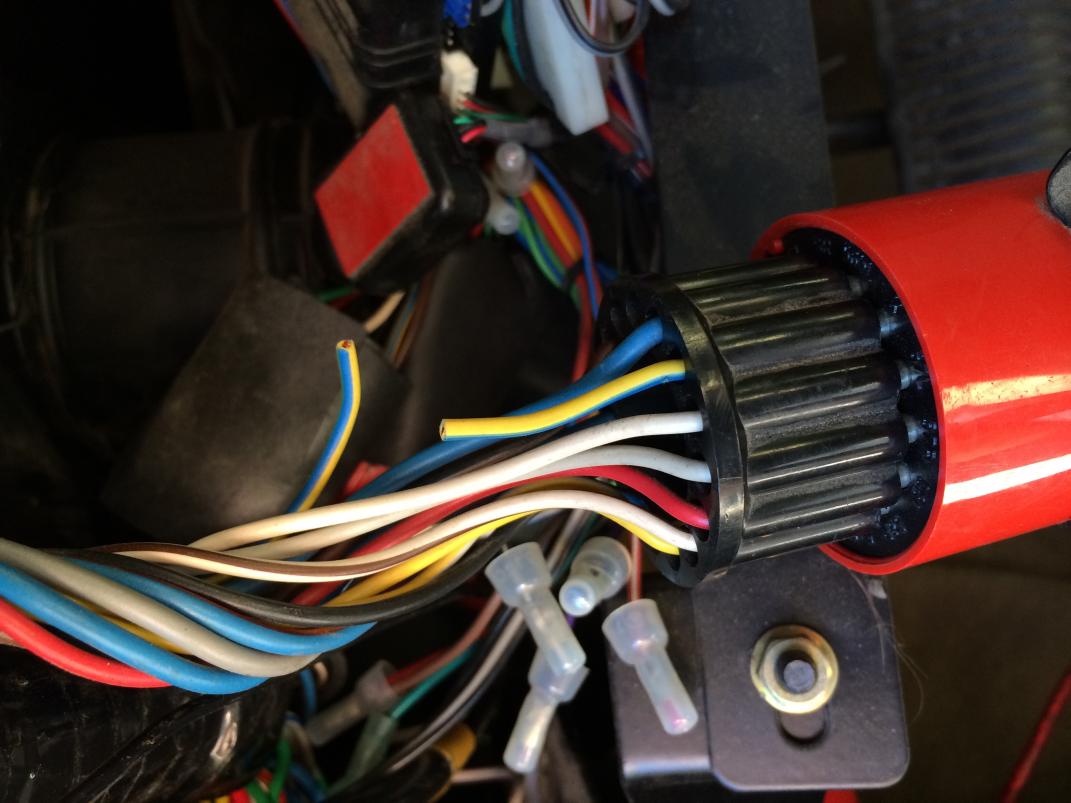
Image is from here, someone with your same problem, yet may not be treated right. Yet provides useful info:
https://volvoforums.com/forum/volvo-240-740-940-12/1992-240-bulb-failure-relay-wiring-help-79548/
As, in 240 wagons, the failing wire harness section at the (I forget the side - right side?) side hinge can break and short, blowing the number seven fuse and may cause failure in the bulb out sensor itself.
Yet you can test disconnected the bulb out sensor itself. These can fail as you know in a few ways causing exterior lighting failures.
Maybe there is a small chance the nuts securing the stop light switch have come loose, causing the switch to recess away from the brake pedal?
As you are working in the area of air bag deployment, disconnect the battery and wait some minutes for the SRS system to de-power. (I dunno how long it keeps charge.)
You'll have to get under the dash, remove the knee bolster, remove that carpet thing hanging under the dash, and you may very well want to remove the box between the steering wheel as well as the instrument cluster.
Test whether the #7 fuse is getting fed power from the junction block. (Powered DC volts test)
According to this same wiring diagrams for your 1992 Volvo 240, the #6 fuse shares the same power feed (fuse panel left side fuse securing blades - is connected with) the #8, 9, 10 fuses. The power feed is connected at fuse #10 left side.
So, if your clock, power windows, power locks, all work, may be a non issue.
Same as before, yet battery remains connected and you say the #7 fuse is good.
Set multimeter to more than 15-20 Volts DC or the lowest DC setting above that. If you have no multimeter, you can use a 12-volt test light to test DC-power circuits in your 1992 Volvo 240. Or make one using a good bulb and long enough wires.
(Though with old auto ownership, a multimeter is mandatory so you need not deal with auto repair shysters often if at all.)
Touch one probe to the right side of the #7 fuse and the other to an available ground, like the door dome light plunger switch securing screw. Got battery voltage? Or your test light illuminates brightly? Yes, we trust.
2. Test whether the #7 fuse good (Powered Test)
Just for grins, touch the voltmeter to the right side of the fuse, with fuse in, at the fuse holder blade. Same result?
Test the brake light / stop light switch (De-powered continuity check)
You've removed the knee bolster have found and freed the orange-red bulb out sensor.
You want to disconnect the battery as you are in the SRS Air Bag vicinity. You would need to remove the center dash kick panel next to your right knee as you drive to disconnect the orange or yellow wire connector that power the air bag deployment charge after you disconnect the battery, wait a few minutes, and disconnect the orange or red SRS power cable connector. Maybe be under the carpet.
With battery disconnected and you disconnect the bulb out sensor from the wire harness socket, a way to test would be to set your multimeter to continuity and:
- Touch or secure one multimeter probe to the load (right) side of the #7 fuse vacated position. The fuse holder blade has a small hole the probe pin can maybe slide into and you can leave it hanging. (Or use a small alligator clip at probe end.)
- At the wire harness socket (as you remove the bulb out sensor) use the probe end, with pin, to test socket position 9, Blue / Red Wire: +12VDC FROM the stop light / brake light switch.
The socket is numbered or see it as a mirror of the number pins on the sensor socket base. Or go by connected wire color.
If good, the multimeter will display some some notion of continuity or beep at you indicating success!
Work the brake pedal. If bad, your multimeter won't display continuity. Though it can help to check the multimeter connections to verify all is well with the multimeter.
If not, indeed the brake light / stop light switch has failed.
Test the brake light / stop light switch (Powered Test for DC Volts - Yet the ABS Air Bag is Powered)
You want to disconnect the battery as you are in the SRS Air Bag vicinity. You would need to remove the center dash kick panel next to your right knee as you drive to disconnect the orange or yellow wire connector that power the air bag deployment charge after you disconnect the battery, wait a few minutes, and disconnect the orange or red SRS power cable connector. Maybe be under the carpet.
Once disconnect, reconnect the battery.
Same as before, yet battery remains connected and you say the #7 fuse is good.
The #7 fuse connects to the brake lights only as you see the fuse panel legend inside the fuse panel cover (or door)
Set multimeter to more than 15-20 Volts DC. If you have no multimeter, you can use a 12-volt test light to test DC-power circuits in your 1992 Volvo 240. Or make one using a good bulb and long enough wires.
(Though with old auto ownership, a multimeter is mandatory so you need not deal with auto repair shysters often if at all.)
So, with the fuse in, and you know the #7 fuse is good, at the wire harness socket (as you remove the bulb out sensor) use the probe end, with pin, to test socket position 9, Blue / Red Wire: +12VDC FROM the stop light / brake light switch.
Work the brake pedal. Your test light fully illuminates or your multimeter shows nearly battery voltage shows a good brake light switch.
If not, the brake light switch is bad.
Yet you can test disconnected the bulb out sensor itself. These can fail as you know in a few ways causing exterior lighting failures.
So, to test the bulb out / bulb failure sensor itself
Test the test the bulb out / bulb failure sensor for continuity
Set the multimeter for continuity.
Touch or secure one probe to the Position 9 pin, what is the Blue / Red Wire: +12VDC FROM the stop light / brake light switch.
So, on the BULB FAIL SENS pin and wire harness socket connection, touch these pins with the other probe:
- Position 5, Brown / Black Wire: +12VDC for the high center brake light.
- Position 11, Yellow Wire: +12VDC to LEFT Wagon Taillight Stop / Brake light
- Position 10, Brown / White Wire: +12VDC to RIGHT Wagon Taillight Stop / Brake light
Yest to continuity through all three. If not, you need a new or known good used bulb failure sensor. That is if the brake light / stop light switch is good, and it is electrically connected to a known good fuse.
In my prior post here I show the good brake light switch and the available OEM brand, now made in China, bulb failure sensor.
https://www.brickboard.com/RWD/volvo/1651289/220/240/260/280/old_brake_light_bulbs_burned_trick_92_245.html
Questions?
Sorry for this hot mess.
Hope that halps. I'll guess Art could write all of this in like three sentences.
Duffed.
--
Give your brickboard.com a big thumbs up! Way up! - Roger Ebert.
|
|
-
|
|
|
hi kit- seafood here is se fla is good if you like scallops, flounder, scrod, grouper, tilapia, even farm raised catfish. the fla lobster is not like the big red and brown ones up off the northeast shores of nj and the chesapeake. these ones are small, not much meat, a mess to bust up, shells as tough as nails and really not worth the effort. mostly a fan here of broiled or grilled white fishes. went through your essay. good details. will use it today to attack the problem . hope its something simple to get too. hate to have to cuss. thanks tons oldduke
|
|
-
-
|
|
|
hi arty b- completed the tests you told me to do- here are the facts. checked the # 7 fuse for continuity- ok . using multimeter set at 20vdc and connected the clips to right side fuse terminal and grounded bolt, showed 12.04 vdc, engine was idling. then stepped on brake pedal , vdc remained the same. no go brake lights. tail lights still functioning with headlights. abs light off for last week, now lights correctly only at startup. thinking that there should be no show of 12 vdc at fuse terminal clip with pedal up, should only show 12vdc when brake pedal is pressed.am i right. wouldnt this confirm brake switch is stinko or shorted? any other tests? if bulb out sensor went to hell would brake lights fail? thanks tons oldduke
|
|
-
|
|
|
No, no, no, and yes.
You've done step 1.
Something is not right that you're getting only 12.04V with the engine idling. Should be over 13V (charging) but that's irrelevant to the brake light problem.
The brake light fuse #7 should be hot all the time. Test with engine off key in your pocket. It should stay hot when you press the pedal, which connects the load. The bulb out sensor is frequently the cause of no brake lights. That's Swedish Irony, for which Volvo's symbol stands. The internal problem is broken solder.
You have to move to step 2 now to verify that. That's the step where you need to remove the knee bolster and drop the orange can so you can get your test light or meter on it.
--
Art Benstein near Baltimore
If you pick up a starving dog and make him prosperous, he will not bite you; that is the principal difference between a dog and a man.
|
|
-
|
|
|
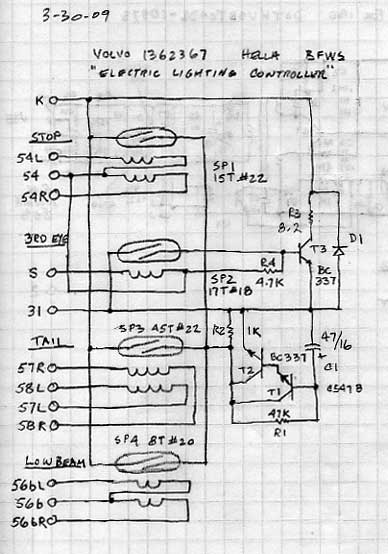
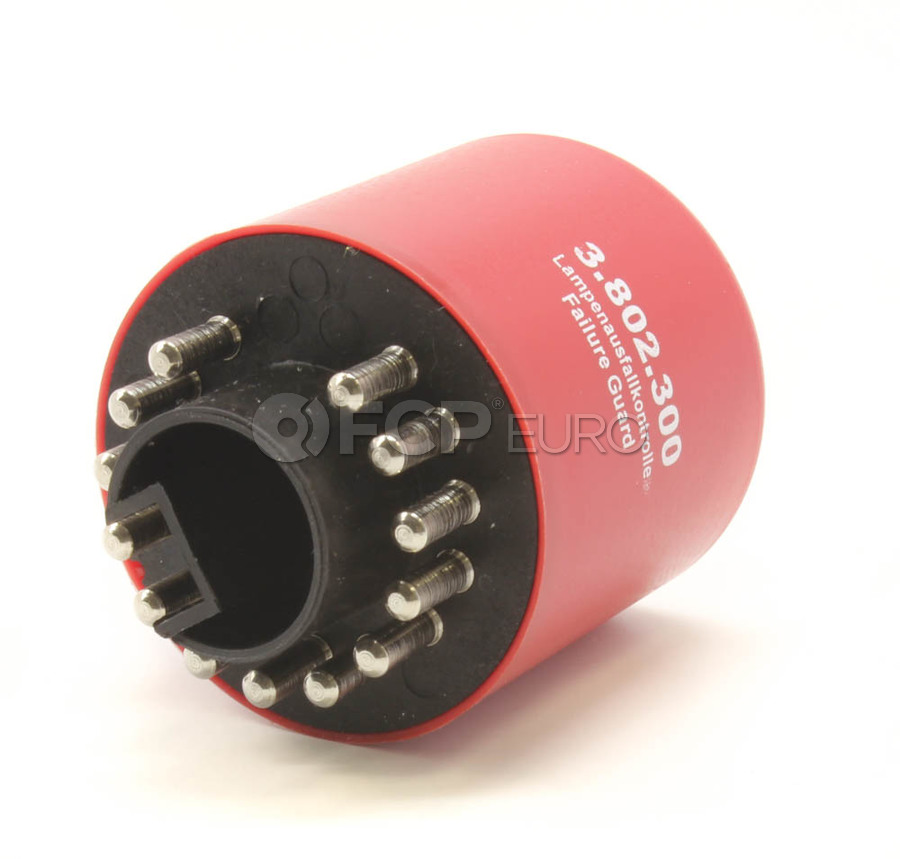
hi arty b- about to locate and remove, inspect and probably replace the bulb integrity sensor or bulb failure relay which appears to be in a red plastic can and is clamped to the front of the lower dashboard . appears this requires the removal of the right knee bolster panel on the side of the central dashboard console. do not want to accidentally explode the air bag in the steering wheel, so plan is to disconnect the battery before i start. the sensor appears to have 13 connector pins on it. btw rechecked the #7 fuse terminals with all systems off and the key out. both fuse terminals were hot and showed 12.5 volts. any additional warnings or instructions before i start
to move my squad up hamburger hill on this rescue mission? thanks tons oldduke
|
|
-
|
|
|
"any additional warnings or instructions..."
The knee bolster comes out easy, but you need a #30 torx screwdriver. Pop off the covers. There is no danger of detonating the airbag in doing this, and anyway the airbag is not powered any time the key is off, so disconnecting the battery is a little like carrying two rabbits's feet up Hamburger Hill. The backup capacitor discharges safely seconds after turning the key off. Anyway, you need the battery connected to check the voltage at the red can.
--
Art Benstein near Baltimore
Don't let people drive you crazy when it is within walking distance.
|
|
-
|
|
|
hi arty b- thanks. why disconnect the battery when you dont have to right. didnt realize that capacitor lost its charge so fast. two rabbits feet wouldnt have done you any good at the bottom of the hamburger. chances would be better with a .45 and a grenade or a claymore. will let you know how the mission goes. when you say bolster panel you mean the upright plastic panel by your right knee correct? the sensor then would be behind the snap off panel above your knee on the dash correct? hope the plastic doesnt crumble when i unsnap it. hate to sound like a chump. thanks tons oldduke
|
|
-
-
|
|
|
hi arty- sincerely appreciate you walking me through this mission today. this picture is more accurate for my 92 245. did a ton of research yesterday. the first picture you sent me does not line up with the southern geography of my 240 . think it may be of a 740 . it has a 3 piece under wheel and side bolster. anyway, the knee bolster has one torx fastener. remember that from when i replaced the dead volvo alpine radio with a new crutchfield one in 2011. that one recently crapped after a million usages and luckily i had a new spare cassette model bought a year ago from crutch. good preplanning since you cant get these amfm cassette players anymore. ok enough of my superfluousness. forgot von moltke said that. clausewitz said it too. heard duke wayne say it in longest day movie(62?). when we hit the beach at omaha all the plans go out the window. hit the beach at asbury park a few times. ok back to reality- think the red can relay im looking to replace is behind the 2d panel you illustrate- with the plug and another torx bolt. ordered that part from autozone $60. guessing you have to get the bolster off first to then get off the 2d panel hiding the relay. btw noticed that this part is made by kaehler in germany but actually is made in china. some vendors list it for $300. let no one tell me there arent shysters today in the car businesses. btw arty since you have been so helpful, going to make you a card carrying member of cba. will keep you posted. thanks tons oldduke
|
|
-
|
|
|
"the first picture you sent me does not line up with the southern geography of my 240 . think it may be of a 740 "
I sent you no pictures of a 740. Maybe someone else did?
Your knee bolster has two torx bolts holding it to a frame under your steering wheel. There's no "side bolster" just the one above your knees under the steering wheel. Once you get the orange can out, you might find it was made by Hella, not KAE. Made in the land of Moltke. Not Tzo.
$300 wow. Makes it worthwhile to prove it is the problem before replacing. That you can do by using your test light or meter on the pins as shown below:
--
Art Benstein near Baltimore
Occam's Razor: That among competing hypotheses, the one with the fewest assumptions should be selected.
|
|
-
-
-
|
|
|
hi arty b- youre right on all counts. i mistakenly attributed that picture to you. still not sure what car it is apparently an 89 240?.fyi on the abs light yes it did go out with the new bulb sensor. found out a few more things doing the job. going to start a new thread to continue. thanks tons oldduke
|
|
-
-
|
|
|
Yup, the orange can failed on my 1990. Similar symptoms to OD's. A good bet that is the problem. No guarantee though as the 240's electrical system can be a real headache. Think I fixed or replaced almost everything to get my 1990's brake lights to work...:)
|
|
-
|
|
|
Test your sensor first per Art. If bad, move onto replacing.
If you have any boneyard 240's in your area save yourself some money and grab one or two brake light sensors from a "retired" 240. Should only be a few bucks... Two is better in case one doesn't work and you'll will also have a backup!
Brake lights are a real bugaboo for 240's! At least the sedans. Haven't owned a 240 wagon.
Please start a new thread!! This one is ridiculously long...
|
|
-
|
|
|
"Please start a new thread!! This one is ridiculously long... "
Agreed. But you got here. Fact is, these off-piste excursions rarely help anyone but the OP, if that. Too much to wade through after a search.
Sedans vs wagons? You bet. Sedans much worse with the flexible circuitry.
The bulb failure sensors get broken solder internally and become intermittent if not altogether failed. An intermittent one could appear to work after jostling/jerking/knocking it around in the process of pulling its plug. Reflowing the connections is not nearly as easy as in all the other solder-troubled relays. These were made by Hella, and I guess second-sourced later by KAE as replacements.
A junkyard replacement would be how I would handle it, because I could reflow the old solder. Your average mechanical enthusiast not keen on relay microsurgery would be better off forking over the big bucks for a new one, given the safety aspect of losing brake lights.
--
Art Benstein near Baltimore
"Never attribute to malice that which is adequately explained by stupidity" Hanlon's Razor
|
|
-
|
|
|
"Agreed. But you got here."
Doesn't mean I liked it!
|
|
-
|
|
|
hi arty b- will try your 3 step program to remediate the brake lights. have verified good bulbs in all three brake lights. will recheck #7 fuse and right fuse contact for 12v. if still no go on brake lights will attempt to view the brake switch from under the dash . this 92 245 does have cruise control but never used it. will that prevent under dash viewing of the switch? want to see if a. the two wires are intact, b. the push button has free play and spring action and c. if the switch is lose or has fallen out of adjustment with the brake pedal.since 64 those 3 items always resolved quickly brake light switch problems in my american tanks. how high will the needle go on my cussometer (full 5 F) if i have to dismantle the dashboard to see or get to the switch? if this works, will get you a mint julep on next trip through stinking creek, md.thanks tons oldduke
|
|
-
|
|
|
"just found out both brake lights no go."
There are three.
--
Art Benstein near Baltimore
A skeptical anthropologist was cataloging South American folk remedies with the assistance of a tribal Brujo who indicated that the leaves of a particular fern were a sure cure for any case of constipation. When the anthropologist expressed his doubts, the Brujo looked him in the eye and said, "Let me tell you, with fronds like these, you don't need enemas."
|
|
-
|
|
|
hi arty b- thanks for the note. youre right. been checking. sockets clean and ok in back. had to pull panels out from inside to get to them . bulbs were old. replaced them with 2057s for good measure. took apart high level brake light in the door. that one an 1156, burned out and replaced. still no brake lights(all 3). leading suspects left are brake switch on pedal and bulb failure sensor relay in dash. what think you? thanks tons oldduke ps, fuse ok too tail light filaments still ok in both lights.
|
|
-
|
|
|
hi kit and other sages- heres an interesting followup. the abs dash light now goes out after i start the engine after a long period of it being on all the time . been driving the car around town for a few weeks. know the bulb isnt burned out since it goes on with all the other indicator lights on the dash when the key switch is turned to on. this is the normal operation. was planning this weekend to take out the rf seat and pull up the carpet to look at the connector under the carpet for the abs light. only thing i can figure is the connector was damp from sitting and dried out with some miles of driving . also a few days ago i inspected cleaned and polished all the terminals, the fuse ends and replaced 2 fuses that were broken. hypothesis is this may have eliminated resistance caused by the corrosion i removed. anybody have a better / more likely theory? thanks tons oldduke
|
|
-
|
|
|
hi kitty g- always a great pleasure to hear from you and savor your wisdom. will probably get back to you to review the abs sensor correction process, if i get that far. right now trying to find and correct as needed the fuse connector wire for the abs which is under the front passenger seat according to my 92 245 handbook which came with the car. actually looks like this wire is under the carpet under the seat which looks like i will have to remove the seat and pull up the carpet. have a vague memory when i had to replace the plastic console between the seats that a wire and connector is there. what think you? would like to avoid removing the seat(could lead to a few f sharps). keep in touch for this ongoing melodrama.one thing i am doing is removing checking and cleaning all the fuses. took out cleaned and polished the number 1 fuse which had some corrosion on it and the radio started working. starting was always perfect on this car but lately it is poor starting and sometimes wont. suspect the fuel pump fuse. thanks tons oldduke
|
|
-
|
|
|
Hiya Uncle Old Duke,
Glad you are doing okay.
Under the passenger seat? I checked mine on my 1992 240 sedan in 2008 during the windshield replacement from heck process.
Yet also check the SRS stuff (under driver seat for sure). All was dry, no rust.
You would need to remove the passenger seat, and to help free the carpet, eitehr remove the center parking brake console or remove the front and rear passenger door bottom sill cover. I'm unsure if the ABS bit of sheathed wire harness harness comes from the drive side, over the hump, to the other side, or if it come from the center console kick panel next to the passenger need, under the carpet, and, maybe following the floor duct, through the duct hole or drops in through the hole you access the ABS control unit, surge suppressor and such.
Didja check the wire harness connector at the ABS pump? Disconnect / connect.
Though you have many better suggestions than I can tard up.
Yeah, a brass brush on the fuse holder clips, with key out and battery disconnected. Though if not after that, and maybe some grease at the fuse ends, corrosion can form where the wire harness terminate back side the fuse panel. It was on the load side for me at where the high current power window load secures when they quit in the 1990 now two years ago.
Yet it took me some timer to figure out the fuse panel legend was for 1993. A real Homer Simpson need more D'oh-nuts moment!
Glad you are all aces and eights! No more Canes! (We hope.) Unless a Christmas candy cane! Ha-ha-huh oh.
Thank you. Hope that halps.
Black bean made at home soup boyeee - vegan. (Forgotz teh snausages maybe?)
--
Give your brickboard.com a big thumbs up! Way up! - Roger Ebert.
|
|
-
|
|
|
Try cleaning the contacts for the abs sensor wiring and apply dielectric grease. Grey connectors near the shock tower on each side.
|
|
-
|
|
|
thanks blues- will check fuse , contacts and grey connectors near shock towers. thanks tons oldduke
|
|
-
|
|
|
Most of the time it is corrosion or rust on the sensors/wiring. Try cleaning the sensors and wiring first. Bet that will take care of the problem as the car sat for awhile.
|
|
-
|
|
|
How did you confirm that the ABS works?
Do you have a BRAKE light as well?
Do all the warning lights work when you turn on the ignition before you activate the starter? ( I think Position III )
|
|
-
|
|
|
hi james- have not tried the skidding hard stop test to determine if abs working yet. all red lights on dash cluster come on when ignition switch turned to just on(normal). brake light itself also comes on but goes out when engine starts and car is driven. suspect corrosion on contacts. let me know . thanks tons oldduke
|
|
|
|
|