|
|
|
To adjust the length / clearance between the brake booster pushrod and the master cylinder it would seem you need a 14 point socket wrench to loosen the lock nut while adjusting the screw in the end of the rod with a small wrench (7 or 8 mm?). Where do I get such a wrench? Can I rent one from a local brake shop? Or is there a simple, more brutal, but non-destructive way to grab onto this odd ball lock nut? I really do not want to ruin the new booster I just purchased making this set-up adjustment. The rebuilt part is adjusted too short compared to the pushrod in the old booster I removed. Thanks, Ron
|
|
-
|
|
|
Hi Ron,
Just grab the pushrod near the locknut with some vice grips, softly if you will, or use a rag to cushion the vicegrip teeth, and then turn the 7mm nut on the end of the rod for adjustment. To get better access, you can pull the pushrod out of the booster somewhat.
One note of caution. Go easy on any adjustment, maybe one turn, or half a turn. The first time I tried to get my pedal up, I probably turned the nut 5x and was back in there for adjustment a half dozen times before I got it right. It is very sensitive to adjustment so be forewarned. If you go too far, your brakes will drag.
Marty Wolfson
Proud member of the 300K club
|
|
-
|
|
|
On further careful examination of the pushrod adjustment, its not a lock nut. Instead the "14 point" spline has been pressed into the end of the pushrod shaft as part of the manufacturing process. With a special tool, this spline allows grasping the shaft without scratching the mirror surface on the shaft. That's important because that surface runs against a seal in the booster. I hesitate to use vice grips, even with a rag, since that operation could scratch the sealing surface and will also tend to further compress the internal threads of the push rod shaft against the adjustment screw. These threads are already an interference fit and further pressure on them seems unwise.
So back to the original problem. I want to grab the shaft all the way around only at the pressed in spline. Short of fabricating a 14 point tool from scratch, the best advice I've gotten so far is to drill a hole in a soft piece of aluminum, where the hole is slightly smaller than the outside diameter of the spline. Then saw a slot across the hole and back an inch or so on the aluminum bar to form a clampable jaw. Then spread this aluminum jaw over the pushrod on the core part I removed and clamp it down hard to form a series of depressions matching most of the teeth on the spline. Now I should be able to use this formed aluminum jaw inside the vice grips to grasp the spline on the new push rod while placing minimal pressure on the threads of the adjustment screw. I will also put some tape on the polished part to the shaft to protect the polished sealing surface during the adjustment.
At least that is the theory.
Thanks, Ron
|
|
-
|
|
|
Ron,
I could be wrong, and forgive me if I am, but I believe the travel of the pushrod is miniscule and the portion of the shaft that you'd "grab" is a couple of inches from the booster seal.
Again, I could be wrong, and if I am, although I've been careful with my vicegrips, I could be in trouble. However,the brakes seem to be working fine and offer a substantially higher pedal.
Marty
|
|
-
|
|
|
Both versions of the space between the spline and the beginning of the "used" sealing surface exist. On the old booster I removed there is plenty of room to scar up a small part of the polished shaft with vice grips without impacting the seal. The old seal sits back away from the spline a bit. BUT, on the new rebuilt booster I bought, the new seal goes all the way up almost to the spline and any nicks on the polished shaft will hurt the seal. In fact, I can see where the rebuilt pushrod has a bit of polished off rust that rides under the new seal, suggesting the old seal left this area uncovered. Hopefully that will not impact its lifetime.
The tool I fabricated last night looks pretty good. I will let you know how it works out this evening.
Thanks, Ron
|
|
-

|
|
Ron- I've wondered too if there is a specific wrench and I had the problem of scarring the smooth part of rod. I recall now that I wished I had needle-nosed vice-grips, they come in all sizes. Might find that an easier solution?
Let us know what happens in the end.
All the best, DaN
|
|
-
|
|
|
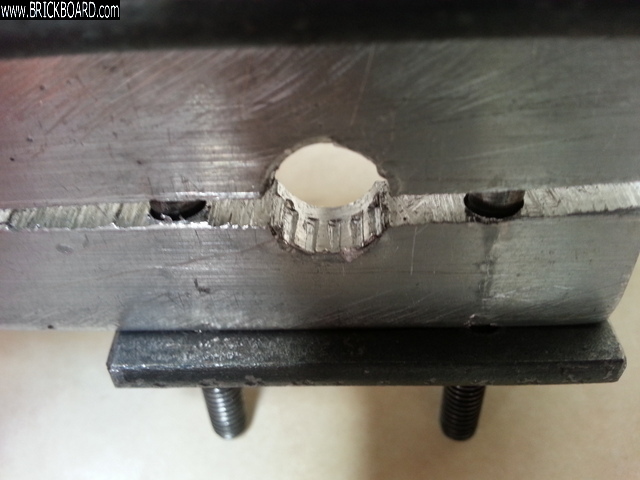
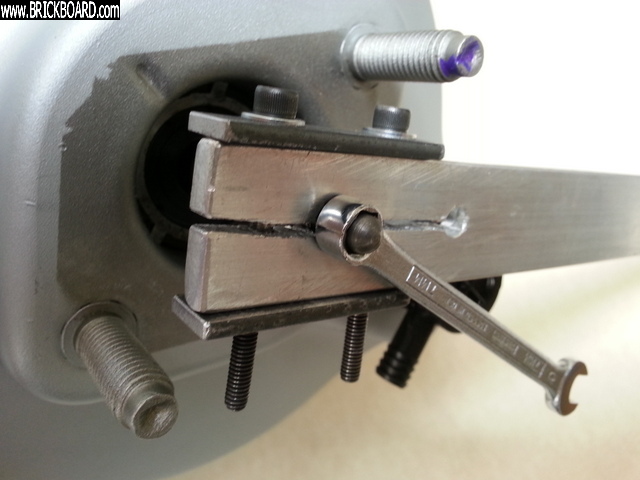
I wanted to spread the locking forces on the splines on the push rod as evenly as possible so as to make it easier for the adjusting screw to turn. So I build a small clamp out of soft aluminum with a hole just about the size of the inner dimension of the spline and a long slot through the hole. Then I spread the aluminum apart, placed it over the push rod on the vacuum servo I removed, put it in a vice and forced the soft aluminum to form itself around the spline. Then I drilled two holes across this part and added some small steel strips and Allen wrench clamping screws to make a crude tool. It worked great without leaving any marks on the polished part of the shaft. On the rebuilt part I purchased, that is important because the seal rests just about flush with the bottom of the spline.

|
|
-
|
|
|
Forgot to mention, I posted some pictures of the homemade push-rod wrench on Brick Pix. See June 14th Technical Postings, titled Vac Servo Pushrod Wrench and Adjusting Vac Servo Pushrod and descriptions on this thread. Note the aluminum was formed by clamping the blank soft aluminum in a vice. The clamping screws on the final tool can not generate enough force to form the spline ridges before the threads strip out.
|
|
-

|
|
Two things interest me about this I know you can answer.
1) What does it look like where the aftermarket rebuild seal is so close to the end of the pushrod?
Take into consideration my ignorance as I've only caught a look at this arrangement a few times while changing a master or once, repainting a booster.
2) What are the symptoms of a failing booster that drives you to replace it?
Thanks!
--
Art Benstein near Baltimore
The shinbone is a device for finding furniture in a dark room.
|
|
-
|
|
|
Sorry, forgot about you other question on how to tell when to replace a Vac Servo. I just rebuilt the entire brake system (except for ABS) and was being a bit compulsive. The booster did not fail in the sense it no longer worked. It did however bleed down sooner then the manual tests suggested it should, so given new rotors, calipers, brake lines to the calipers, and a new master cylinder, I thought why the hell not? My goal in this project is to fix the brakes "like new" so I don't need to worry about them for a long, long time. The last job did not last.
Thanks Ron
|
|
-
|
|
|
Ok, thanks!!
I was beginning to think my boosters would last forever, which for things that have rubber in them is wishful thinking.
Nice to see the difference in the seal in your photos, and now I understand exactly why you didn't go for this with your Harbor Freight locking needlenose pliers (as I might have). Very nice work and documentation! Whoever rides in your car will have the benefit of thoughtful mechanical care for their personal safety.
--
Art Benstein near Baltimore
Women may not hit harder, but they hit lower.
|
|
-
|
|
|
Here are pictures of both the older vac booster I removed where the seal is located back away from the spline, and the rebuilt one where the seal rides all the way up to the edge of the spline. That location of the seal is why I was so careful about grabbing the shaft with pliers.


|
|
-
|
|
|
Ron, you really went the extra mile on this one! Nice photos too. To get your pictures from Brickpix into any post, copy the HTML code in box under "HTML" and paste it into a message, voila!
Last night I installed a used brake booster and adjusted pushrod to match old one. I bought some $5 special needle-nose (6" size) pliers from Harbor Freight that worked excellent too.
Did you get a Cardone rebuild booster? I've had no luck with them. I couldn't believe how full range of brake feel my new-used one has!
|
|
-
|
|
|
My concern with pliers, channel locks, vice grips, etc. is that they compress the spline around the adjusting screw at exactly the time when you want to turn it. It is already a pretty tight interference fit. The crude wrench I made causes much less distortion to the threads, I think. Compulsive I guess, but at this point I have spent so much time and dollars on this total brake rebuild, I did not want to take any chances.
I ordered the vac booster from Parts Geek and was sent a rebuilt unit from Cardone / Parts Master. Should know if everything works in a few days when I get a chance to button everything up. It is all new from the pedal linkage to hubs (except for the ABS and frame brake lines. I replaced the last stage of brake lines to the calipers because the original brass line nuts were so badly abused/stripped by previous mechanics and "nothing left to loose" efforts to overtighten and seal them against pitted flare surfaces in the calipers.
I tried out a few other somewhat drastic tricks in this project to work around the badly eroded caliper cores they are rebuilding these days. The two major problems with calipers I have found are 1) piston dust seals that will not stay in place because so much material has gone away in the rust and sandblasting cycles (pistons are then exposed to water/salt and rust/freeze), and 2) badly pitted flare fitting surfaces and threads, again because of rust / sandblasting over and over again (fittings are then overtightened until they strip out in an attempt to get them to stop leaking).
If my tricks work out, I will share them in detail with pictures. First I want to put a few miles on all these changes to be sure it all works.
Thanks, Ron
|
|
-
|
|
|
"I tried out a few other somewhat drastic tricks in this project to work around the badly eroded caliper cores they are rebuilding these days. The two major problems with calipers I have found are 1) piston dust seals that will not stay in place because so much material has gone away in the rust and sandblasting cycles (pistons are then exposed to water/salt and rust/freeze), and 2) badly pitted flare fitting surfaces and threads, again because of rust / sandblasting over and over again (fittings are then overtightened until they strip out in an attempt to get them to stop leaking). "
Very interesting! The (2) above is something I've looked for now having switched to buying calipers locally instead of on line, but the (1) I had seen, but attributed it to poorly fitting universal brake repair parts. At least the dust boots I see on ATe rebuilds I've used are not the Alfred Tevis boots. I never thought about the rebuild cycles eroding what retains them. But that is clearly a problem if you look at the features closely. Makes me want to be very careful about what I return to the local stores for cores.
--
Art Benstein near Baltimore
The main reason Santa is so jolly is because he knows where all the bad girls live.
|
|
-
-
|
|
|
awww.... I was going to let him have the fun :-)
|
|
|
|
|