|
|
|
Some may recall my issue with not having a 2-3 shift on my BW35 automatic a few months back (Link here
). The problem spontaneously disappeared about as fast as it showed up. It's done it a couple of times since, but vigorously actuating the carb linkage with the car off by hand seemed to cure it immediately. Apart from that, it actually drove quite nicely.
Fast forward to tuesday, when the problem reared it's head again, but refused to go away with my previous carb linkage trick and a fluid top up. Having warmed up a few degrees outside I figured I'd pull the pan and see if anything looked seriously out of place. Results below.
There were no broken bits or metal shavings in the pan, but I immediatley noticed the filter screen had fallen apart a bit (hard to miss).
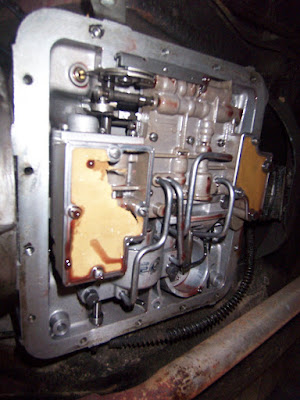
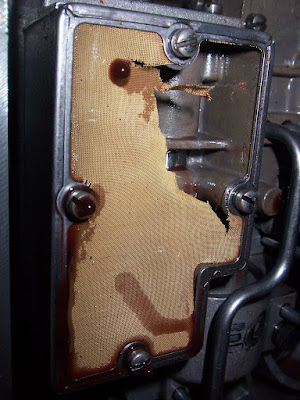
There is definitely some of the mesh remnants in the bottom of the pan, but I have no clue where else they may have gone, or if that could be contributing to the symptoms I was seeing.

I really have no clue how to proceed from here. The automatic trans section of the green manuals is not hosted with the others on the amazonpictures site, and the Haynes offers little assistance. I'd be comfortable continuing the tear down and inspection, but not without proper instructions.
Any suggestions, input, or general advice? I'd hate to punt entirely on the BW35 because it seemed to be functioning pretty well most of the time. If there was evidence of major damage (which I'm not excluding the possibility of), I'd be more inclined to lean towards a transmission swap . . . the the thought of sourcing all the bits, bolts and parts is daunting. Mechanically I'm sure I could handle it, and I have a line on a trans/OD combo, but unless I can find a nearby donor with most everything else required I'm not sure I'm up for it.
|
|
|
|
|
A quick recap of reassembly and adjustment for anyone unlucky enough to even need the information.
Front bottom left to right:
-Cleaned valve body, new screens, oil tubes
-Front band servo, servo strut, and tubes
-Rear band servo, servo strut, and tubes
-Cleaned and painted transmission oil pan with new gasket
-Petroleum Jelly
-Laptop with service manual for reference

The front and rear servos get bolted in place in first. I don't think order matters, but I did the rear one before the front. One of the more difficult assembly steps is getting the servo struts to stay in place long enough to the the servo bolted down to hold them in. The petroleum jelly is the key here: a good dollop of the stuff will stick them in place long enough to get things tightened down. Sounds like a shadetree tactic, but it's what is in the green book.

Next is the front band servo adjustment. The green book says to use a special spacer to set gap on the front servo adjustment, which of course I don't have. Some online sources say the proper gap is .25", others say 6mm, but the difference there works out to be only .35 millimeters. I used a 1/4" hex key as a spacer to set the gap. Just back off the locknut, screw the adjuster in or out until the hex key drags slightly in the gap, then snug the locknut back up.

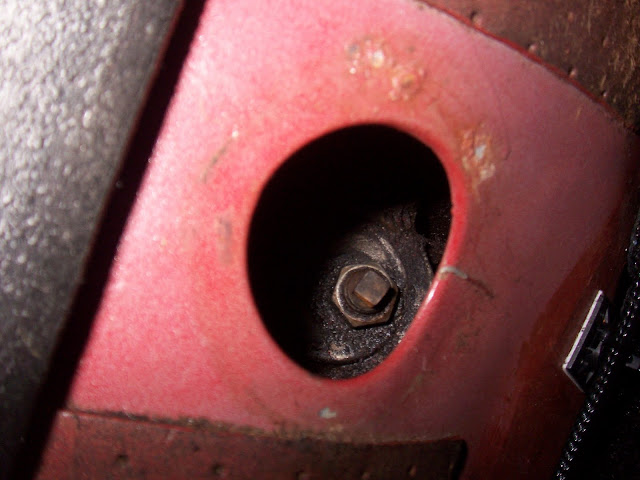
The rear band is adjusted from inside the car. There is a large rubber plug on the passenger side of the tunnel. Removing it gives access to the locknut and adjuster for the rear band. The green book reccomends the following adjustment procedure: back off locknut, tighter adjuster to 10 ft-lbs with a torque wrench, then BACK OFF the adjuster .75-1.0 turns, then snug the locknut back up.
The valve body bolts up next (3 bolts, two in the rearward screen, one in the middle of the body portion). Make sure the pump tubes fully seat, and make sure the big one has it's o-ring on it.


Make sure to line up the gear selection piston with the shift linkage while tightening the body down.

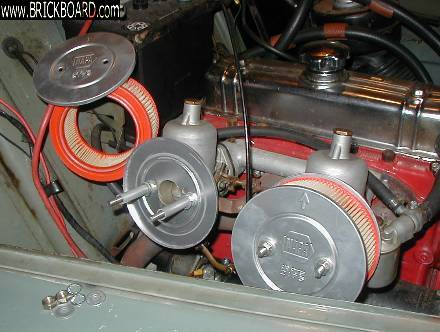
Reconnect your throttle valve cable. I actually couldn't get the cable end free of the pulley during the tear down, so I unscrewed the entire cam bracket from the valve body when I removed it, and just let the cam and bracket hang from the cable while I dismantled the valve body. There is obviously a lot of slack in the cable as shown below. I tried to get some of it out by making the outer cable sleeve longer, using the bracket near the carb. It still seems too long though, and does not "snap back" cleanly when you actuate the carb linkage.

Refit the 4 servo and clutch tubes. The rear clutch tube has to go quite a ways up into the innards to bottom out. You should sort of feel the tubes "click" into place when they are fully seated.

Reinstall the pan with gasket and the gear selection stop that prevents overshifting. PUT THE DRAIN PLUG BACK IN. Fill with Type F ATF. The manual states about 6.5 quarts to fill the thing up, but I'm guessing that's if you manage to drain the clutches as well. I added six quarts, which was probably a little bit too much. Run the car until it is up to temp, and slowly shift through the gears with the wheels chocked and emergency brake on. It will take awhile of letting the car sit in each gear to move fluid into all the nooks and crannies, and flush the air out. I could definitely feel the RPM's surging occasionally, or getting a very delayed shift, for a good 5-10 minutes of idling and going through the gears, but it seemed to level out eventually as air was forced through the system.
|
|
|
|
|
I'll be brutally honest: I halfway expected things to be worse than when I started off. This is one of the more intimidating repairs I've ever attempted. Not "difficult", just "scary".
I was actually pretty impressed that the car moved forwards and backwards at ALL, and spent the first 5 minutes of the first test ride just backing up about 200', then driving forwards 200' (alternating between L and D), then doing it again and again. Drive seemed to be slow to engage, and slip a bit on take off, but it seemed to get better which gave me enough confidence to leave the street and head out into the neighborhood.
The car DOES indeed shift through all three gears (which for those still following, was the initial problem . . . no 3rd gear shift). Needless to say, that first 2-3 shift made me smile.
It's not all roses, however. The 2-3 shift seems to occur at a higher speed than I would expect (but, at least it HAPPENS now). Not like an obnoxiously high speed, just higher than I think I'm used to. I have my speedo disconnected at the moment, so I'll have to take another drive with the GPS to compare to the expected values in the green book.
Also, after going WOT and getting the "kick down" effect, it seems like it WON'T make the 2-3 shift again. If I stop, pop the hood, and nudge the throttle valve cable back into the outer housing, it seems to solve the problem.
So, my problems seem to be at least partially cured. I think a bulk of the remaining issues are related to the throttle valve cable adjustment, and not an internal transmission problem. Progress, at least.
It was 5 pm when I was doing the test drive (lots of parents in the neighborhood, heavy traffic on surrounding secondary roads), so I really couldn't get a sense for how things were working much above 30-40 mph. I think tomorrow I'll have to go out in the late morning so I can see how things go over a wider speed range.
|
|
|
|
|
To any who might be interested, I found a link with some good basic descriptions of the different functional components of an automatic transmission. It uses the BW35 as an example, so most of the flow diagrams and component descriptions relate very well to what one might see on a vintage Volvo.
http://www.cdxetextbook.com/trans/trans.html
|
|
|
|
|
Great set of pictures and nice to see it all being done on a clean bench. always best when working on autmatics.
Besides the screen, what are you replacing, O rings and other seals?
Total fill from dry is 11 pints/6.2 litres. Unpredictable top up if there is a lot left in the convertor. Don't know how easy that is to clean out.
Do I interpret your post as saying that you have found a BW35 Green Book and are waiting for it to arrive? I have one available if you want it but it's in the UK.
Looks like you're doing the job right so fingers crossed on the end result.
|
|
|
|
|
My mom would probably not approve of using her kitchen island to do this, but luckily clean up is easy enough that she hasn't noticed yet.
Besides the filter, I'll be changing out the large rear piston O-ring, the o-ring on the front tube, and the pan gasket. I'm not sure there is a whole lot more in the way of replaceable seals without pulling the trans from the car.
Yes I'm waiting on the parts and green book to arrive. Both are ordered and should be here about the same time. I really just wanted to book for the bits on cable adjustment, and setting the band tension.
|
|
|
|
|
All I ever did was replace the screen on a BW35. I was impressed with the cleanliness on the 1975, after playing around with the oil pan!
It is not magic or voodoo stuff, just a very clean environment. It always amazes me that auto box shops charge so much for so little work. Besides, it is fun!
After adding 8 quarts or so of ATF, the bottom of the dipstick, let the engine run without shifting to get all of the air bubbles out. Then top it off. Shift from P to L several times, slowly, to let the fluid fill all of the cavities. Check the level again with the engine still running. If it all looks good, grab your AAA card and go for a ride!!
Don't forget to smile a lot after the first mile :)
Klaus
--
Proud owner of a 220S. If I had more room, I would have more Volvos.
|
|
|
|
I think I have a new screen lying around somewhere. You can have it for the price of a stamp or two.
Shoot me an email if you're interested. I'll look around for it.
|
|
|
|
|
Little bits of dirt, and I'd have to include small bits of mesh, can stick up valves in the valve block. I had this happen with a later BW65. You had to get it up to max revs to get it to change into top. Cured by a complete clean out. As long as you can get a suitable bit of mesh I'd think that you might get away with a washout and rebuild by any reasonable auto box shop. I'm in the UK so can't offer much more. There is a green book on the BW35 and I'd think you'd be able to find one pretty easily. Also used in MGB's and Jaguars if you can lay your hands on a suitable manual.
Parts from here?
https://www.drivetrain.com/parts_catalog/transmissions_automatics/jaguar_overhaul_kit.html#AllModelsBW35
|
|
|
|
|
Hello,
I agree that at least the valve body should be cleaned, but be very very careful not to mix up or lose any parts.
New screens are easily available.
--
Eric
Hi Performance Automotive Service (formerly OVO or Old Volvos Only)
Torrance, CA 90502
|
|
|
|
|
Hey Eric,
Do you have the screens and pan gasket in stock? If so, can you send me a quote (you should have the email address . . . I think this is like the third order in as many weeks).
I just finished going through the valve body, and didn't end up with any extra screws or springs on reassembly, which I suppose is a good sign. I did one valve "section" at a time (not sure of the proper term, but the body seems to have multiple segments) so as not to swap stuff, and took pictures along the way to remind myself in case I got confused. Everything cleaned up well and there wasn't any valves that looked or felt worn. . . on reassembly everything slid smoothly with a nice "hydraulic seal" type of resistance to it.
The one bit of useful information I did find in the Helms was a description and image of the speed control cable and cam. I think my cable had quite a bit more slack in it than shown, and the little brass stop crimped onto the cable near the carb linkage moves around (Helms says it should be fixed). In any case, that is something that certainly merits further investigation.
-Tim
|
|
|
|
|
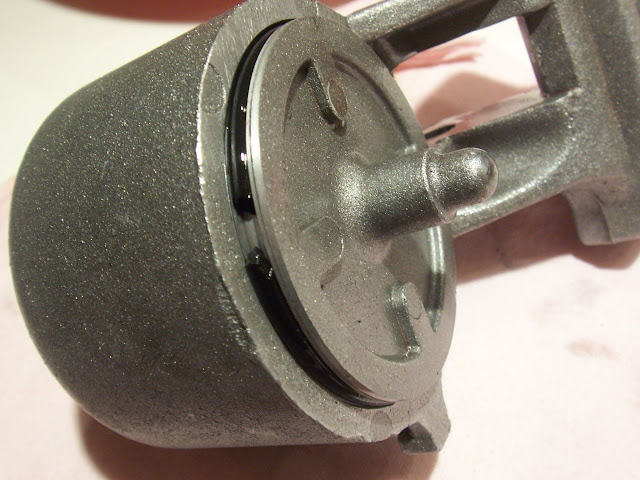
Well I did find one o-ring in the rear band apply piston that had a chunk missing. I'm pretttty sure I remember seeing the chunk when I was cleaning up the valve body. I think the rear band is what engages third (?) so I suppose it could have something to do with my symptoms of no third gear. If pressure was leaking past the o-ring I suppose it probably cant lock the band down. Does not really account for the sporadic nature of the problem I was seeing at first, but I guess it's something to be hopeful for.
|
|
|
|
|
With the "O" ring as shown in your photo you might have had problems engaging reverse. Another common problem associated with that servo that I've seen--the two bolts holding the unit to the trans body loosen--check the threads carefully before reassembly--sometimes they require a heli-coils. There's an adjustment spec for clearance between the servo piston and the rocker arm--I don't recall specifically--maybe something in the 1/8" range.-- Dave
|
|
|
|
|
I think you might have something there, especially as you say you found the missing chunk and removed it. With a new screen, new fluid, and a new gasket or 3 you might very well make it. Good luck!
|
|
|
|
|
I managed to get the valve body off. Looks pretty scary in there the first time you drop the pan, but with the valve body in good light I'm beginning to see the method to the madness. Automatic transmissions were always voodoo black magic territory to me (this is the first auto car I've ever owned).
|
|
|
|
|
looks like a little clean up, new screen and o ring may be all it takes. Remember to keep it simple. I'm leery of auto as well and can only pass on this info from an old friend of mine.
He had an old car and was tired of paying repair bills. One day he realized the guys taking auto shop class back at high school were no smarter than he was so he decided to do it himself, craked out the books and got it done. The same applies here, the gusy rebuilding repairing automatics are no different from you or I , git er done.
--
Patrick, '68 220, '92 Eurovan , '53 PD4104 (highway coach conversion).
|
|
|
|
|
Looks like a pretty tidy repair and should work out fine. The only other thing I would do is send out the torq converter for cleaning and service. The debris that accumulated in your valve body is also inside the converter.
Good luck,
Roger
|
|
|
|
|


